Preparing for Windows 11 - UEFI

Even though Windows 10 has settled in on our computers, Microsoft has prepared a real surprise for us – Windows 11. In addition, it announced that the update will be free – well, almost.
Not everything looks so green.
Microsoft has indeed announced that the Windows 11 update will be free, but it has also added some hardware requirements, which means that devices older than 3 years may have a real problem.
However, these requirements are (constantly) changing. Right after they were published, a number of computer manufacturers poured a bucket of cold water on Microsoft and some of them were quickly “slightly” modified.
Despite this, everything still indicates that a large number of computers will not comply with the minimum requirements.
For now, there is nothing to worry about, because Windows 11 is not officially available yet. At this stage, methods for installing a test version of Windows 11 on a laptop with an old third-generation Intel Core i5 have already been created, so when the system is officially released, we will see what we have to do.
One requirement will unfortunately become a pain for owners of older machines, namely UEFI.
A large part of computers released after 2013 support booting the system using the so-called UEFI method and the older, so-called Legacy.
To boot (install) the system in Legacy mode, our hard drive must be formatted in MBR (Master Boot Record) mode. In this case, the system creates (in addition to the Recovery recovery partition) one system partition (500MB to 1GB) and the main one for the system and that’s it.
In the case of UEFI, the drive must be formatted in GPT mode, which is why the way the system manages partitions is slightly different.
That’s it in a nutshell. If you want to learn more, here’s the link: UEFI - Unified Extensible Firmware Interface - Wikipedia PL.
To check if your computer is compatible with the current requirements for running Windows 11, you can use the PC Health Check program from Microsoft (which has been temporarily suspended), but it’s much better to use the WhyNotWin11 application, available for free download from GitHub.
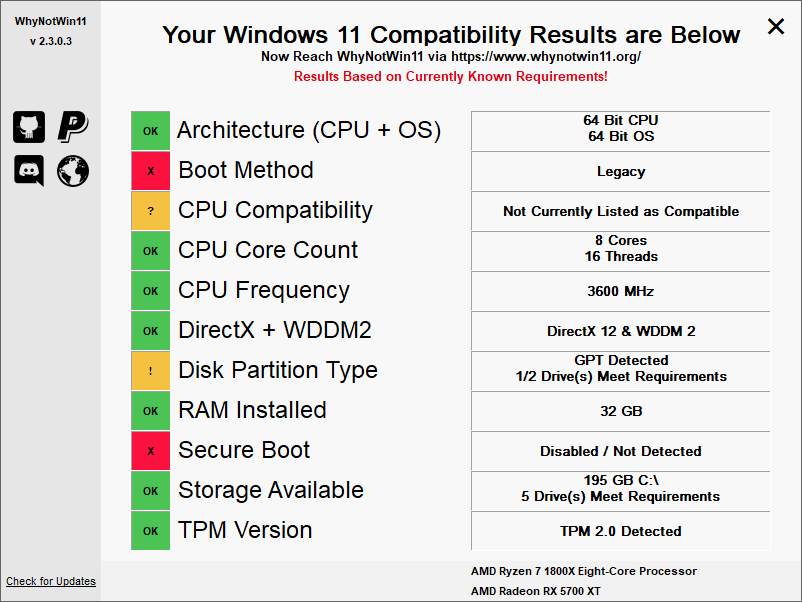
The application will tell us in more detail whether our computer will be compatible with Windows 11, and if not, it will also tell us why.
If your processor only supports 32-bit, you can forget about Windows 11.
While we can initially ignore some elements, in the case of Boot Method, i.e. the way the operating system is started. If we have the inscription Legacy, we need to see if we can change it to UEFI before we can think about Windows 11.
If our computer allows it, we can change the boot mode from Legacy to UEFI without any major problems. Additionally, we will gain additional options in Windows 10 and newer systems, such as Fast Boot.
To check (we do not change anything at this stage!) whether our computer supports UEFI, we need to turn it off and then turn it on go to BIOS.
Depending on the manufacturer of our computer, to enter the BIOS, when turning on the computer we must use the F1, F2, F10, F12 or other (different combination) button. For this purpose, I encourage you to read the information provided by the hardware manufacturer.
If in BIOS, usually in Boot Options, we find the option to switch from Legacy to UEFI mode, then that’s good, but let’s not switch it yet!. If we switch it without adapting our disk to boot in UEFI mode (GPT), our system will not start!
Some time ago, we would have had to reformat the disk in GPT mode, which would have required reinstalling Windows.
Fortunately, Microsoft has built a tool into Windows 10 that allows us to convert a disk from MBR to GPT without having to reinstall anything.
This method requires a maximum of 3 partitions on your system drive. However, note that Windows 10 creates a recovery partition when you first install it and a system partition (usually around 500MB) preceding your operating system partition (Drive C), so you now have three partitions!
By running the command line (cmd) in administrator mode and executing the command below, you will convert your drive to boot in UEFI mode.
If we just want to check if it is possible to convert, we execute the command:
mbr2gpt /validate /allowFullOSIf we want to convert, we execute the command:
mbr2gpt /convert /allowFullOSIn my case, it turned out that somehow my system had created two recovery partitions, so I had a total of 4. This resulted in an error and the conversion did not occur.
Using the diskpart command from the command line, I selected partition 4 and deleted it.
In fact, at this stage we can delete all partitions marked as Recovery because the above command (mbr2gpt) will recreate them during conversion and the first time the system is started.
In my case my commands in diskpart looked like this:
diskpart
list disk
select disk 0
select partition 4
delete partition
exit
Yours may be slightly different. Basic knowledge of the subject is required.
Once our conversion has occurred without serious errors (I did this on 6 different computers), we turn off the computer.
When we turn it on for the first time, we go to BIOS and change the system boot method from Legacy to UEFI.
And so our system should boot without any problem and the WhyNotWin11 application should report Boot Method as UEFI.

As I mentioned, there are several requirements for Windows 11. If our system (Windows 10) is 64-bit and the boot method is set to UEFI, we are one step closer to our compatibility.
Although we probably won’t be able to meet all the requirements (e.g. DirectX 12, WDDM 2), we will have everything else ready. When it comes to installing Windows 11 using a “clever” workaround, as others have already managed to do in the testing phase, nothing will stand in our way.
Best regards.


Comments & Reactions