Secure DNS (in browser and on OpenWrt router)

You are probably aware that it is very important that the website you visit, especially the one where you enter any data (including login and password) is secured with a so-called green padlock, i.e. served by https:// before the name of the website.
HTTPS is a norm. More and more browsers now warn you if you’re visiting a site over an unencrypted connection, and in the future, most won’t even let you access it.
Thanks to HTTPS, websites are equipped with a certificate that allows us to encrypt our connection. The data we enter on the website, whether it is forms or simply the password to our account, is sent in an unreadable way to an outsider.
In the case of unencrypted HTTP connections, anyone between you and the target site can “eavesdrop” on what you do on that site. This doesn’t require much knowledge, just the right software.
The person who can eavesdrop on you, whether you want them to or not, is primarily your Internet service provider. Depending on what obligations local law imposes on them, whether they want to or not, they are forced to pass on “your” information to the appropriate state authorities.
And so a global surveillance program is created, which, in conjunction with individual regimes around the world, decides what its citizens can and cannot see on the internet.
Hence, the HTTPS connection was presented, thanks to which all data sent to the website is encrypted beyond recognition. While it started with banking institutions, it has gained momentum and websites such as mine are served via a secure connection. A few years ago, certificates were an expensive investment and unprofitable for the average person. As the standard became more popular and users were oriented towards their own security, everything began to get cheaper. A certificate for a website can now be obtained practically for free and issued by very trusted institutions. On my website, I described how you can obtain a certificate in a very simple way, for free, and serve your website by default via HTTPS (SSL Certificate for your WWW, in Polish)).
When you visit a site through an encrypted connection, a potential eavesdropper won’t see anything else besides a string of characters — well, almost.
A website and its address are one thing, but on the Internet everything starts with numbers. These numbers are IP addresses that correspond to servers located behind them. There can be many websites under one IP address, on one server (or more than one). To get to the website we want, we need to provide the appropriate name — website name — domain. Based on the name, the server will forward us to this website, not another.
For example, if we want to go to the Google website, we enter google.com (name, domain), not 216.58.206.110 (IP).
The server on the other side of the numbers, based on the name — domain we entered, forwards us to where we want.
And so, using an encrypted connection, you land on the page https://www.google.com and you can safely search for what you want. What you type into the search engine is not easily accessible to people eavesdropping on you. However, this does not mean that these people do not know what you are doing and what page you are visiting.
Well, when you type google.com in your web browser, the appropriate query goes to the so-called name servers (dns), which read the text (name — domain) and inform which server (IP address) you should be connected to.
When you query a name server, and before you land on a landing page, anyone who can eavesdrop on you can see where you are going and what page you are visiting. While they won’t be able to tell what you do next on the page, what you visited is what they can use to determine what to do next.
You’ve probably heard of a person being accused of terrorism simply because they accessed (knowingly or unknowingly) a website that was deemed unauthorized.
Why?
Namely, the query to the name server is sent in an unencrypted form. Any encryption slows down Internet traffic (this was the case a few years ago), so in order to quickly redirect to the target server, all queries are sent in clear text, which can be easily read by proxy servers, as well as others on the way to the destination.
A few years ago, the connection with the green padlock (HTTPS) was not so popular among ordinary users and owners of small websites. This was associated not only with costs, but also with the fact that slightly more computing power was needed to handle such a connection. Pages via HTTPS on weak servers loaded significantly longer than pages served via the standard HTTP protocol.
Everything has changed, fortunately. The difference in the speeds of unencrypted (HTTP) and encrypted (HTTPS) connections is really marginal. And despite the fact that the server on which the site is located still plays a significant role, even companies such as Google have announced that in 2020, it is secure sites that will lead in search results.
Despite the great leap in technology and user awareness, most of us are still unaware of the fact that the websites we visit - the addresses - are visible to everyone, because the name servers (DNS) have been working in a “simple” way for years.
Regardless of whether you choose the one provided by your operator as your name server, or as a conscious user you change it to Google (i.e. 8.8.8.8), Cloudflare (1.1.1.1) or OpenDNS, it is still all visible to prying eyes. Hence, user awareness is being created by large companies, introducing encryption to the level of name servers, thus increasing user security.
User security is all the rage these days, and rightly so!
At the beginning of 2020, Mozilla released information that was quickly picked up by all portals. Namely, in their Firefox web browser, they enabled by default (officially will come in the next weeks) encryption of DNS nameservers using a similar method to pages served over HTTPS. That is why it was called DNS over HTTPS, or DNS name server served over a secure HTTPS connection, in short DoH.
Therefore, from the moment you type in google.com until you land on the target page, everything is encrypted (well, almost everything). Snoopers will see that you are visiting something on the Internet, but it will be limited only to the IP address of the server. As a rule, one IP address can host a multitude of websites, so determining exactly which page you are visiting is not so easy.
The fact that Firefox has been enriched with this feature, which has also been enabled by default for all sites we type in the address bar, does not mean that we should abandon our dangerous browsers en masse and install the safe Firefox browser.
Over the years, other browsers have also gained support for encrypting DNS queries. Firefox has this feature enabled by default, while in others we have to do it manually.
In Firefox, the entire service will initially rely on nameservers provided by Cloudflare.
Cloudflare nameservers are some of the fastest on the market today, and they come with a few extra perks.
But what if we want to use DoH today and keep our browser safe from prying eyes, especially in countries that are starting to track users at every step?
I am not talking only about Poland, but also about Great Britain. After leaving the European Union and the end of the transition period, many things can change.
Well, we can enable DNS encryption today in our browser on our computer.
Mozilla Firefox
As I mentioned earlier, Firefox currently has DNS encryption enabled by default, however, as we can see, it doesn’t always work right away. The software’s creators point out that whether the service works by default depends on the region of the world in which we are located.
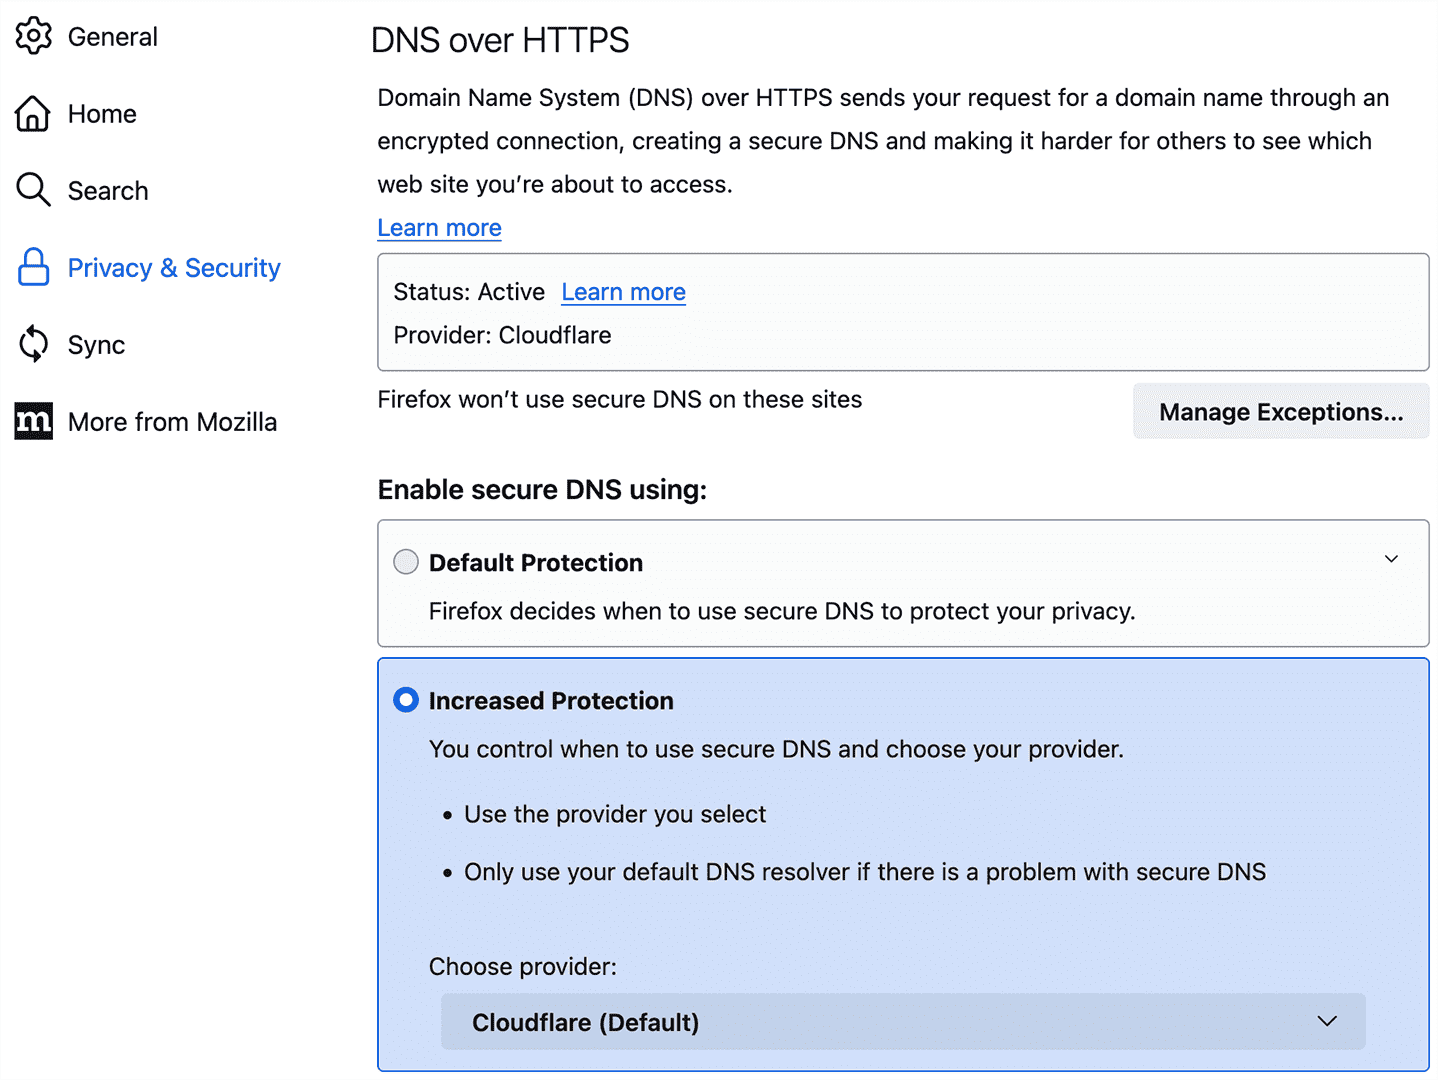
To check this, go to Settings > Privacy & Security and scroll down to the DNS over HTTPS section.
As you can see below, in my case (UK), with Default Protection selected, the status above returns Off.
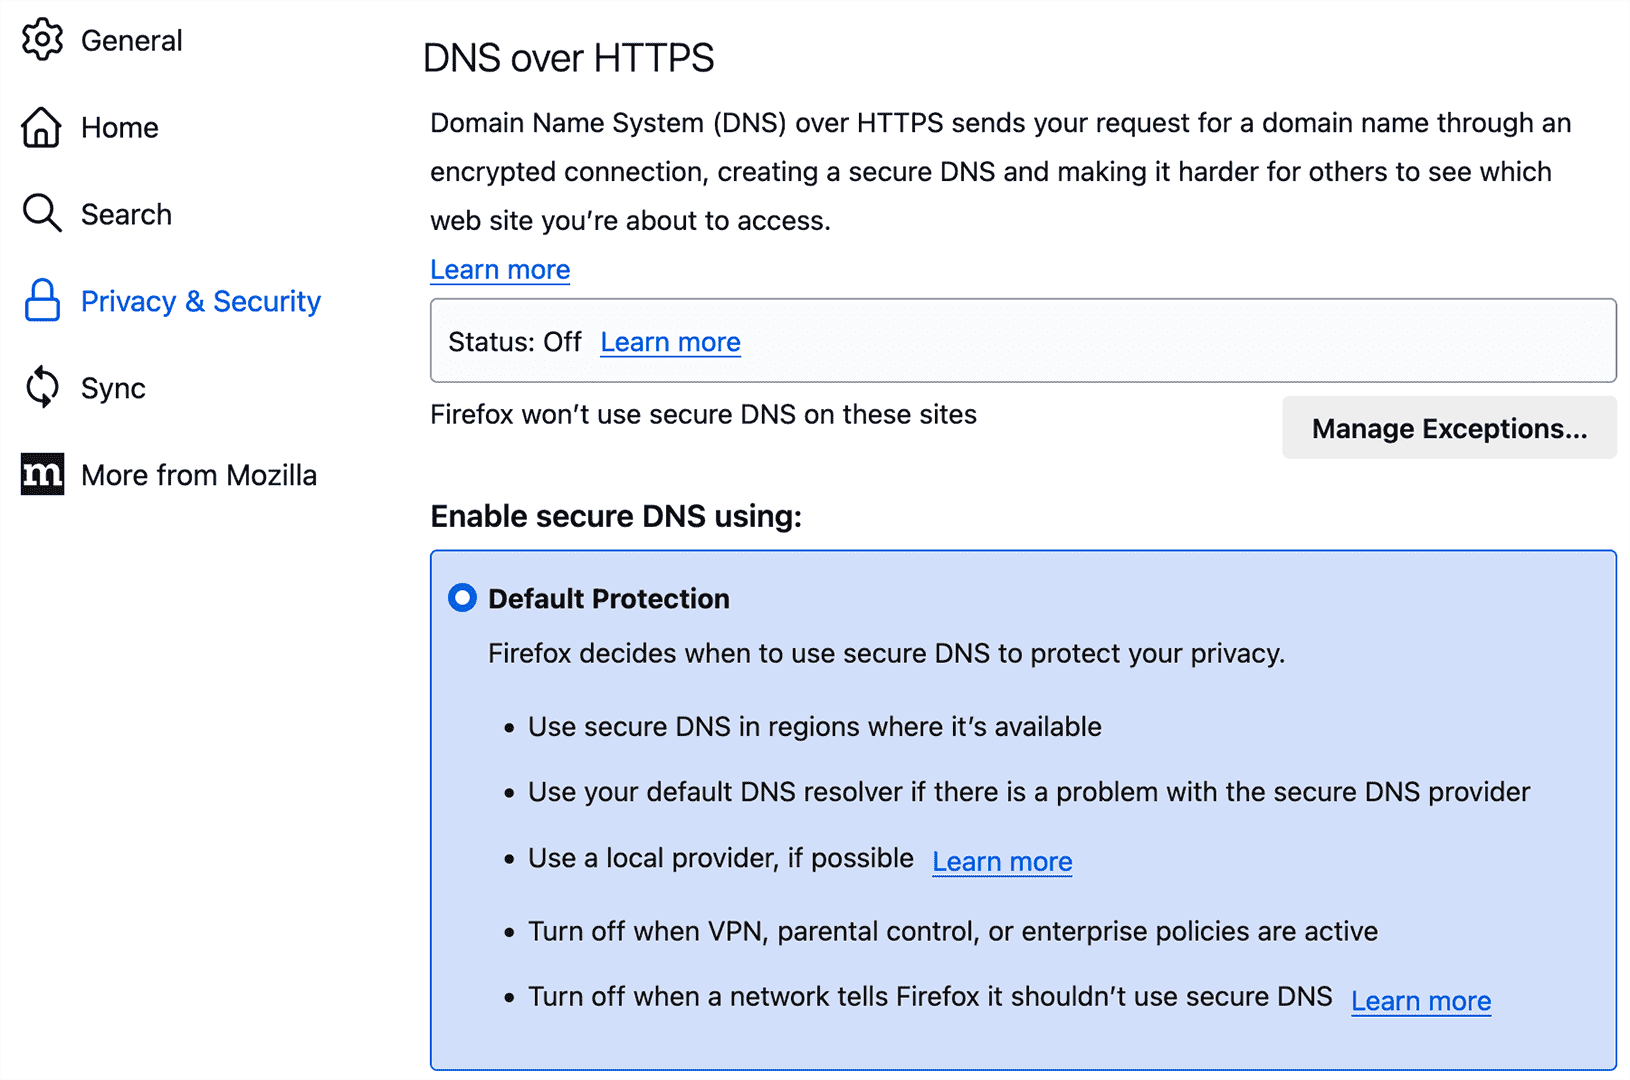
By choosing the Increased Protection option we can change this. At this stage we also have a choice of other service providers, in addition to Cloudflare.
Google Chrome & Microsoft Edge (Chromium)
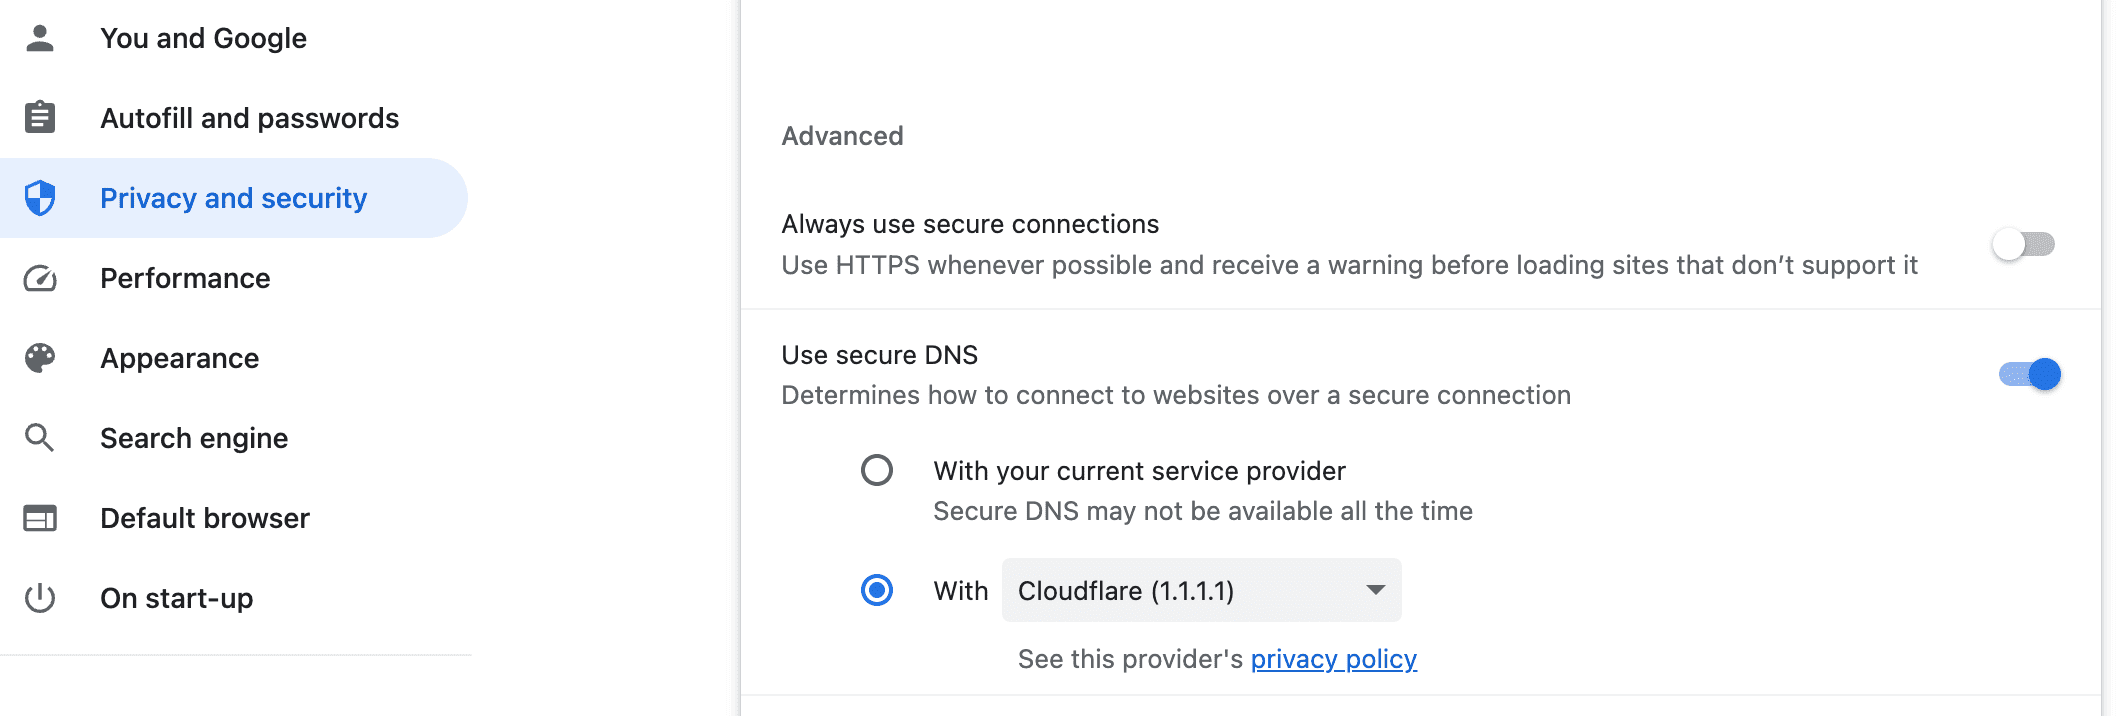
For Google Chrome, go to Settings > Privacy and Security, and in the Advanced section, make sure the toggle next to Use secure DNS is turned on.
The default option that is checked is to use secure DNS from the current service provider, but it is not specified which one, and it is noted that sometimes this option may not be available (Secure DNS may not be available at all time).
Therefore, it is better to choose the next option and select Cloudflare or another service provider from the list.
Similarly, in the case of Microsoft Edge, we go to Settings > Privacy, Search, and Services, where in the Security section, we check the option next to Use secure DNS… (Use secure DNS to specify how to lookup the network address for websites). By choosing the second option, as in Google Chrome, we can choose our service provider, e.g. Cloudflare.
Safari
Here, unfortunately, we can’t enable anything — set it to start using encrypted DNS. Apple has built protection for our DNS server queries into the system (macOS, iOS or iPadOS), provided that we have purchased the iCloud+ package, which will provide us with the Private Relay service.
The positive side of this solution is that all our DNS server queries, including those from other applications, are encrypted. Then we are not limited to just the web browser. The negative side is the fact that we have to pay Apple for this type of service.
If, however, we do not want to pay, and we want to receive protection for our entire system for Apple systems, but also Windows and Android devices, all we need to do is install the application WARP (1.1.1.1) by Cloudflare, which will provide us with what Apple offers within Private Relay. More on this below.
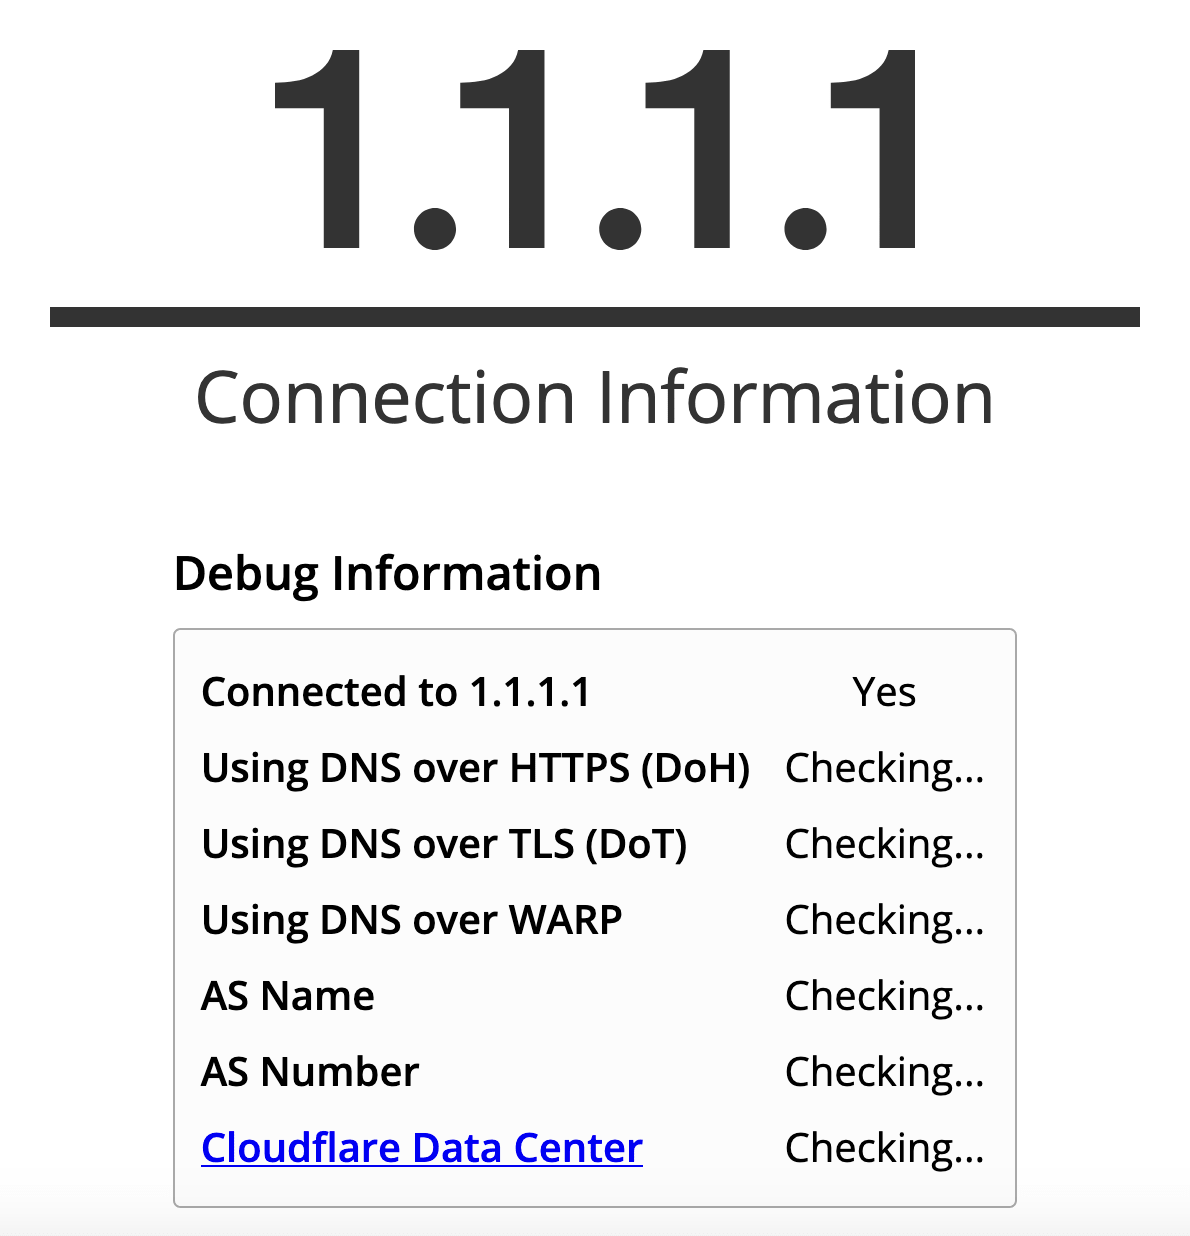
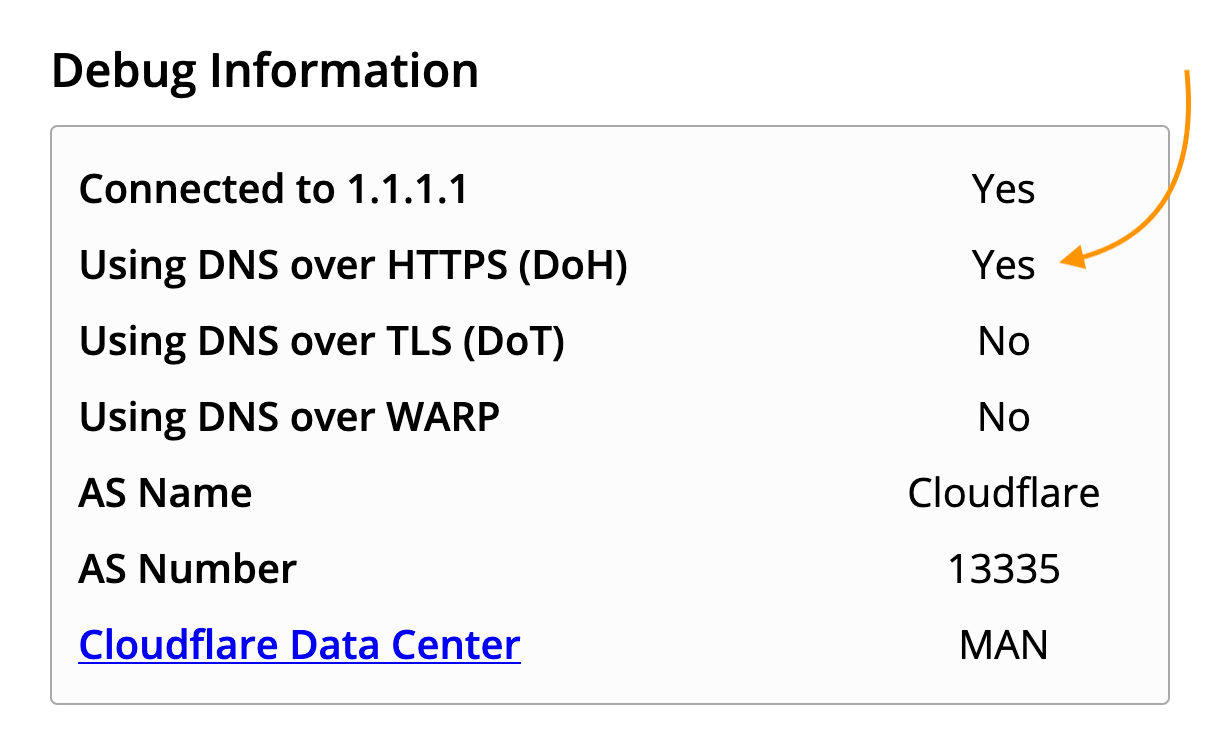
If we did everything correctly, we go to the page https://one.one.one.one/help to check if our DoH works or not. However, this is not a 100% interpretation, especially if you use another method of implementing secure DNS in your home network, which I will write about in a moment.
Before you go any further, you will ask how to enable DNS over HTTPS on your tablet or mobile phone.
Well, nothing could be simpler! Just install the dedicated WARP application from Play Store (Android) or AppStore (iOS) and follow the instructions.

In addition to DNS security, the Cloudflare app also offers WARP (1.1.1.1) to speed up internet surfing, but I won’t go into detail about that, as that’s a topic for another post.
Windows 11 also has the ability to enable system-wide DNS server encryption from your network card settings. I personally don’t use this because it causes problems in my corporate environment, but that doesn’t mean it can’t be done. I refer you to the post Enable DNS over HTTPS (DoH) in Windows 11.
Moving on…
If you’ve reached this point, you may have had a light bulb go on above your head that has turned into a question mark.
If we have set secure DNS in the browser, what happens if other programs connect using the name server. Unfortunately, these are not secured (except for mobile applications using the WARP (1.1.1.1) application).
So you ask how to protect the entire network and all programs on the network using DNS from nosy outsiders, or people from our home network who do not use our Internet for the purposes they should (they spy on us).
Now this matter is not so simple, but possible.
The best solution would be to enable DoH on our router side. And I’m not just talking about setting Cloudflare DNS addresses on your router for your entire network (which you should enable anyway), as the name server queries will still be sent in clear, unsecure text.
Unfortunately, routers that are standardly received from operators and Internet service providers do not have the ability to enable DNS over HTTPS as standard and there is (usually) nothing we can do about it.
However, if we have our own router that we have chosen not only to do its job, but also to offer additional, advanced options, OpenWrt can come to our aid.
OpenWrt is an alternative firmware for our router that turns it more into a Linux-based box. It opens up options for advanced configurations.
To check if your hardware supports OpenWrt, just go to: https://openwrt.org/toh/views/toh_fwdownload and search.
DNS over HTTPS (OpenWrt)
Optimised for OpenWrt 25.12 using
apkinsteadopkg
So, if we decided to run DoH on our OpenWrt router, we start as follows.
First, we need to update the information regarding our software packages on the router.
We log in via SSH and execute the following command:
apk updateThen:
apk upgradeThis will update the packages currently installed on the router to the latest versions.
We then proceed to install the DNS encryption package.
apk add https-dns-proxy luci-app-https-dns-proxyTo check if our router is acting as an encryption proxy, we execute the following command:
nslookup openwrt.org localhostAfter which we should receive an answer.
This is how DNS encryption works at the router level.
By default, the package on the router uses Cloudflare servers (as primary) and Google (backup), depending on which one is currently available.
After these actions in DHCP and DNS we will notice that our DNS servers that we entered earlier have changed to 127.0.0.1#5053 (Cloudflare) or 127.0.0.1#5054 (Google).
In the administration panel, in the Services tab > DNS HTTPS Proxy we can check which port is responsible for Cloudflare and which for Google.
By going to https://one.one.one.one/help we will see that we are using Cloudflare as our default name server (DNS) and that our DNS queries are encrypted over HTTPS (DoH).
We quickly and relatively painlessly secured our entire local network and forced it to use DNS over HTTPS for every DNS server query.
Moving on…
On a router with OpenWrt we can also run DNS encryption over TLS, however, this requires a lot of system resources and a decent router, which is why I decided not to describe this method.
As an aside, everyone is adopting DNS over HTTPS as the standard, which pushes away the option of encryption over TLS. Similar to what happened with HD DVD and Blu-ray. As I know, Blu-ray was much better received, and HD DVD died a natural death. I suspect that will happen with DNS over TLS as well.
A quick comparison of the differences between DNS over HTTPS (DoH) and DNS over TLS (DoT).
Both methods aim to achieve the same thing, which is encrypting our name server (DNS) queries.
DoT uses the TCP protocol (basic connection protocol) with an encryption and authentication layer (layers over TLS encryption and authentication). DoH uses the HTTP/2 protocol to connect. HTTP/2 is responsible for communication between the server and the browser to ensure fast loading of websites, and it is not without reason that it is important in the case of the name server (DNS). The connection to the DNS must be fast, because this is the first step when we enter a given website on the Internet.
In addition, DoT uses port 853 (or 53), while DoH uses port 443, the same port used to go to the page with the green padlock (HTTPS). This means that visiting a secure page (via port 443) and a query request to the name server look the same and it is difficult to distinguish them and, above all, block them. In the case of a dedicated port, blocking 853/tcp is much easier than 443.
Another difference is that in the case of DoT on the router, we are not 100% sure that everything works by going to the https://one.one.one.one/help page, without running packet tracking with WireShark. Only then can we confirm that DNS queries are indeed encrypted. In the case of correctly entered DoH on the router, the above page should confirm to us that everything works.
Of course, it is also worth using the DNS Leak page to analyze the leak of queries to name servers (DNS). By running the advanced test (Extended test), we can check whether the answers come from only one source (one type of server).
The https-dns-proxy package uses authentication unit certificates to function correctly, so these certificates need to be renewed from time to time. I recently encountered a problem where DNS over HTTPS suddenly stopped working (it was when I was making the post: Setting domain for dynamic IP address (OpenWrt and DDNS)). It turned out then that the file storing the certificates in the system was corrupted and had to be downloaded again:
With curl
curl -k -o /etc/ssl/certs/ca-certificates.crt https://curl.se/ca/cacert.pemBy default, OpenWrt (on devices with low storage) does not have curl installed (or has a stripped down version). To add it, run the following command:
apk update
apk add curl
Curl is a good method for updating certificates. If you run it for the first time and don’t have any certificates on your system, it may return an error. Therefore, it is worth using
wgetat the beginning and then relying oncurl.
Using wget
wget --no-check-certificate -O /etc/ssl/certs/ca-certificates.crt http://curl.se/ca/cacert.pemIt was an unusual situation, but at the same time it gave us something to think about, because the certificates in our system should be refreshed from time to time. To do this, we can add a rule to the schedule (Scheduled Tasks), which will do it for us on the first of every month at 3 am.
Going to System > Scheduled Tasks we add the following line:
For curl
00 3 1 * * /usr/bin/curl -k --silent --remote-name --time-cond /etc/ssl/certs/ca-certificates.crt -o /etc/ssl/certs/ca-certificates.crt https://curl.se/ca/cacert.pem >/dev/null 2>&1For wget
00 3 1 * * /usr/bin/wget -q --timestamping --no-check-certificate -O /etc/ssl/certs/ca-certificates.crt http://curl.se/ca/cacert.pem >/dev/null 2>&1A minor note.
The OpenWrt built-in wget (in some versions) may not have the option to check the time (–timestamping) for files. To do this, you need to install (update) the latest version of it:
apk update
apk add wget
Package Tracking
To check whether our internet requests are actually sent in easy-to-read text, we can extend the tcpdump packet.
apk add tcpdumpAnd on our computer we install the program WireShark, which will be used to capture packets directly from the router.
In the case of macOS, simply launch the terminal and execute the following command to start capturing packets on our router and pass them on for analysis in WireShark on our computer.
ssh root@192.168.1.1 tcpdump -i eth0.2 -U -s0 -w - 'not port 22' | sudo wireshark -k -i -Of course, 192.168.1.1 is the address of our router, which we need to adjust if it is different.
At this point you will be required to enter your router’s SSH password and your macOS admin password. Since this process can be a bit confusing as to which password to enter when, it is best to fire up Terminal and run sudo su before doing the above.
Now, in the WireShark window, we should see the traffic we are generating.
And that would be all.
Regards.


Comments & Reactions