Setting domain for dynamic IP address (OpenWrt and DDNS)

Today I am going to discuss a topic that causes problems for people who have an Internet connection without a permanent external IP address if we want to run a VPN server on our connection, as I described in the post Installing a VPN server on a router with OpenWrt (WireGuard).
The number of IP addresses in version 4 of this protocol is practically exhausted, so expecting a permanent IP address from our operator will become increasingly difficult, especially for home users.
Therefore, I would like to solve this problem by running DDNS on our router. This way we will assign it (our external IP address) a domain that will point to our router. When our IP address changes, it will be automatically refreshed to point to the current, new IP address.
For this purpose, I would like to use a domain that I own, whose DNS entries I manage through Cloudflare.
Personally, I didn’t think Cloudflare had such an option, especially for free users. I searched, read, and decided to try. Of course, if you don’t have a domain managed (DNS entries) by Cloudflare, there are also other sites that offer this type of service, such as NoIP.com.
Before we start, it is worth noting that if we have an internet connection via 4G/LTE and the like, our router usually does not receive an external IP address. In this case, we are behind the so-called operator NAT or double NAT, which prevents us from properly redirecting incoming connections to our router. Although we will be able to set a domain, we will still not be able to connect to our VPN.
Not every operator uses this type of solution (almost every one in the UK), so it’s worth checking. For this purpose, we can use an online solution, i.e. Port Forwarding Tester. On our router, we need to open any port in the firewall rules and check whether this page sees it as open. If so, there is a good chance that everything will work.
Here we go…
Optimised for OpenWrt 25.12 using
apkinsteadopkg
Installing the necessary packages
To do this, we can do it from the browser (System > Software), refreshing the package list (Update lists) and installing luci-app-ddns.
From the SSH terminal we can do this as follows:
apk update
apk add luci-app-ddns
By installing the lubi-app-ddns package, the basic package for DDNS support, i.e. ddns-scripts, will be automatically installed.
Next, we need to install the Cloudflare DDNS support package ddns-scripts-cloudflare. We do this from a browser in a similar way or from the terminal:
apk add ddns-scripts-cloudflareIn addition to Cloudflare, there are packages available for various services. You can find a list of those available here.
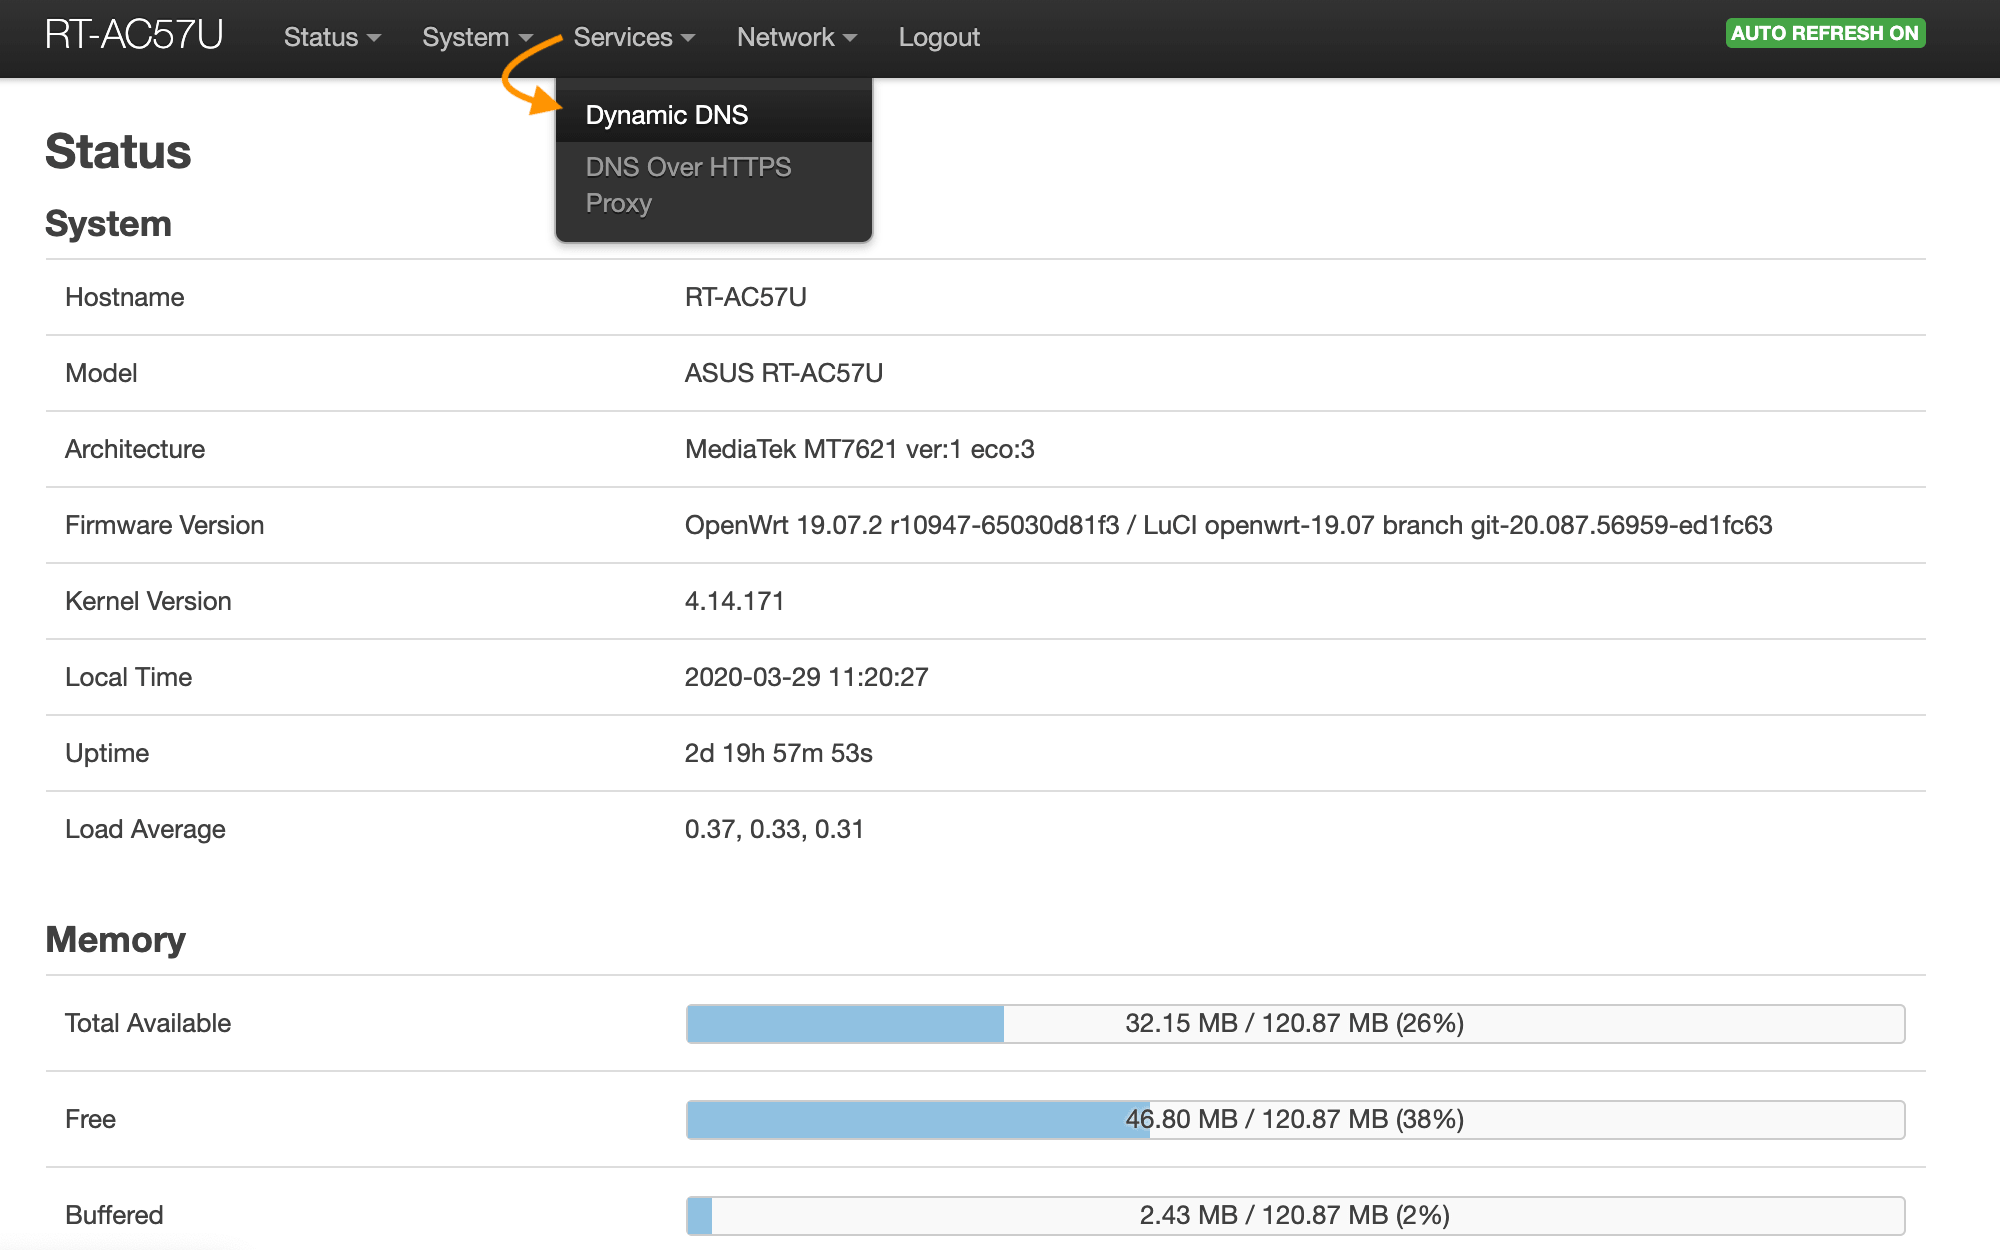
After successful installation and refreshing of our administration panel in the web browser, in the Services section we will see the dynamic DNS option, which we go to.
Since currently all communication, including IP address refresh, is done via a secure HTTPS (SSL) connection, and the default built-in options on our router do not fully support this, you should also install the external wget or curl package. It may turn out that you already have curl in your system (the ddns-scripts package installs it by default), so there is no need to install wget (which is usually also available in the system).
Set your domain in Cloudflare
At this point we will set up our domain for our router. Assuming we have a domain of mydomain.something, our router will use the subdomain of vpn.mydomain.something.
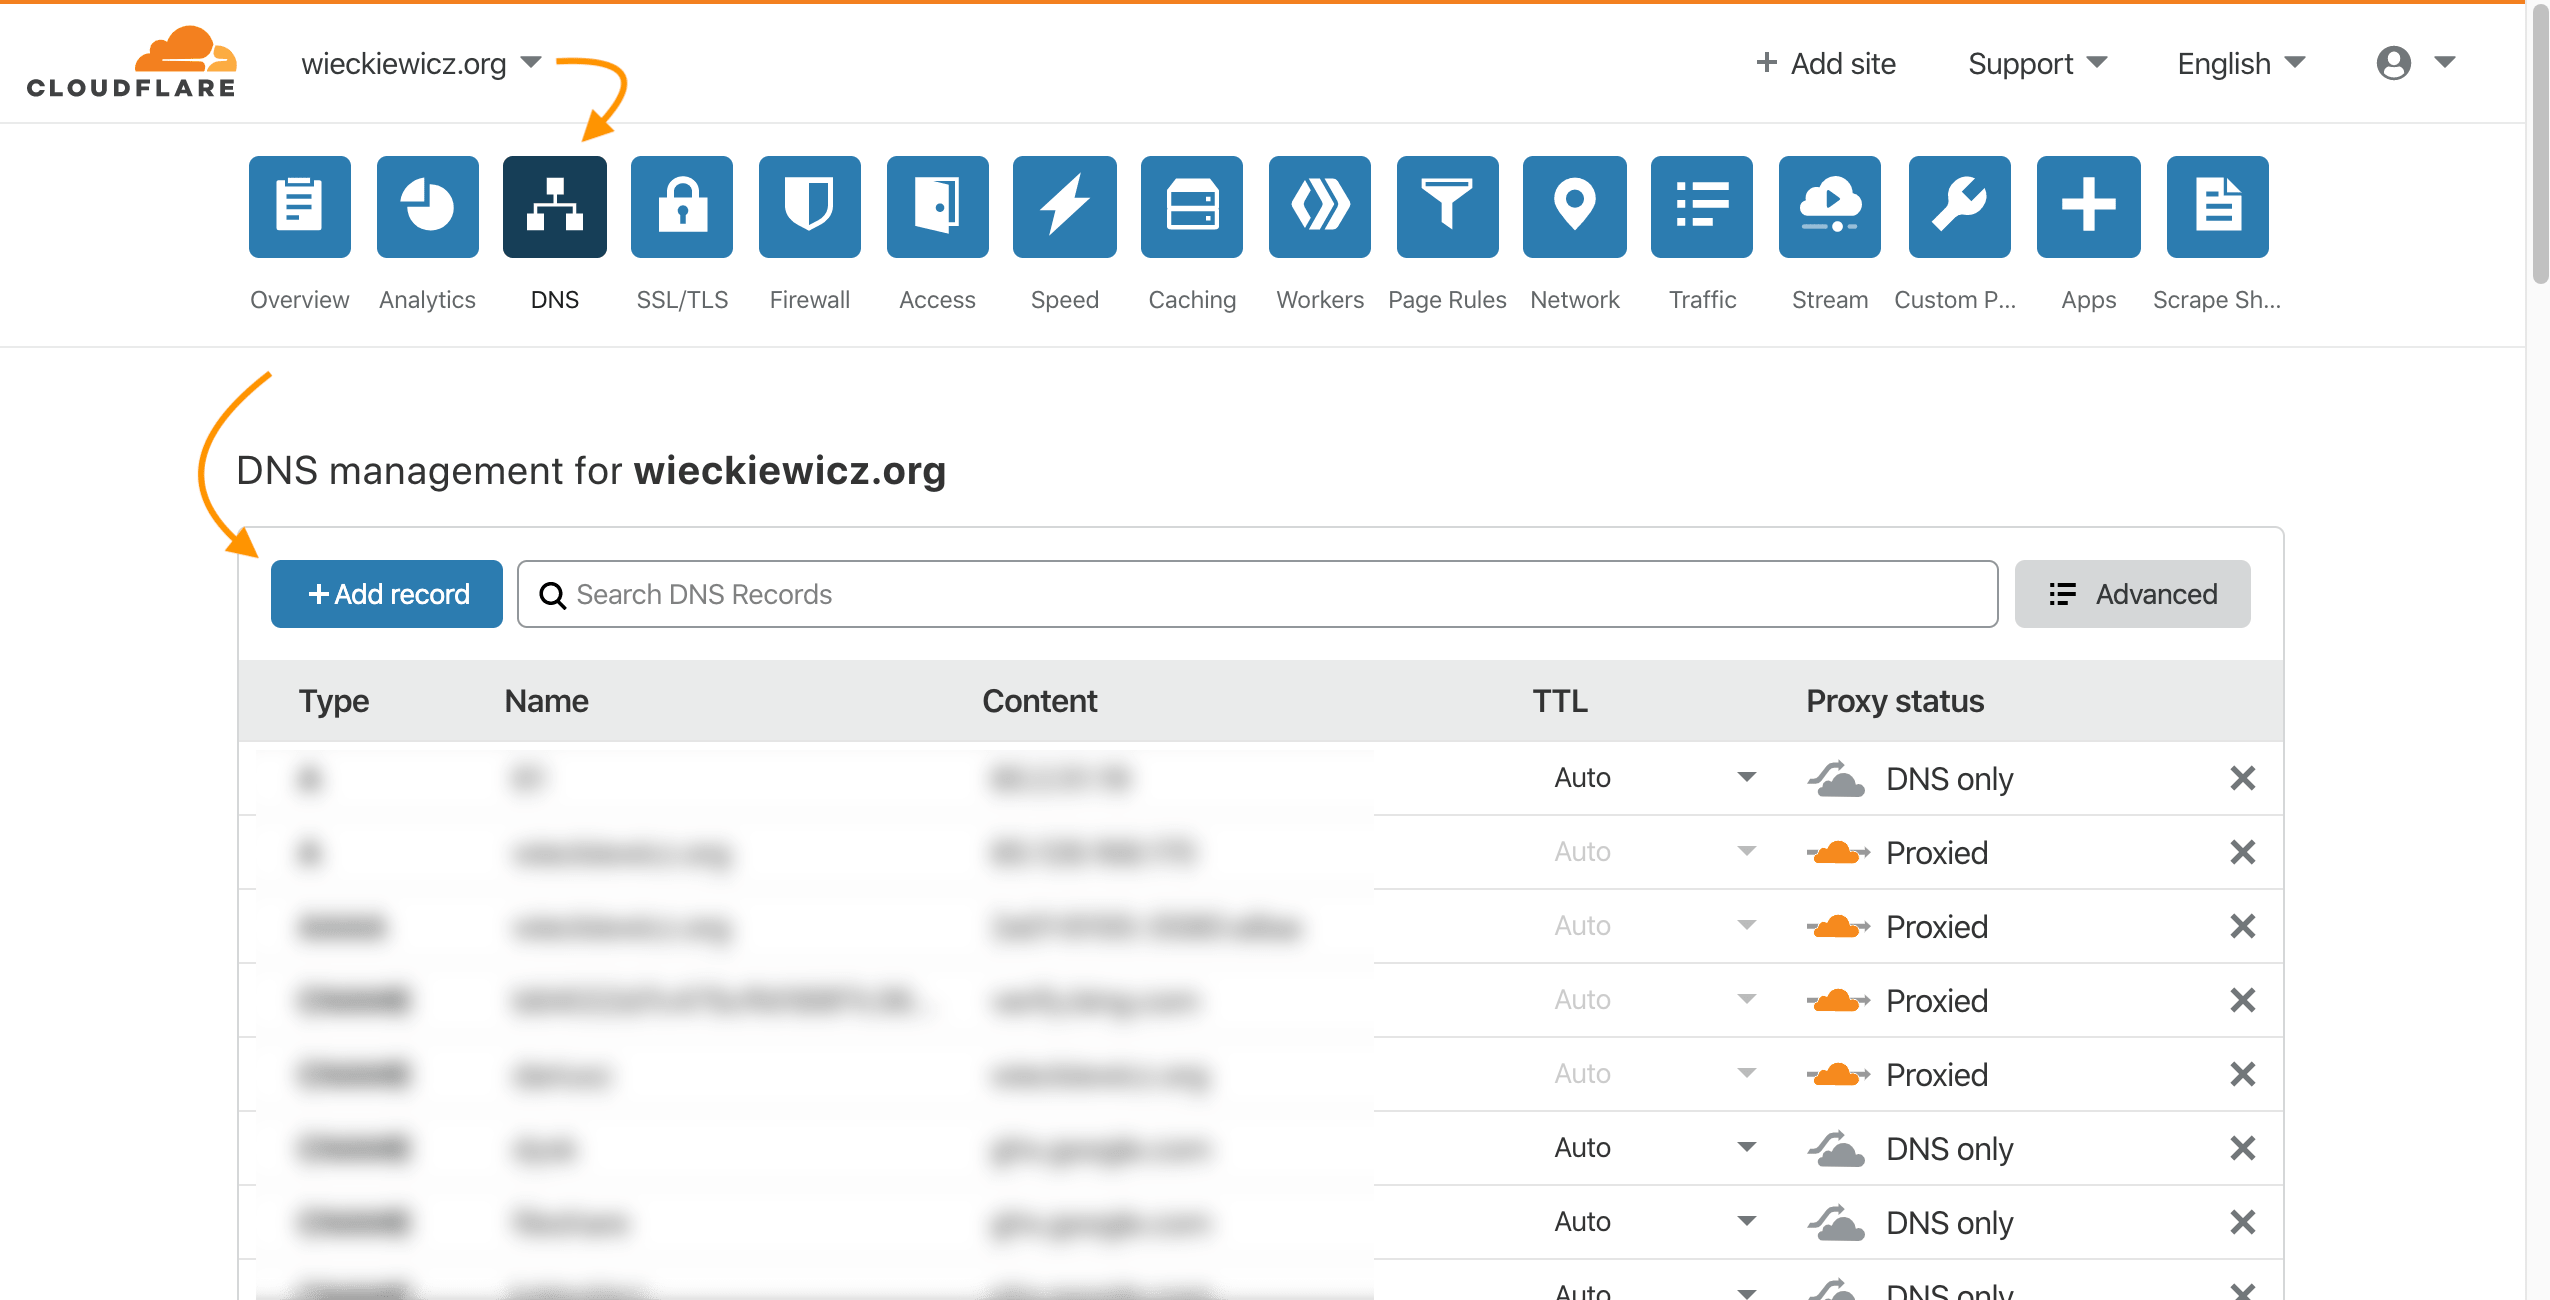
We log in to our Cloudflare account and select our domain.
In the DNS tab we add a new record (+ Add Record).
We choose the A type record, enter our subdomain name vpn and insert the IP address. Here we can set whatever we want.
I recommend NOT putting our current IP address, because we need to make sure that our application is working and after finishing the setup, the IP address will be given by our router. Then it will be correct.
We also click on the Cloudflare cloud icon and set Proxied to DNS only.
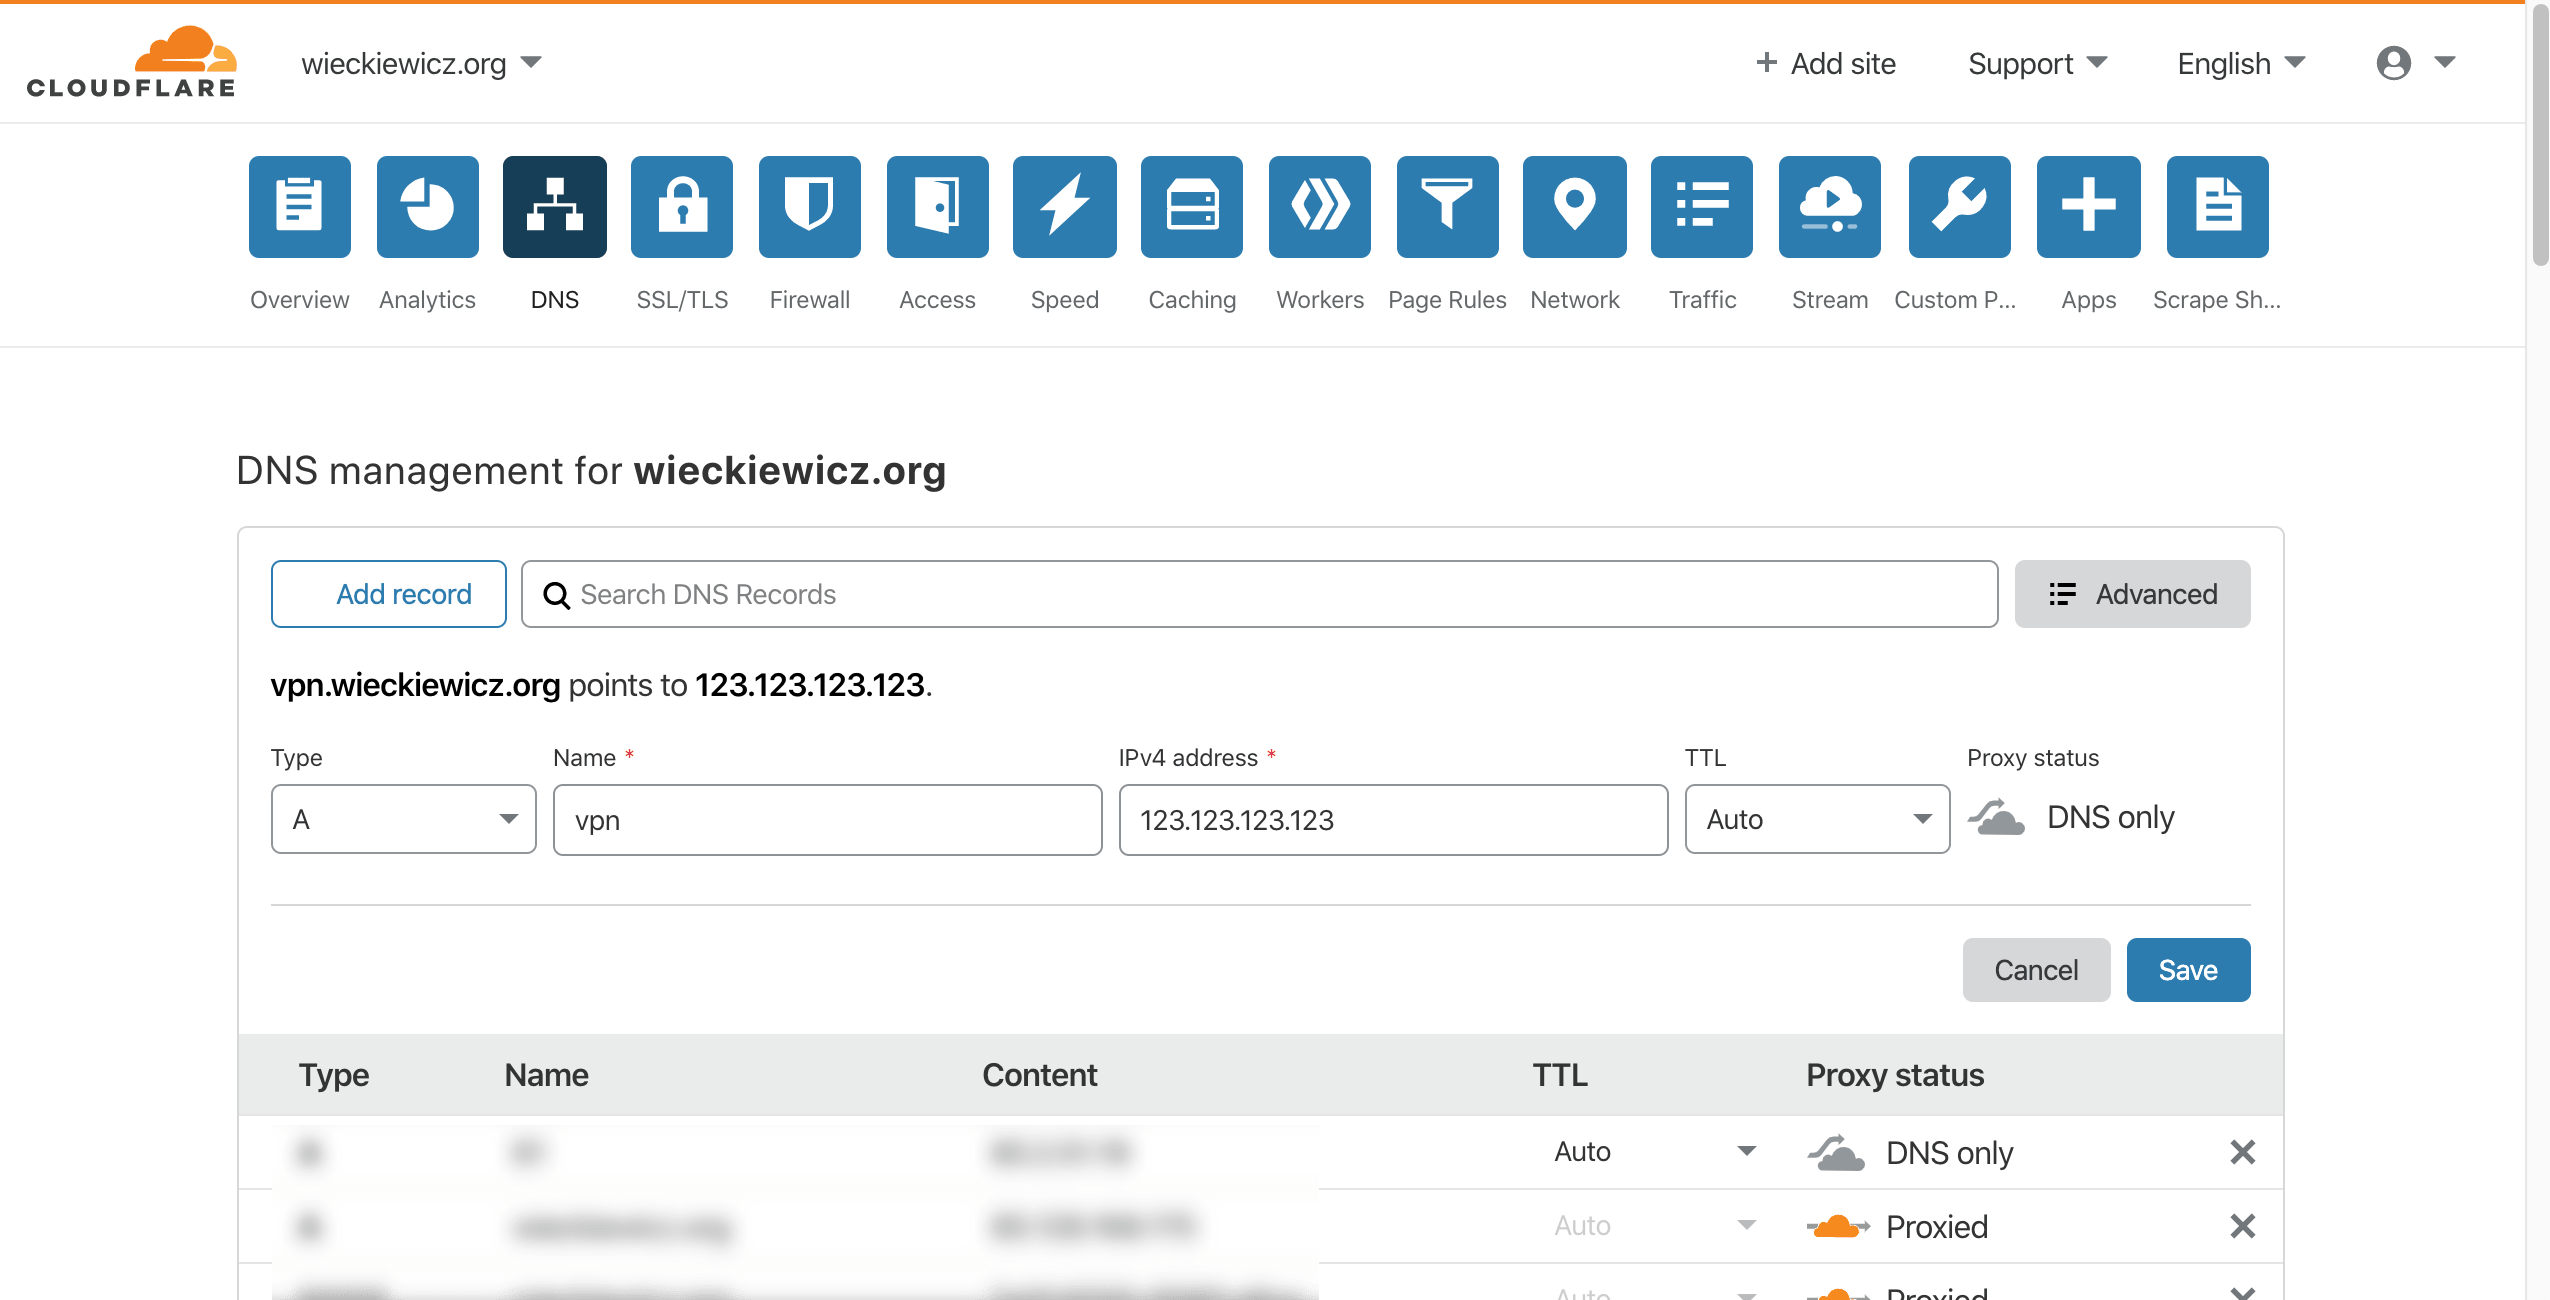
When we ping our domain, we will see a response from the assigned IP address, not the Cloudflare IP address. For VPNs, I recommend leaving this in DNS only mode.
That’s not all…
Before we proceed to configuring our router, we need data for communication and authentication between the router and Cloudflare. In this case, we do not use a username and password, but API. For this purpose, we will need our API key (API keys), which can be found in our profile settings (My Profile), in the API tokens section (API Tokens).
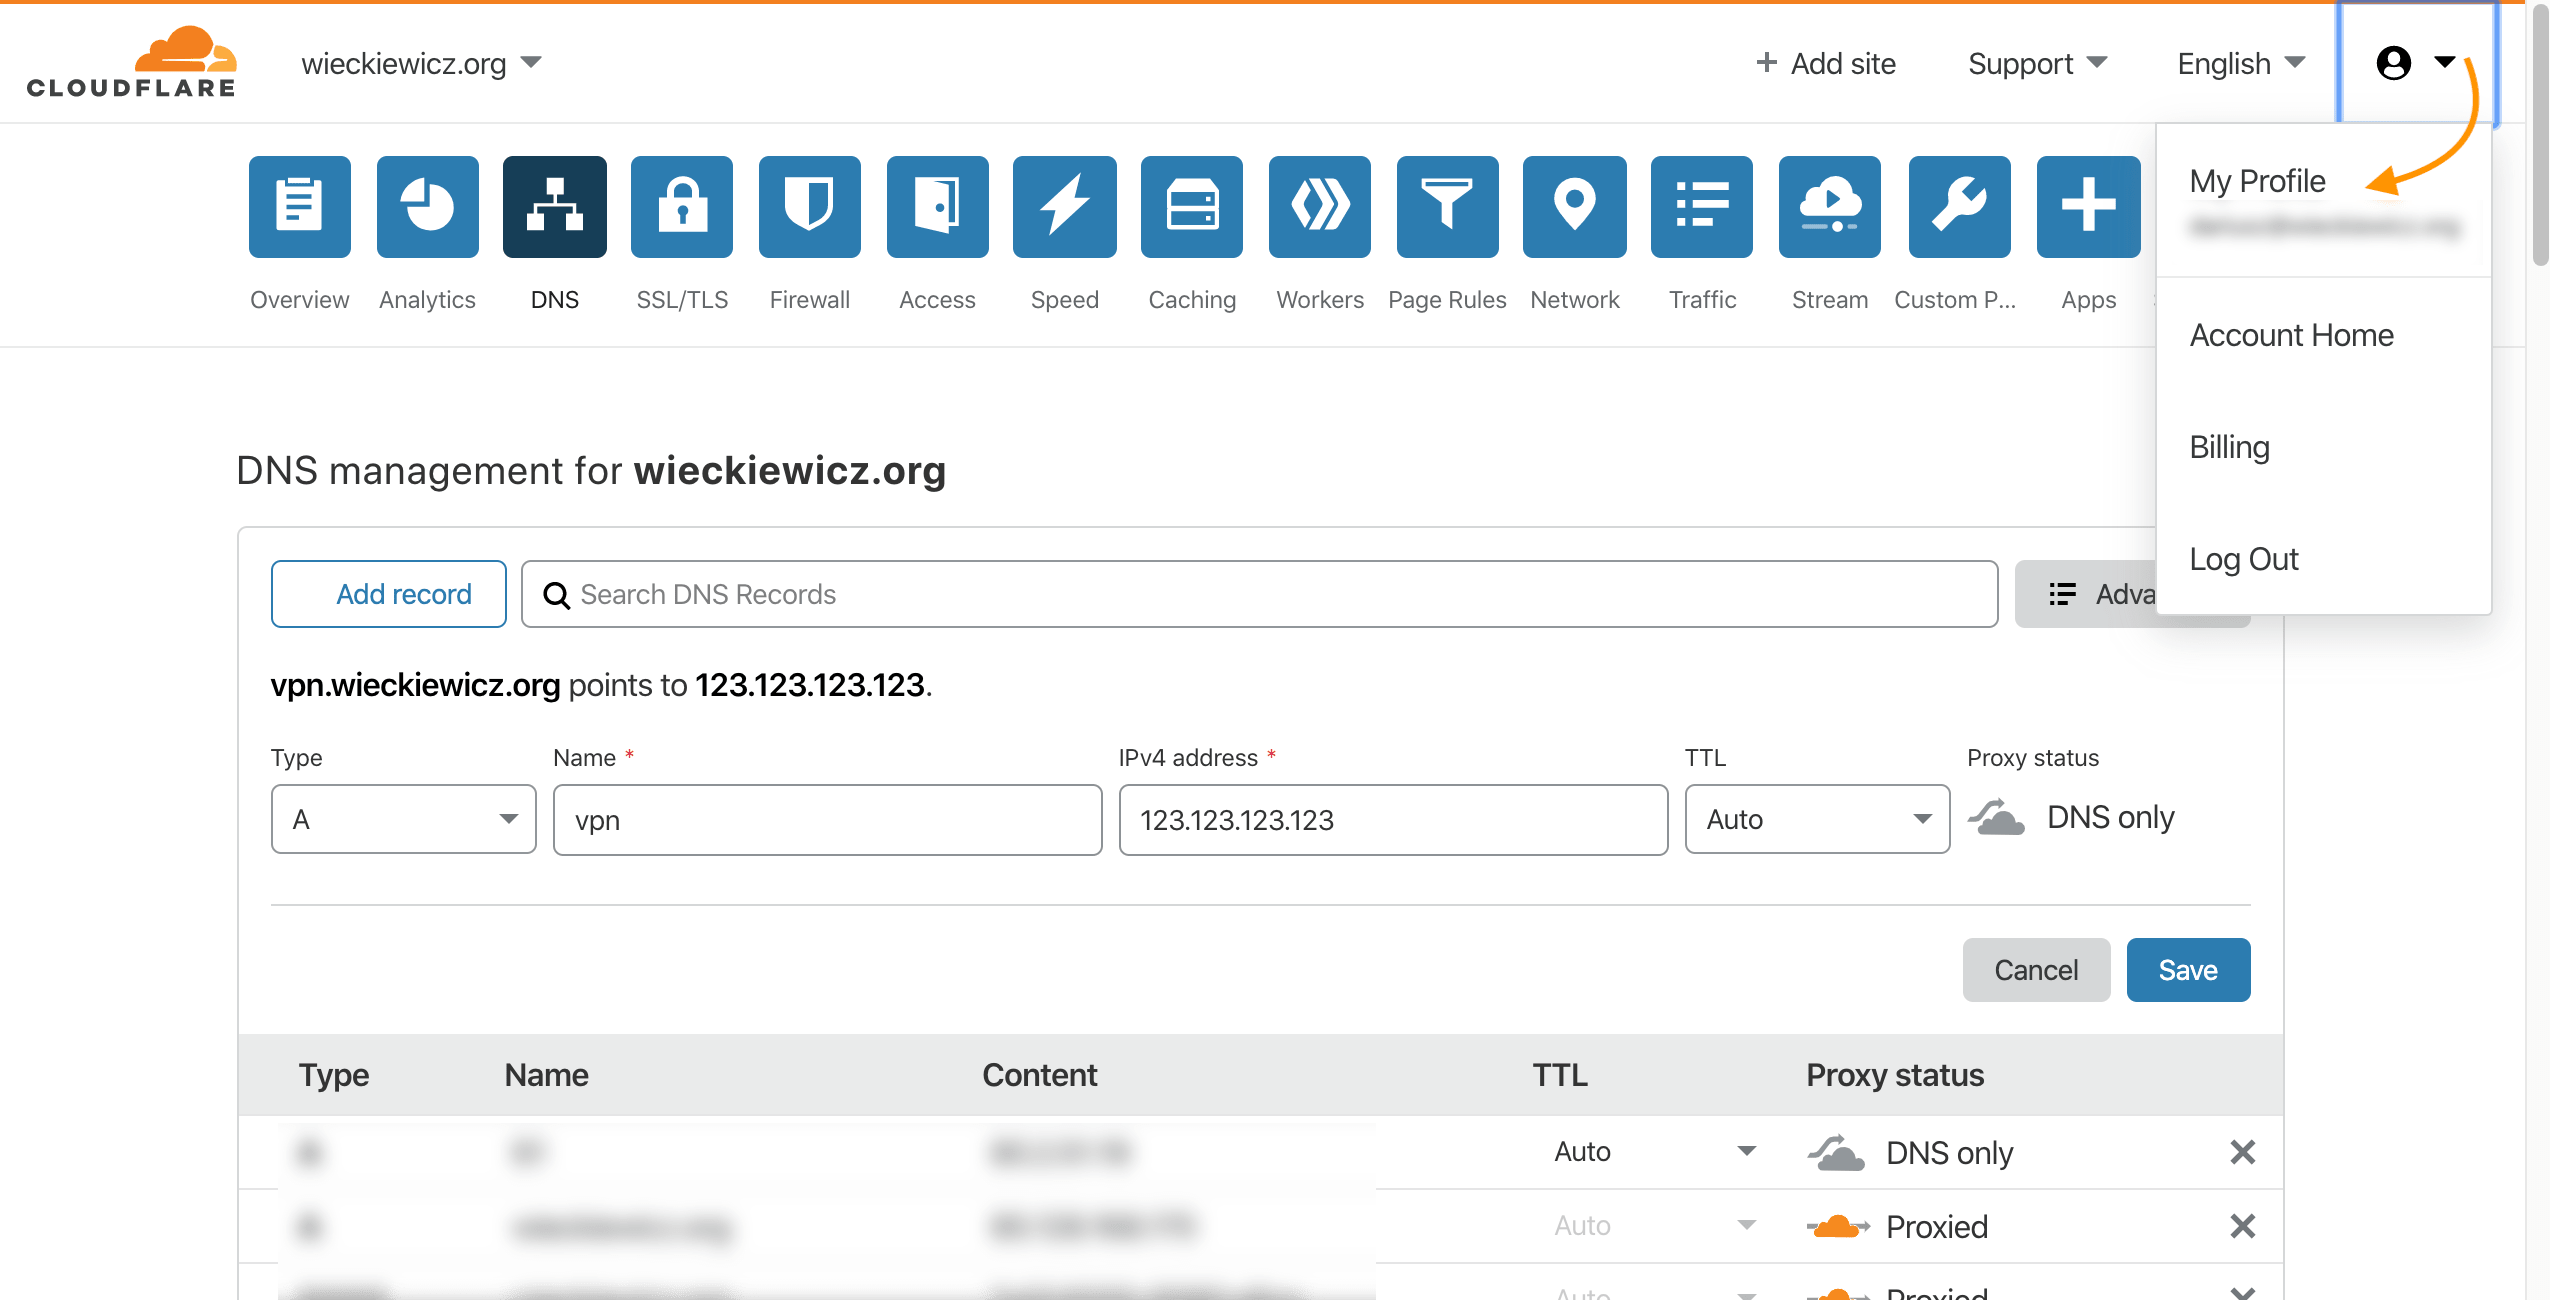
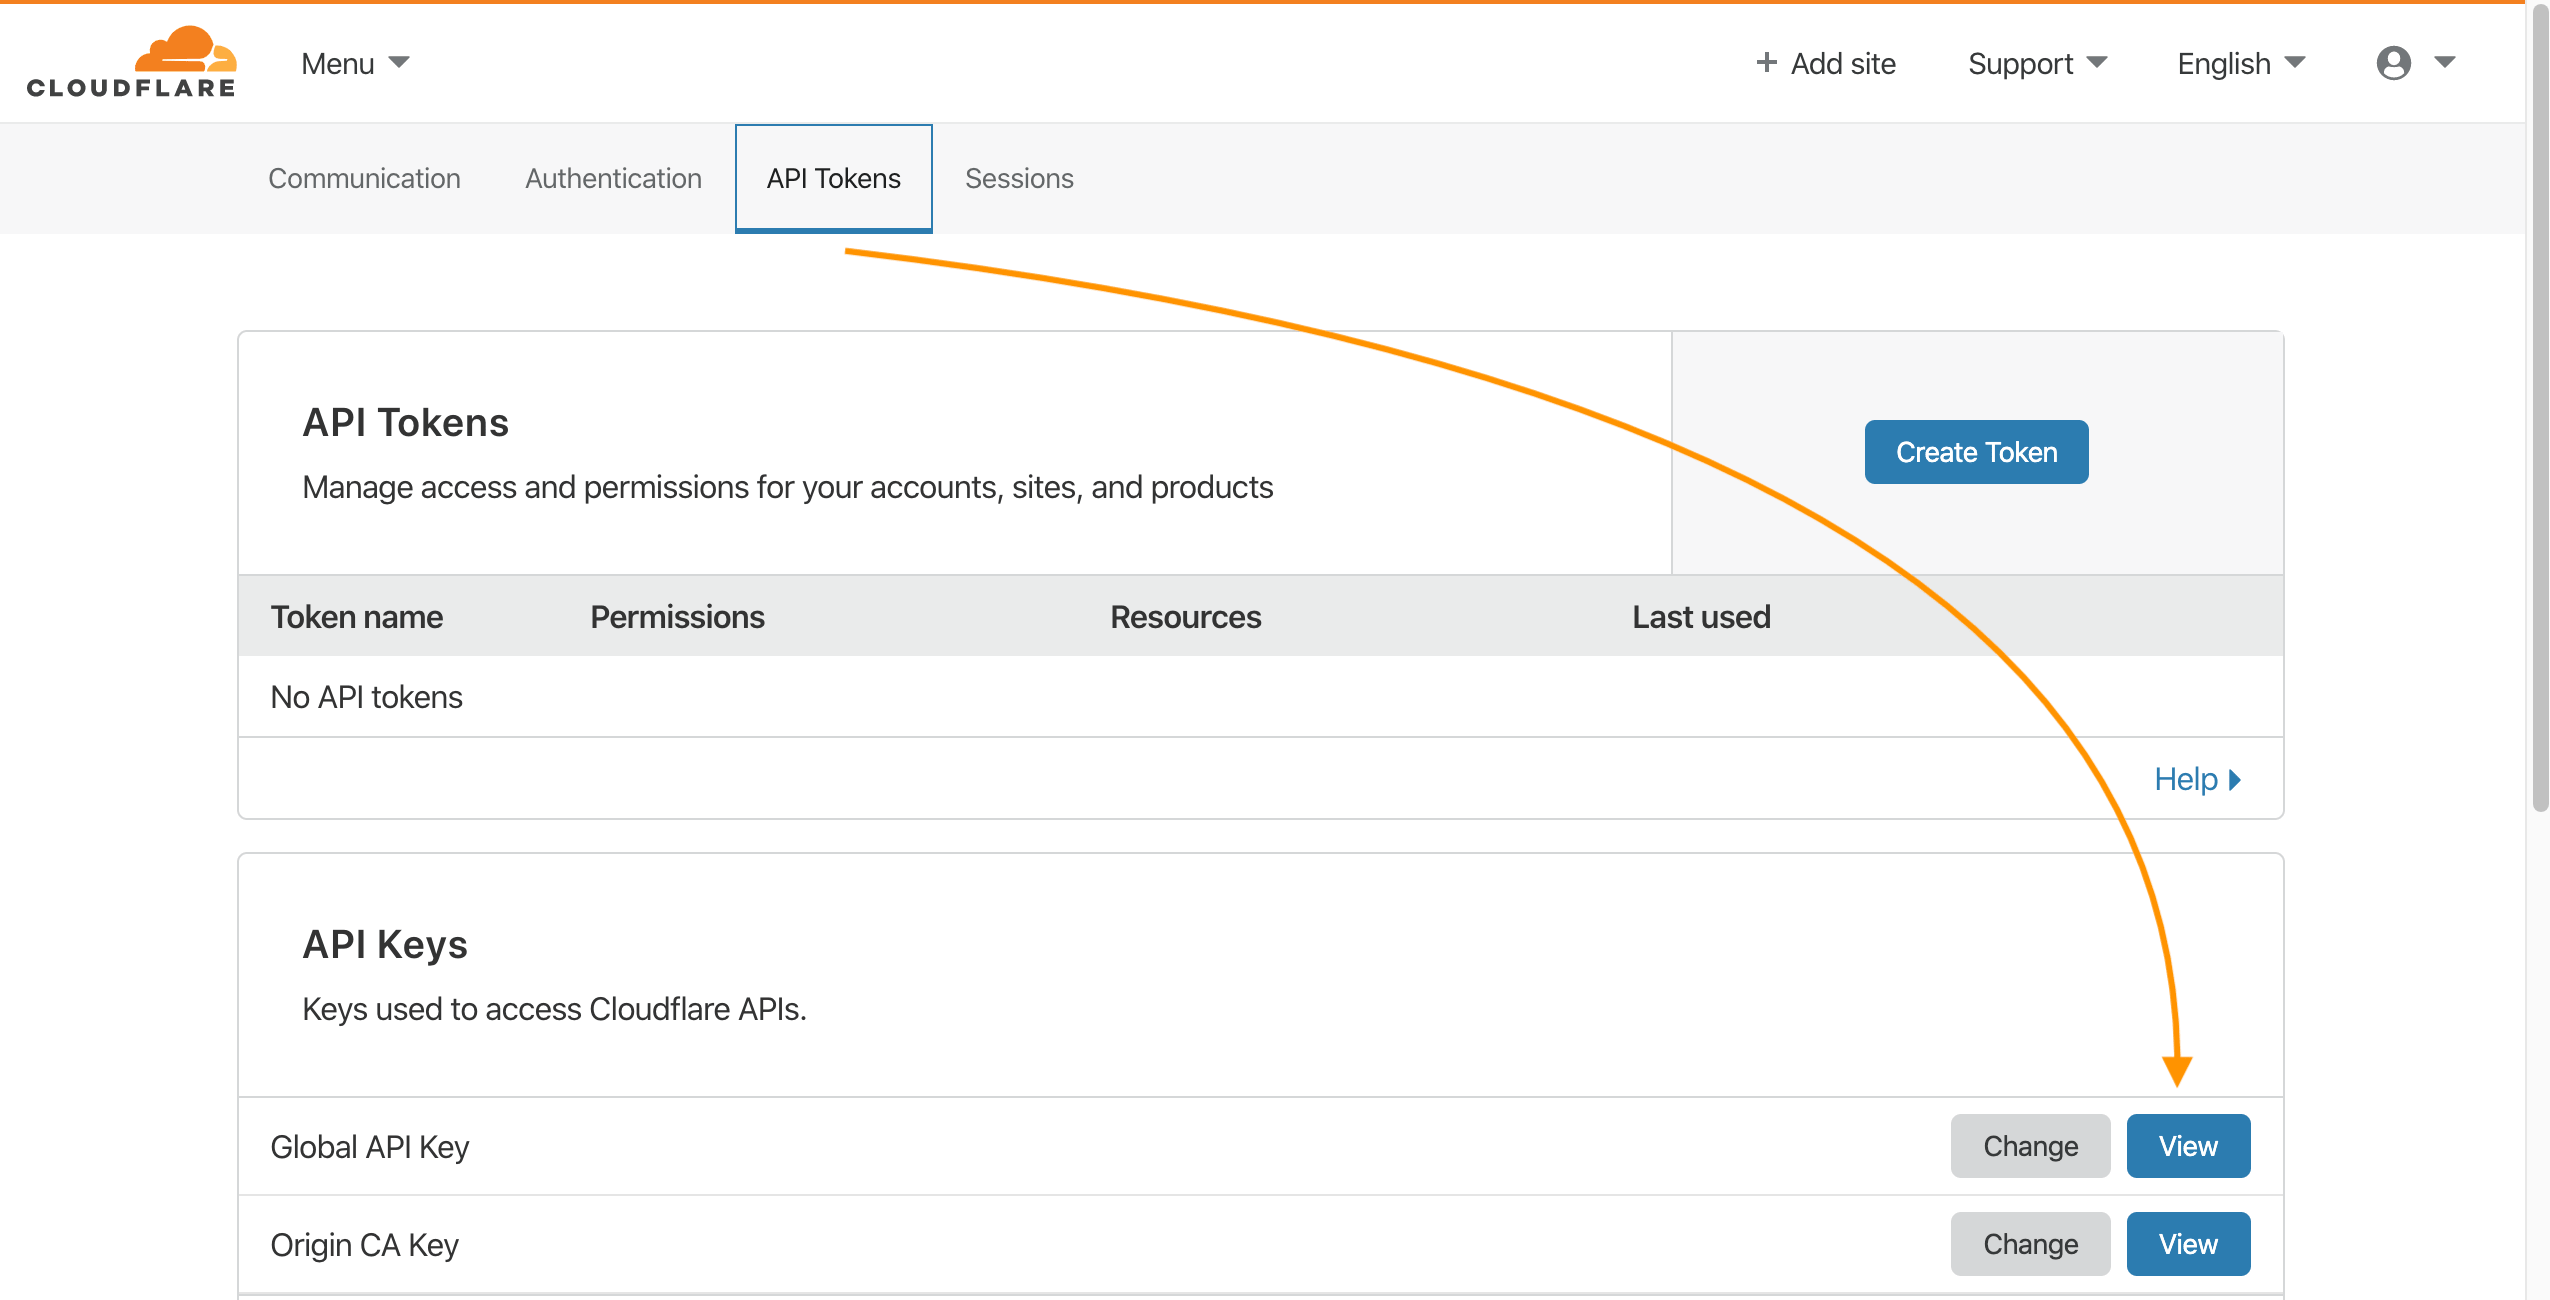
Then click on the View button next to Global API key (we will need to re-enter the Cloudflare password). In the next window we will get the key, which we copy and write down on the side, because we will need it later.
Back to our router…
Configuration
We move on to configuration. For convenience, it will be done via a web browser (Services > Dynamic DNS).
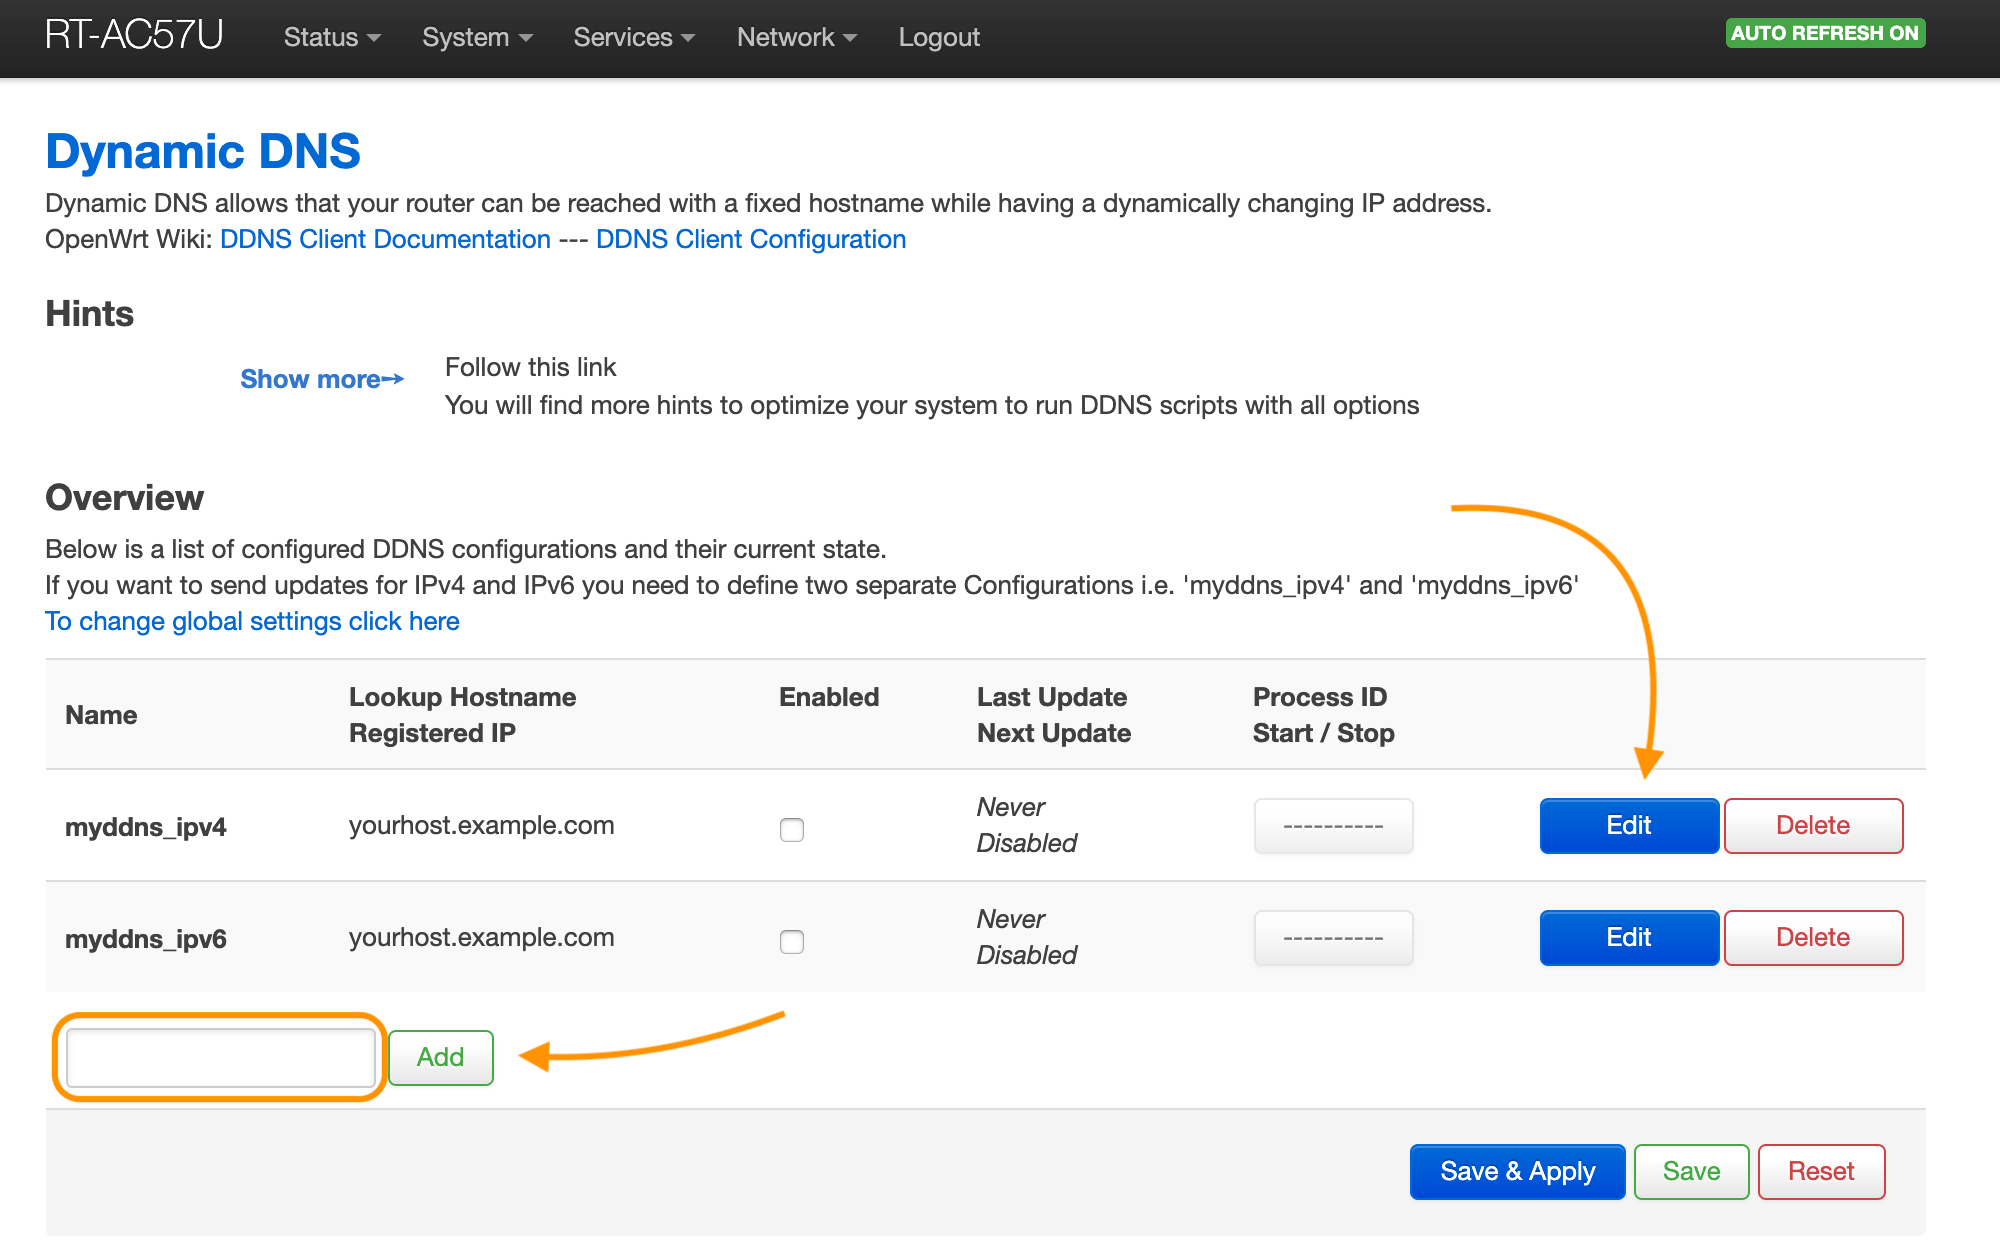
At this stage we will focus on setting our IPv4 address, so we will start editing with myddns_ipv4.
Of course, Cloudflare also supports DNS over IPv6 and if our service provider also provides us with this address pool, it is worth adding the appropriate domain with a AAAA record.
Click the edit button next to myddns_ipv4 or create a new configuration by entering its name and clicking the add button.
In my case I created cloudflare_ipv4.
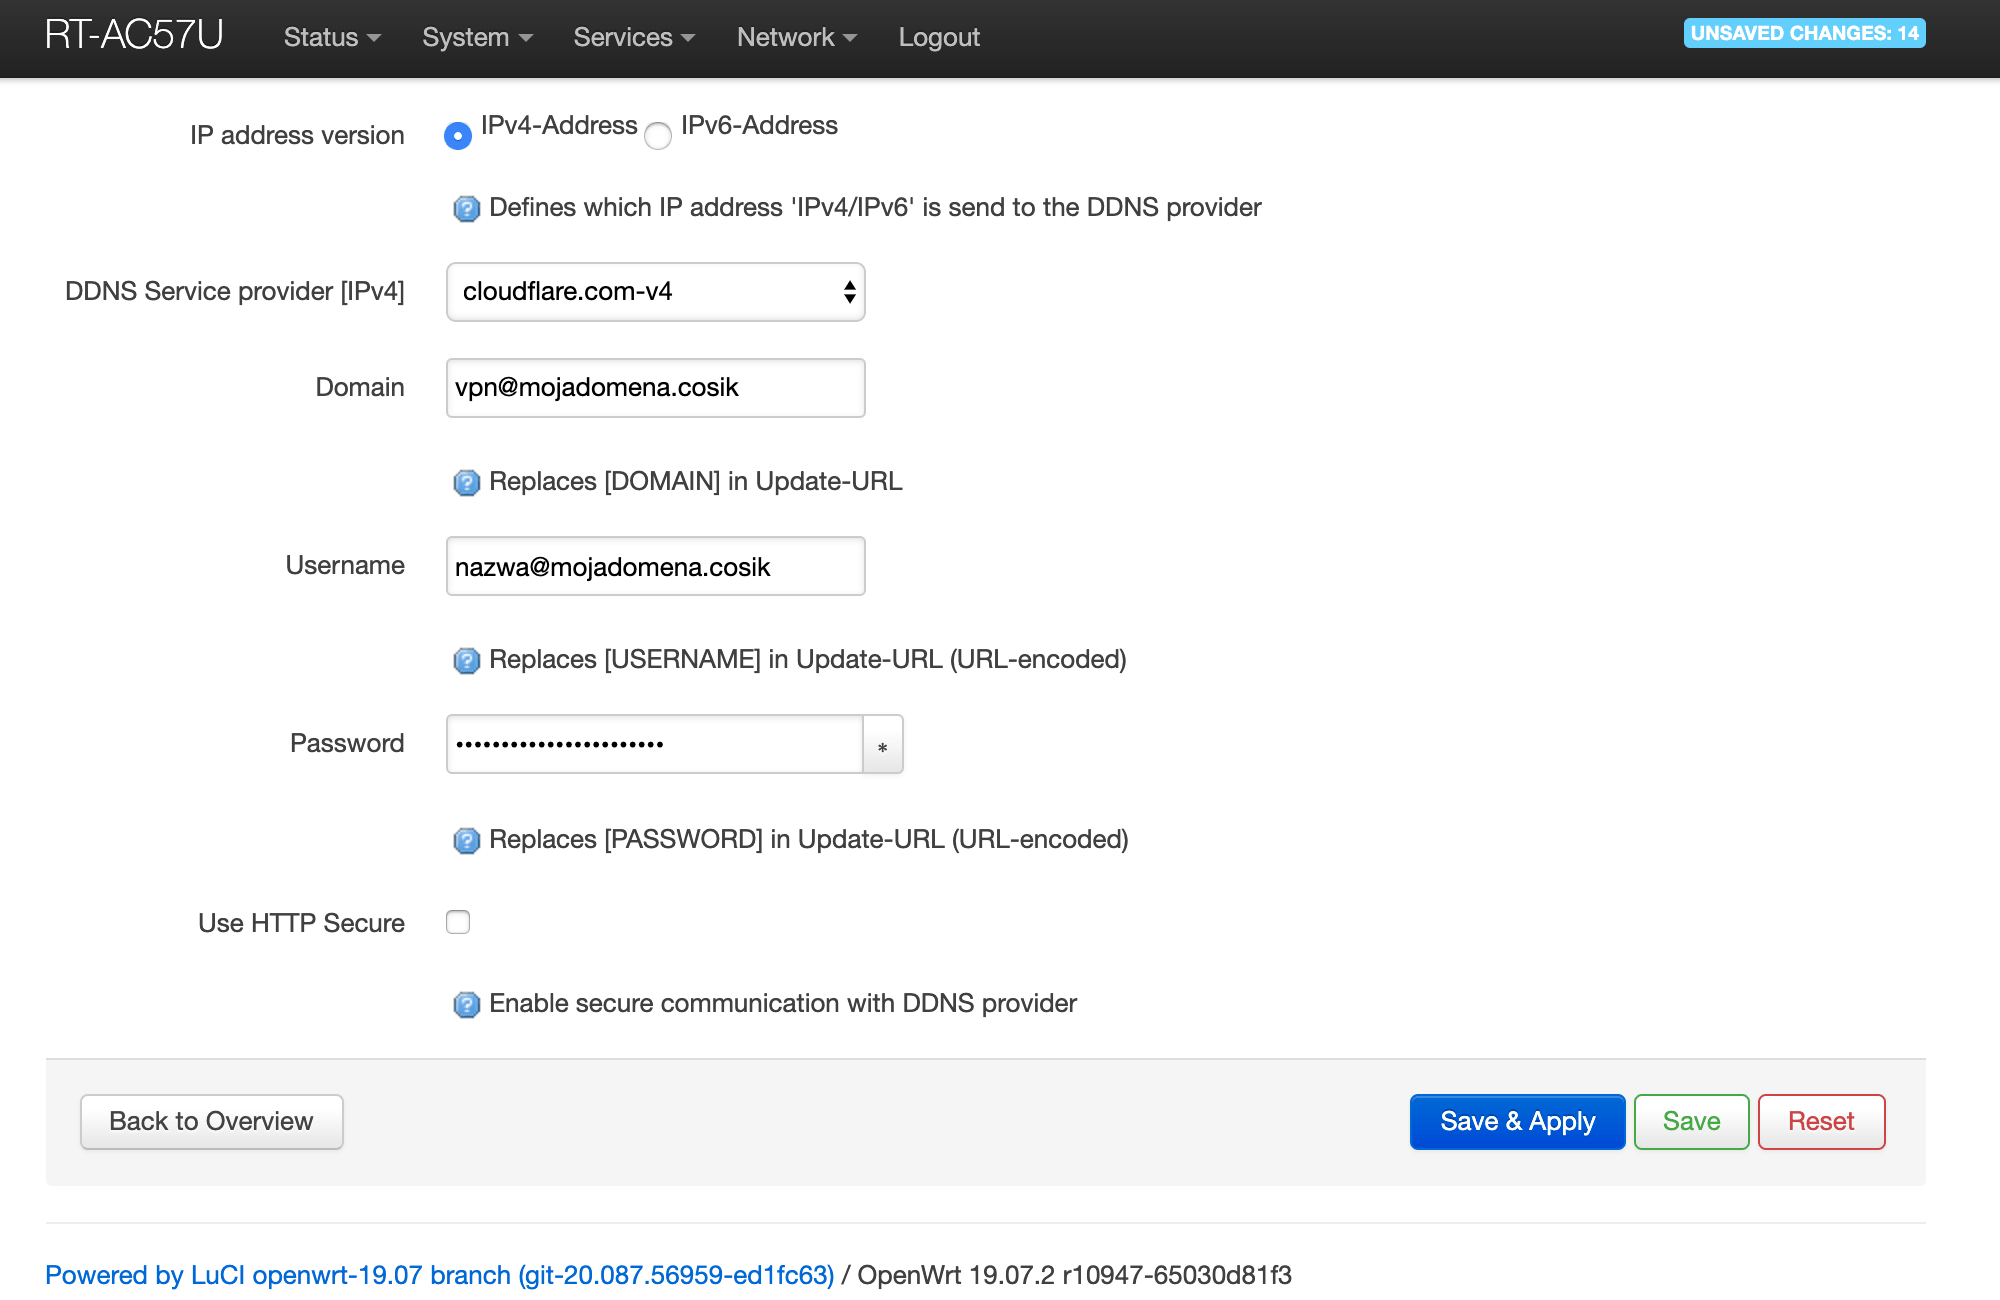
In the first step, we go to the DDNS Service provider section and select cloudflare.com-v4. We may be asked to confirm the change (Really change DDNS provider?), which we confirm by clicking the Change provider button.
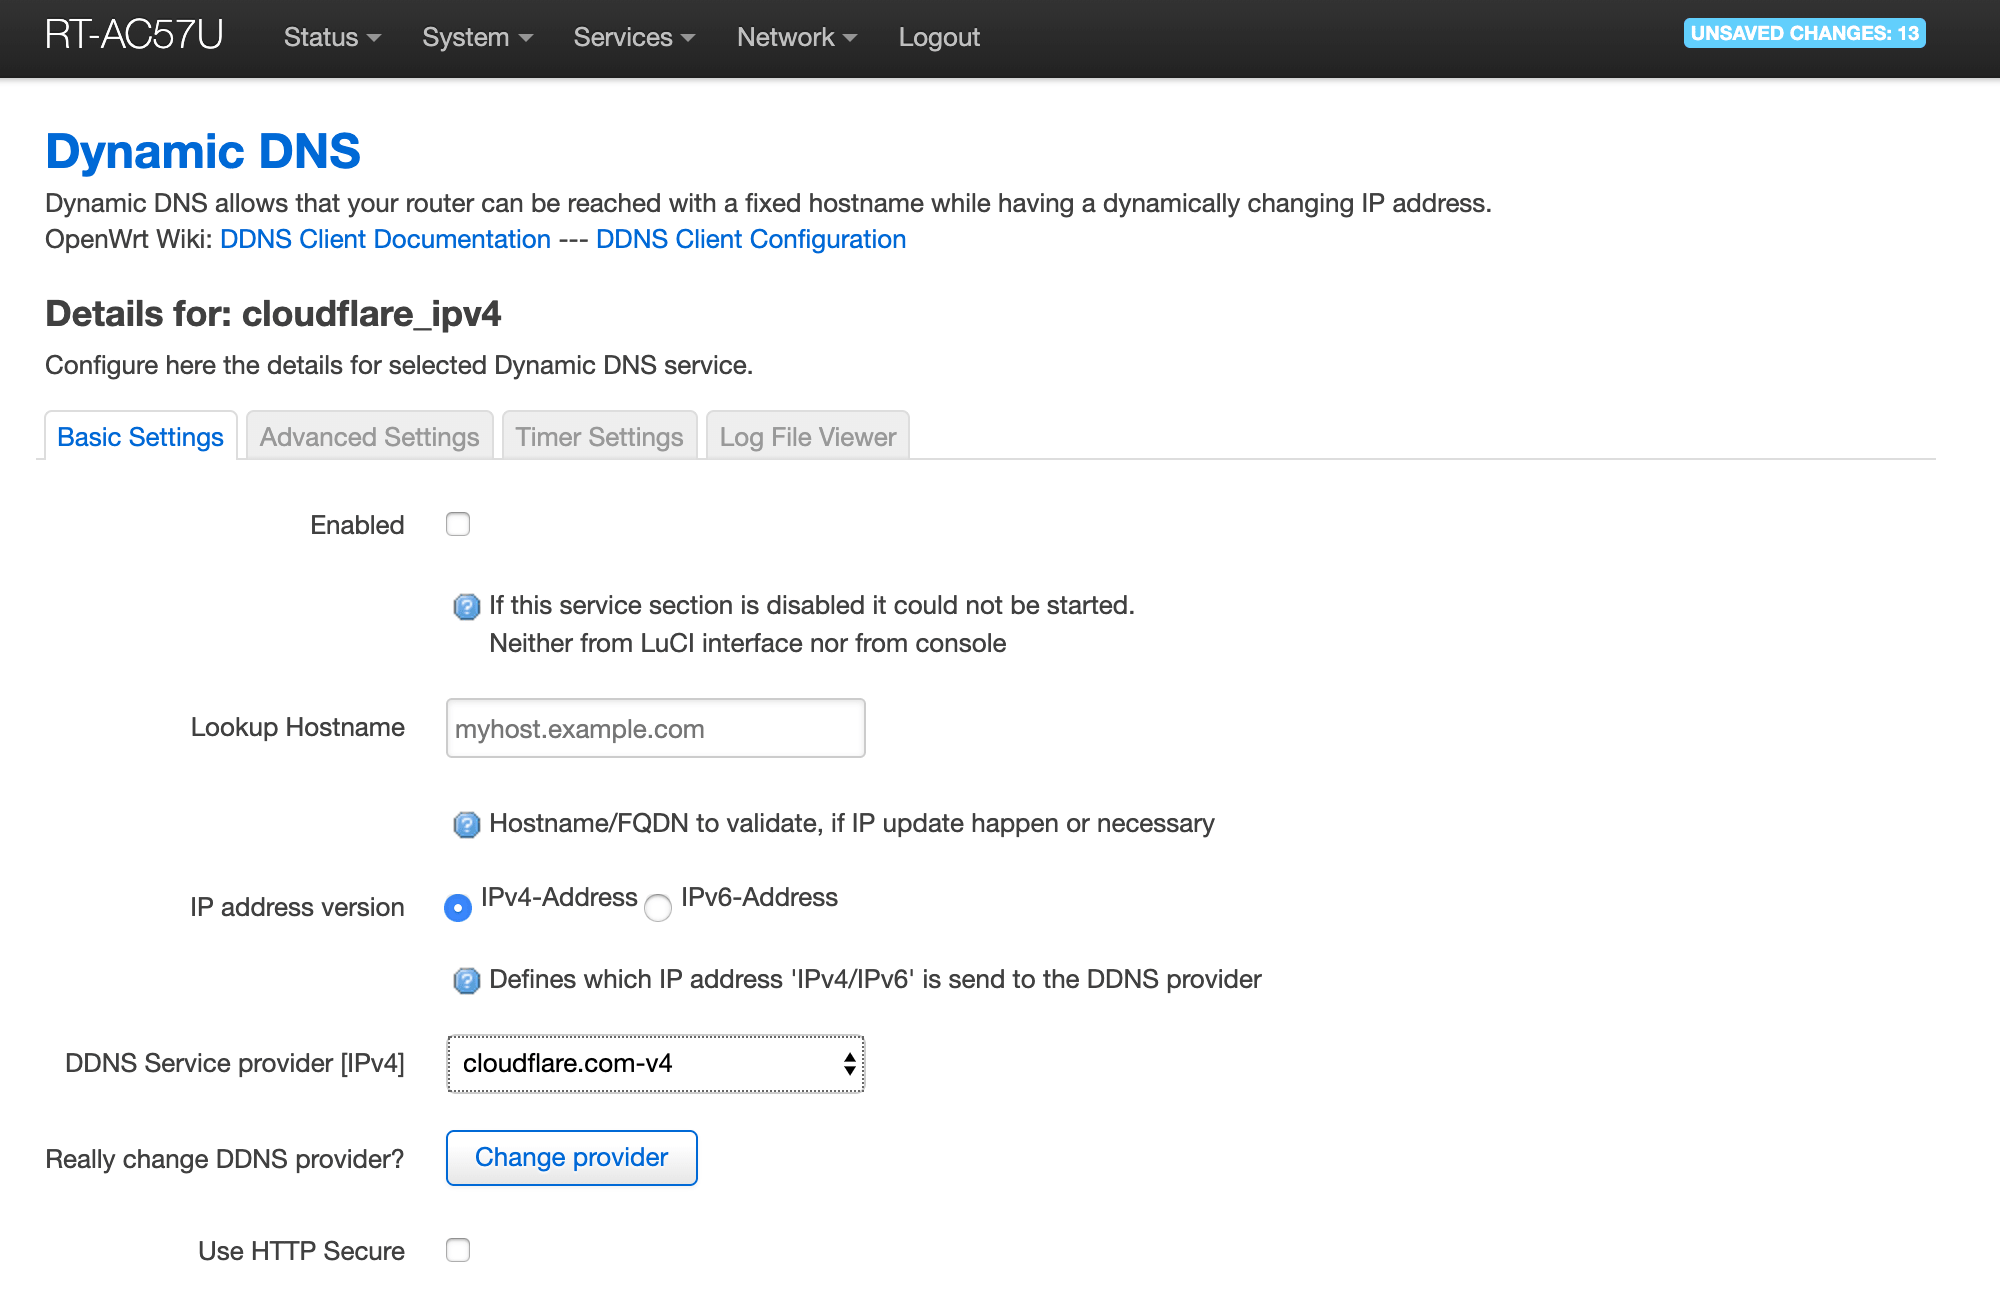
Next, let’s mark our service as enabled.
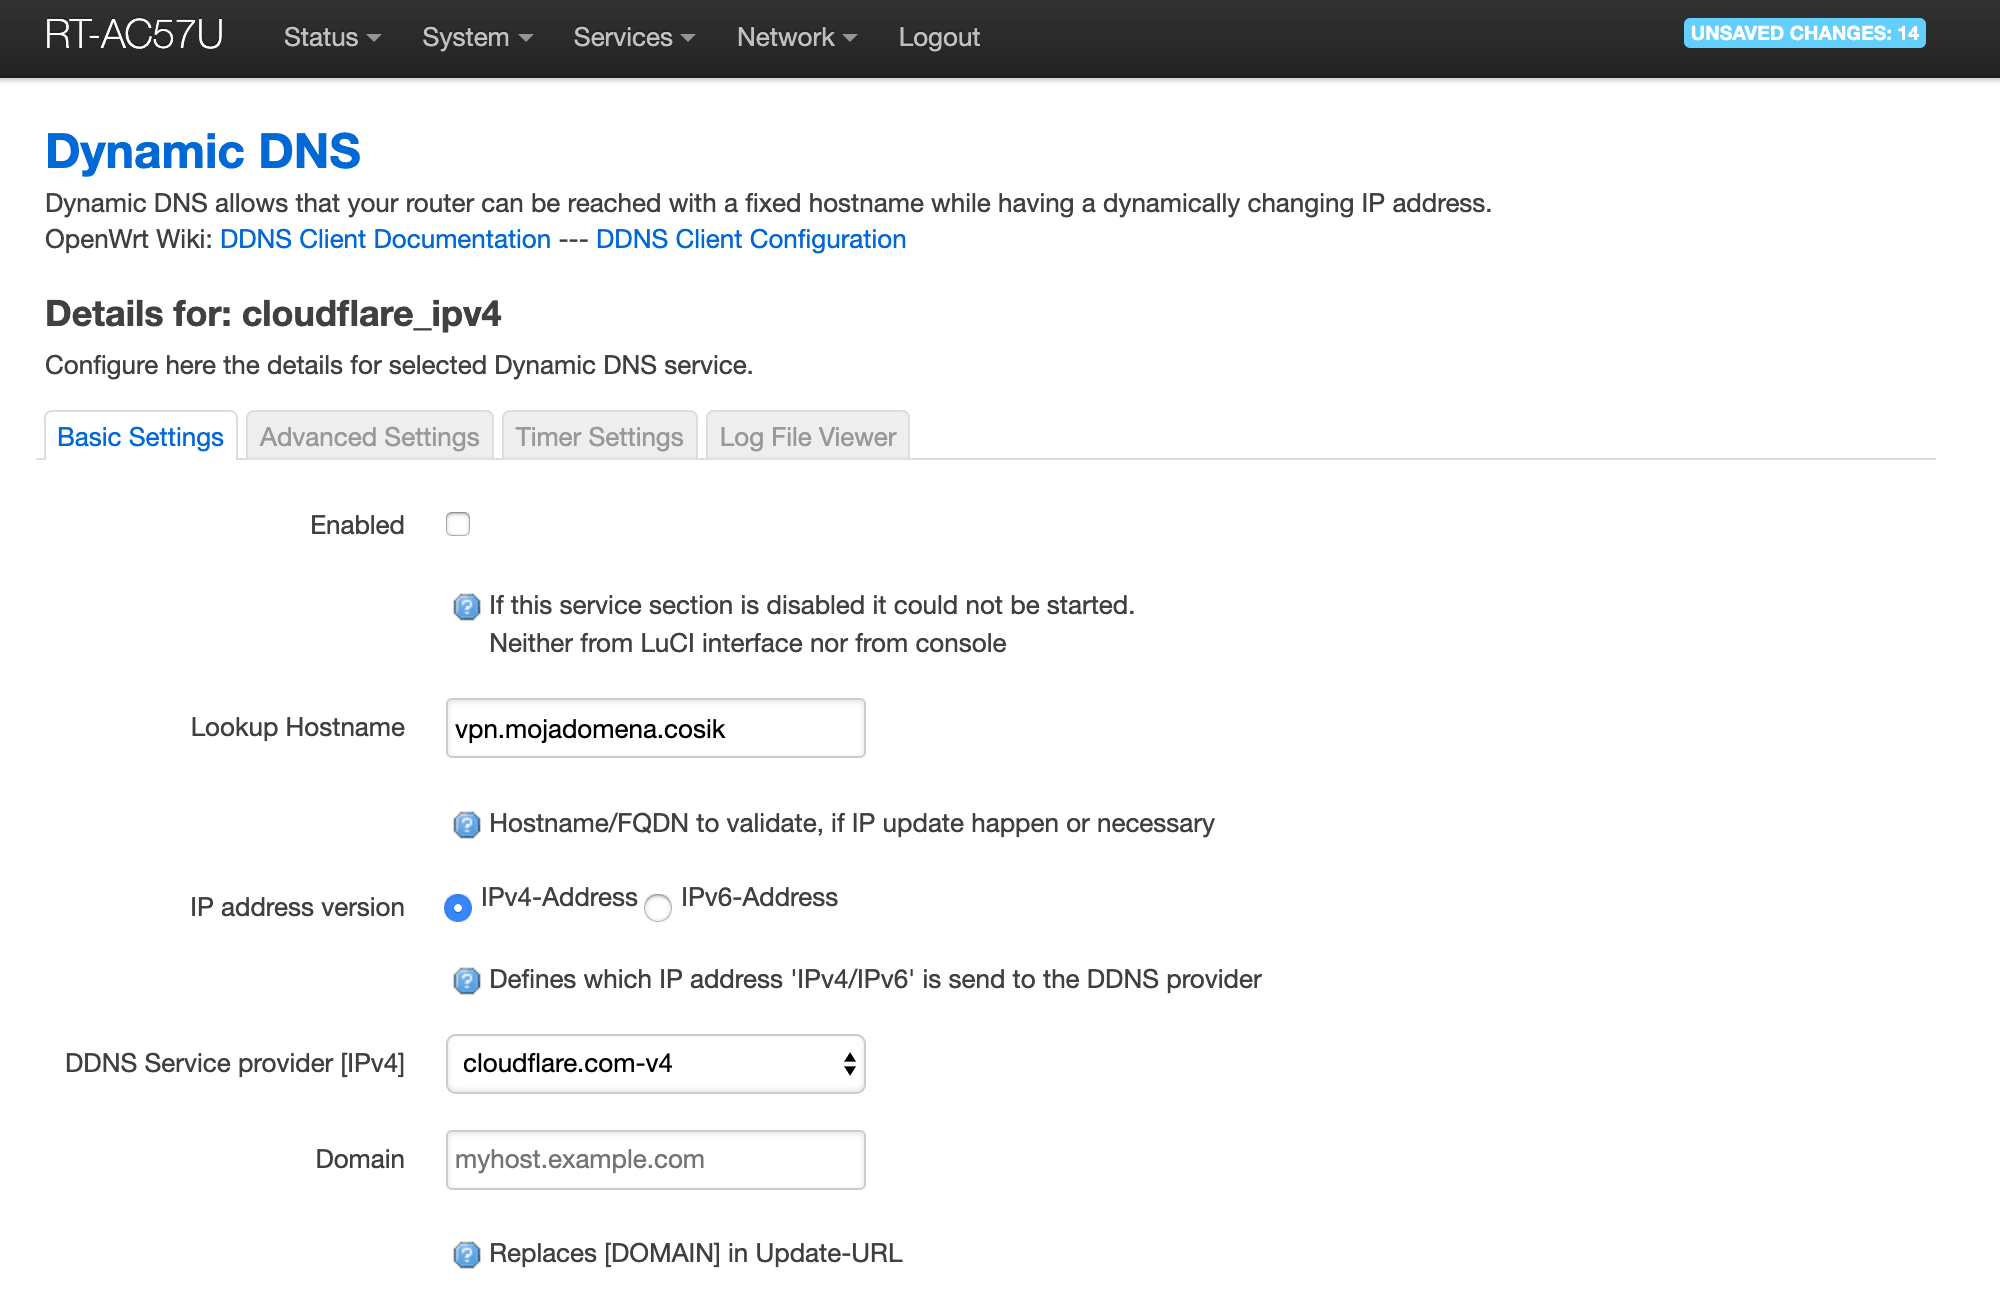
In Lookup Hostname we enter our domain vpn.mydomain.something
In the domain section (Domain), enter the same as above, except instead of the dot separating the main domain from the subdomain, enter the @ symbol as in the email address, i.e. vpn@mydomain.something
In the username field we enter our Cloudflare email address.
In the password field we paste our API key (Global API key).
Setting the secure HTTPS connection (Use HTTP Secure), for now we leave it not enabled.
Moving on to the advanced settings of our configuration, we need to set how the program will check our external IP address and how the external IP address will be determined.
There are several options here.
If our router sees the external IP address from the interface (Network > Interfaces), then it is enough to select the interface option (Interface). In the case when the interface has a private IP address assigned, for example 192.168.8.2, then we need to use other options to specify the IP address. Below I will describe the method with the URL option.
For those who use DDNS with mwan3 (see the post: Adding a second internet connection to a router with OpenWrt), I refer you to another point of this article, where I describe another method of getting the external IP address using a script (Script).
In the example with the URL option we will use the website checkip.dyndns.com.
In the IP address source section select URL and in URL to detect enter: http://checkip.dyndns.com (if it is not already entered by default).
Make sure the address is http and not https.
In the Event Network section we select which network interface the communication will take place through to discover the external IP address. In my case, when I have two connections (wan and 4g fallback), I selected wan.
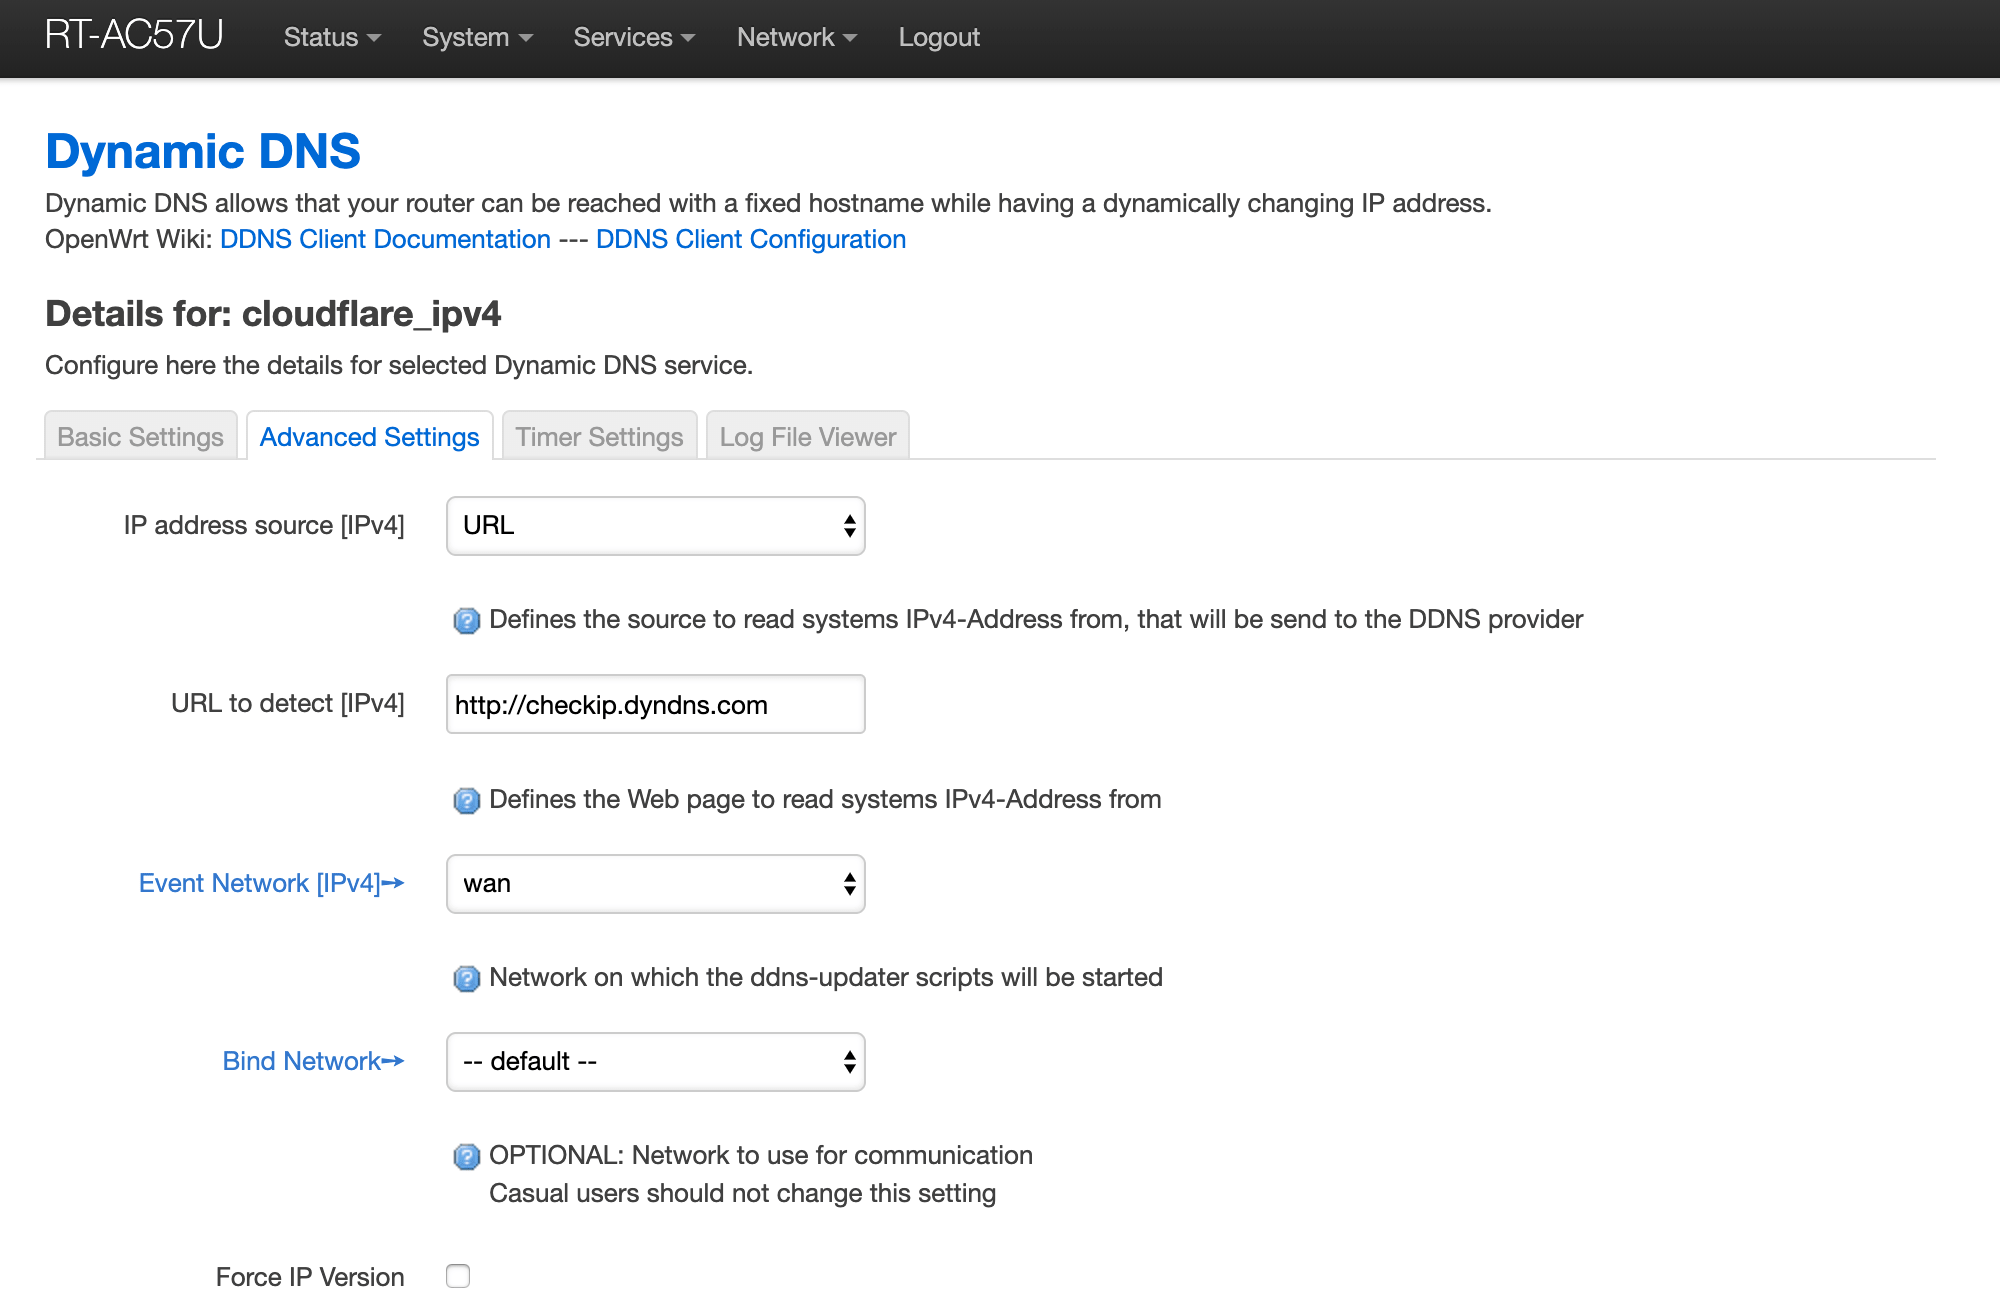
We leave the rest unchanged and click Save & Apply.
Now all you need to do is enable our service using the Start button.
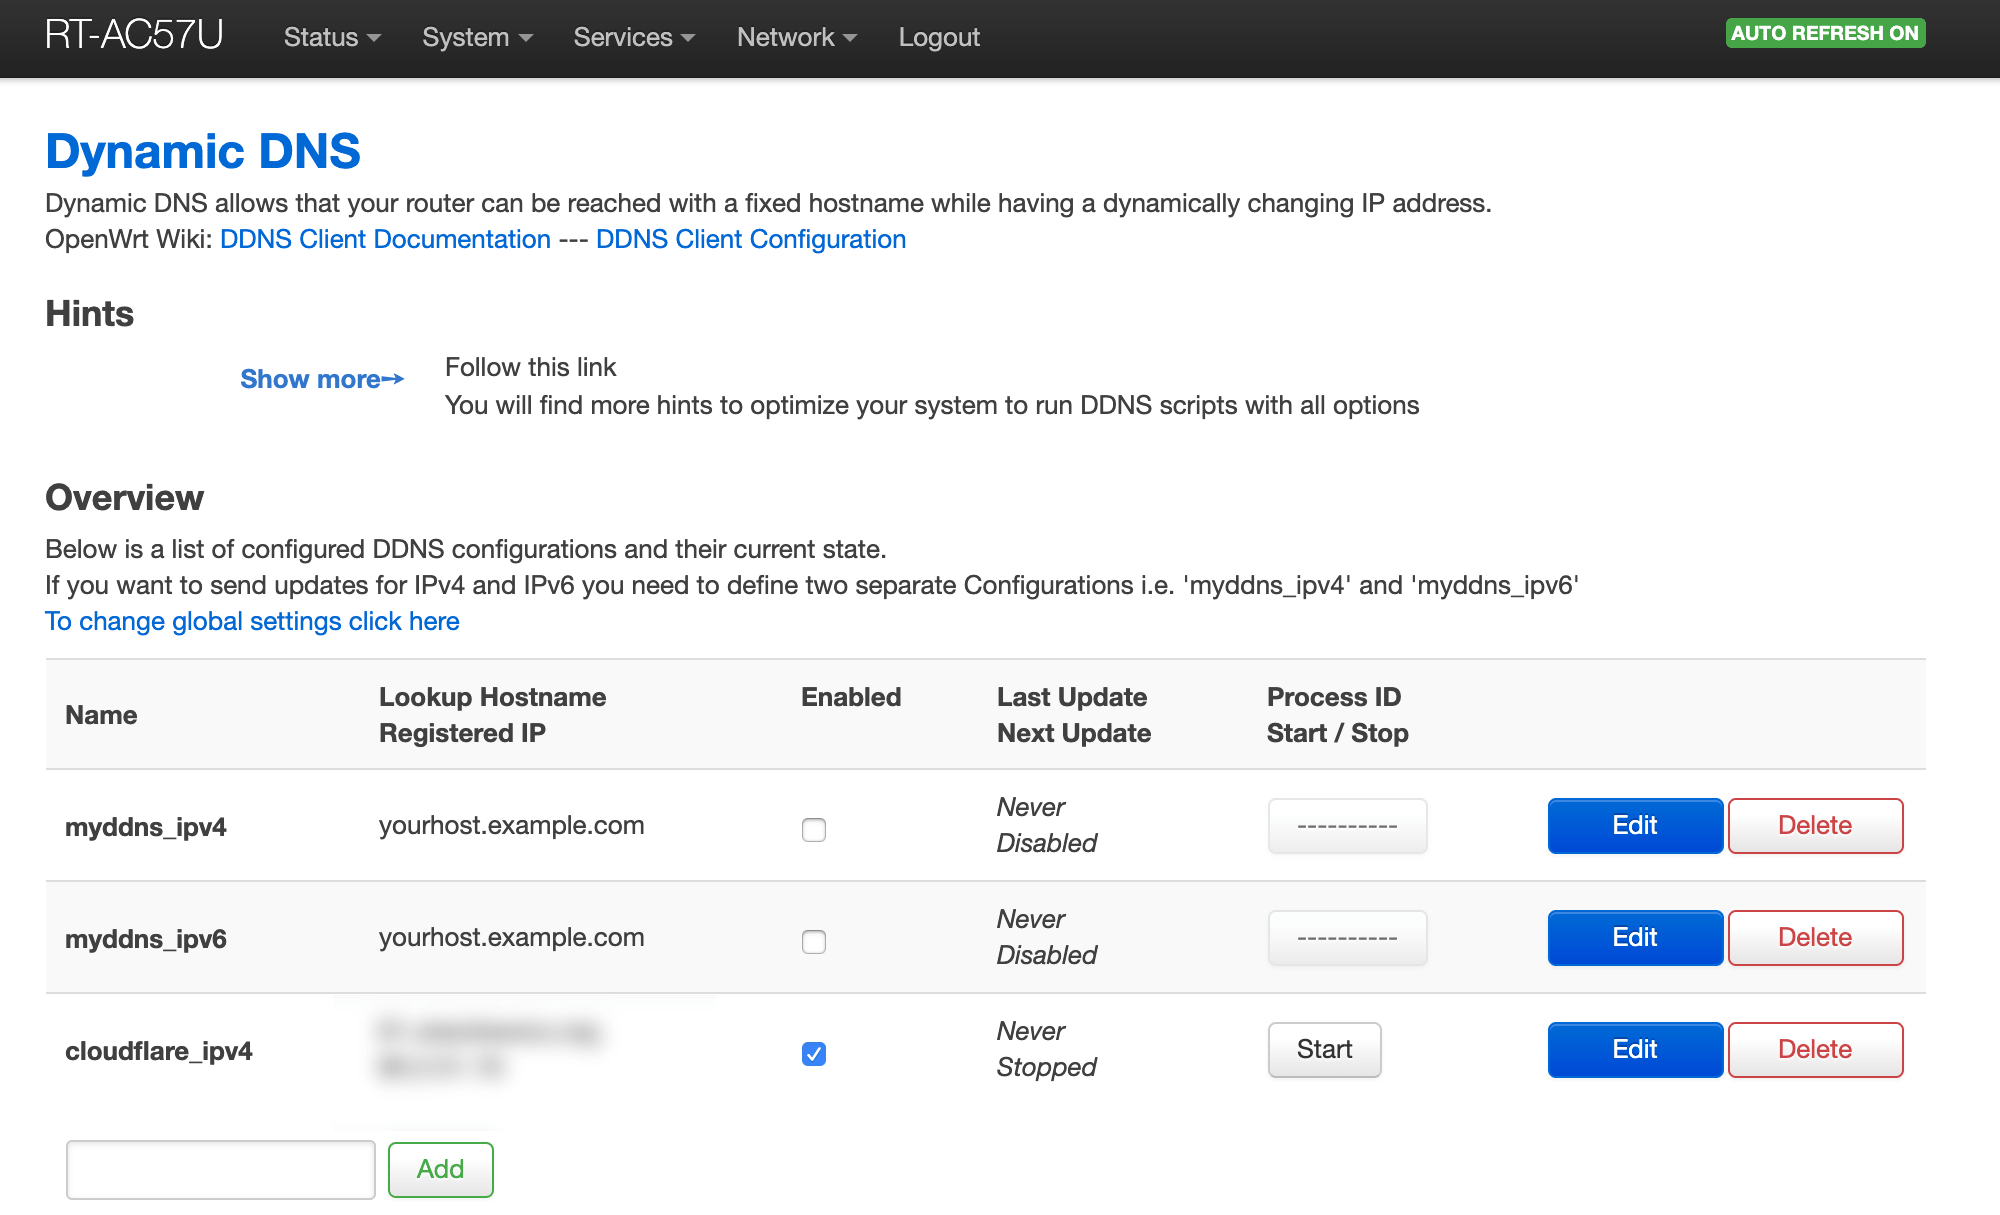
When our service is up and running, we will receive information in the Last update position when the address was refreshed. We set the refresh rate in the Timer Settings section in our configuration settings (we adjust it as needed).
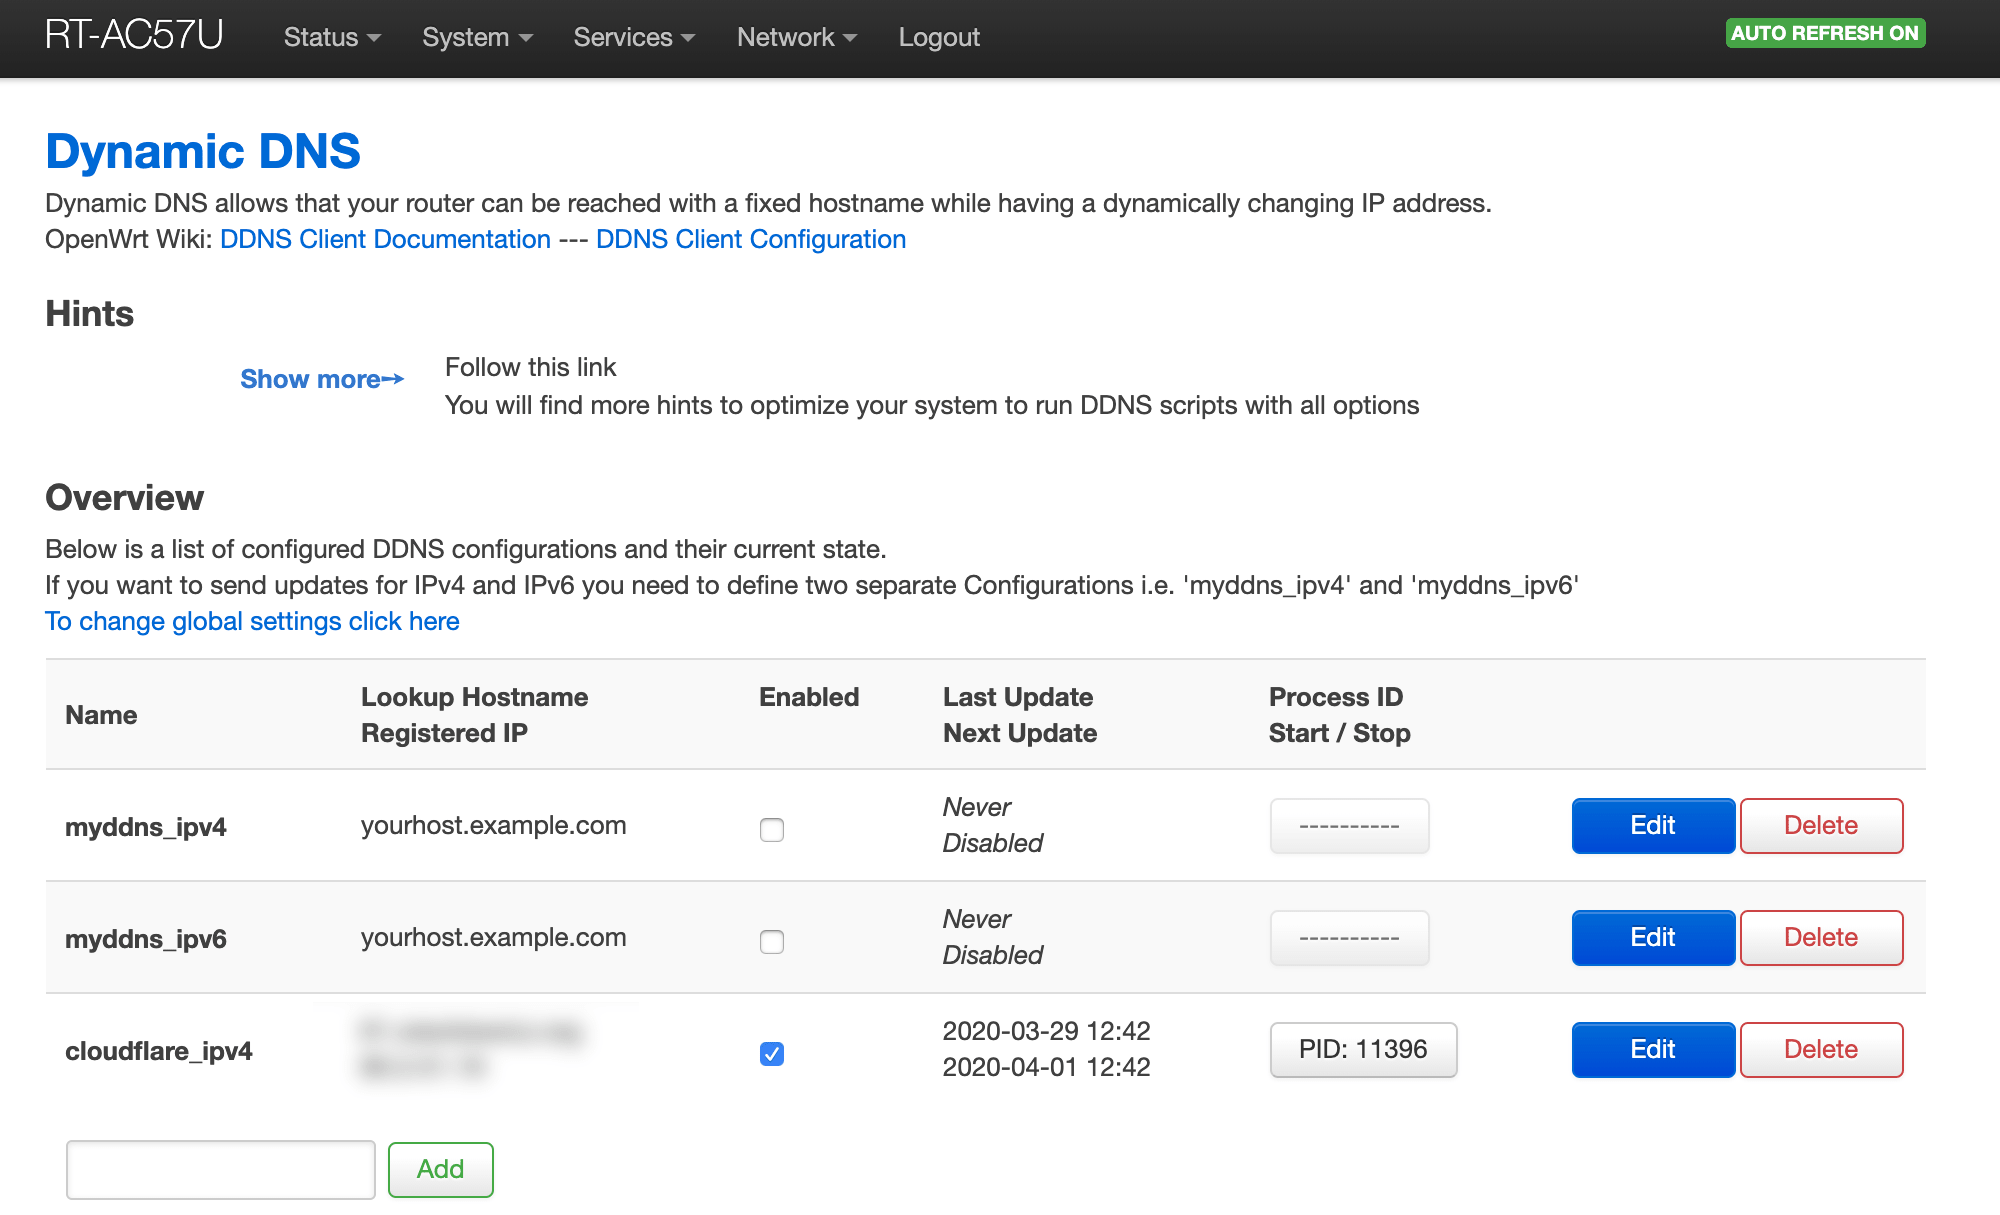
To check if everything is working, we can execute the ping command
ping vpn.mydomain.somethingOr log in to the Cloudflare admin panel and check what IP address is listed next to our record.
Now, when our address changes, our script will automatically check our external IP address. When it is the same as the one listed in Cloudflare settings, it will wait for the next attempt. When the IP address is different than the one in Cloudflare, it will be automatically refreshed.
But that’s not all…
Communication via secure HTTP (SSL) connection
When setting up our configuration, I skipped the Use HTTP Secure section.
If we want our IP address refresh and all configuration between our router and Cloudflare to be secure/encrypted (highly recommended!), we still need to set up a few things.
First of all, we stop our service that we enabled above by clicking on the PID: xxxx button.
When the service is stopped, I recommend going to Cloudflare and changing our current IP address in the DNS settings, again to some invented one, i.e. 123.123.123.123. Then, after correctly applying the steps below, we will be able to easily verify that everything works and the IP address is being refreshed.
In the next step we can install the ca-certificates package from the control panel or terminal, however this does not always work as it should, so we will use another method.
From the terminal we execute the following command:
mkdir -p /etc/ssl/certs
curl -k -o /etc/ssl/certs/ca-certificates.crt https://curl.se/ca/cacert.pem
W przypadku gdy na początku zdecydowaliśmy się na wykorzystanie wget zamiast curl, powyższa komenda powinna zostać zastąpiona następującą:
mkdir -p /etc/ssl/certs
wget  --no-check-certificate -O /etc/ssl/certs/ca-certificates.crt http://curl.se/ca/cacert.pem
Curl is a good method for updating certificates. If you run it for the first time and don’t have any certificates on your system, it may return an error. Therefore, it is worth using
wgetat the beginning and then relying oncurl.
Then we check if everything works and we have no errors using the command:
curl -I -v https://google.comIf we have an error like:
* Error reading ca cert file /etc/ssl/certs/ca-certificates.crt - mbedTLS: (-0x2180) X509 - The CRT/CRL/CSR format is invalid, e.g. different type expected
curl: (77) Error reading ca cert file /etc/ssl/certs/ca-certificates.crt - mbedTLS: (-0x2180) X509 - The CRT/CRL/CSR format is invalid, e.g. different type expected
It is likely that the certificates were not correctly retrieved by curl. In this case, I recommend downloading them using the method with wget.
We proceed to configure our previously set cloudflare_ipv4 configuration in Dynamic DNS.
Click the edit button.
In the basic settings select Use HTTP Secure and click Save & Apply.
We run our configuration using the Start button (as before).
We check if our IP address has refreshed as in the previous step. If we did everything correctly, everything should work and we should see our IP address.
You can stop at this point.
If you have set up an additional Internet connection, as per my post Adding a second internet connection to a router with OpenWrt, read on to learn how to correctly set the rules so that the IP refresh only takes place via the connection we have designated for this purpose.
Support multiple internet connections with DDNS
If you have configured your router to support two (or more) internet connections, especially in a mode where the primary fails over (4G in my case) and is automatically started, you may not want the DDNS domain assigned to the IP address from the second connection, especially if the second one does not have a direct, external IP address.
In this case we need to slightly modify our Policies and Rules in mwan3.
First we add a Policy policy that will only use the main connection. In my case I named it wan_only and set Members used to only wan_m1_w1.
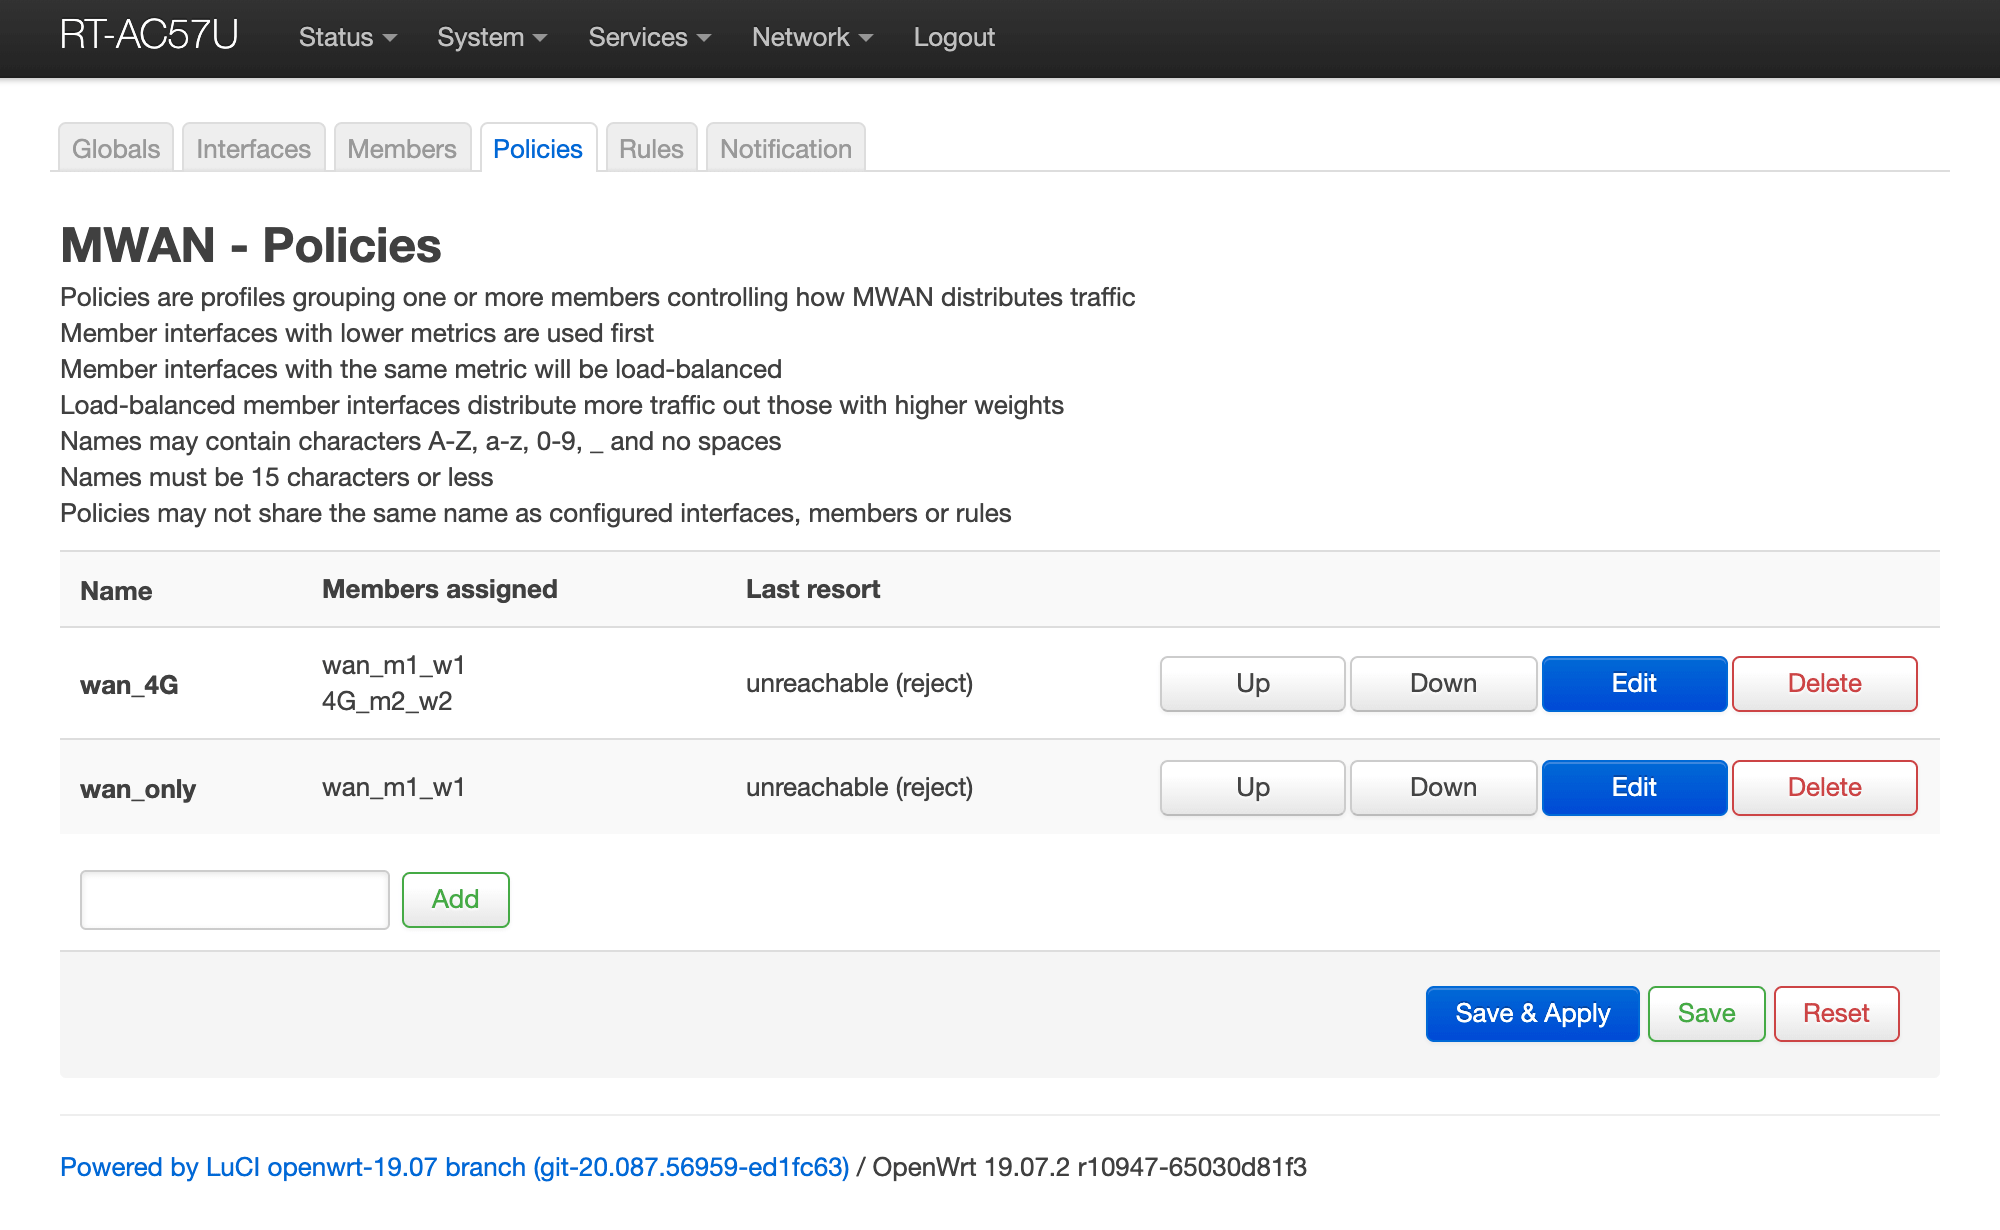
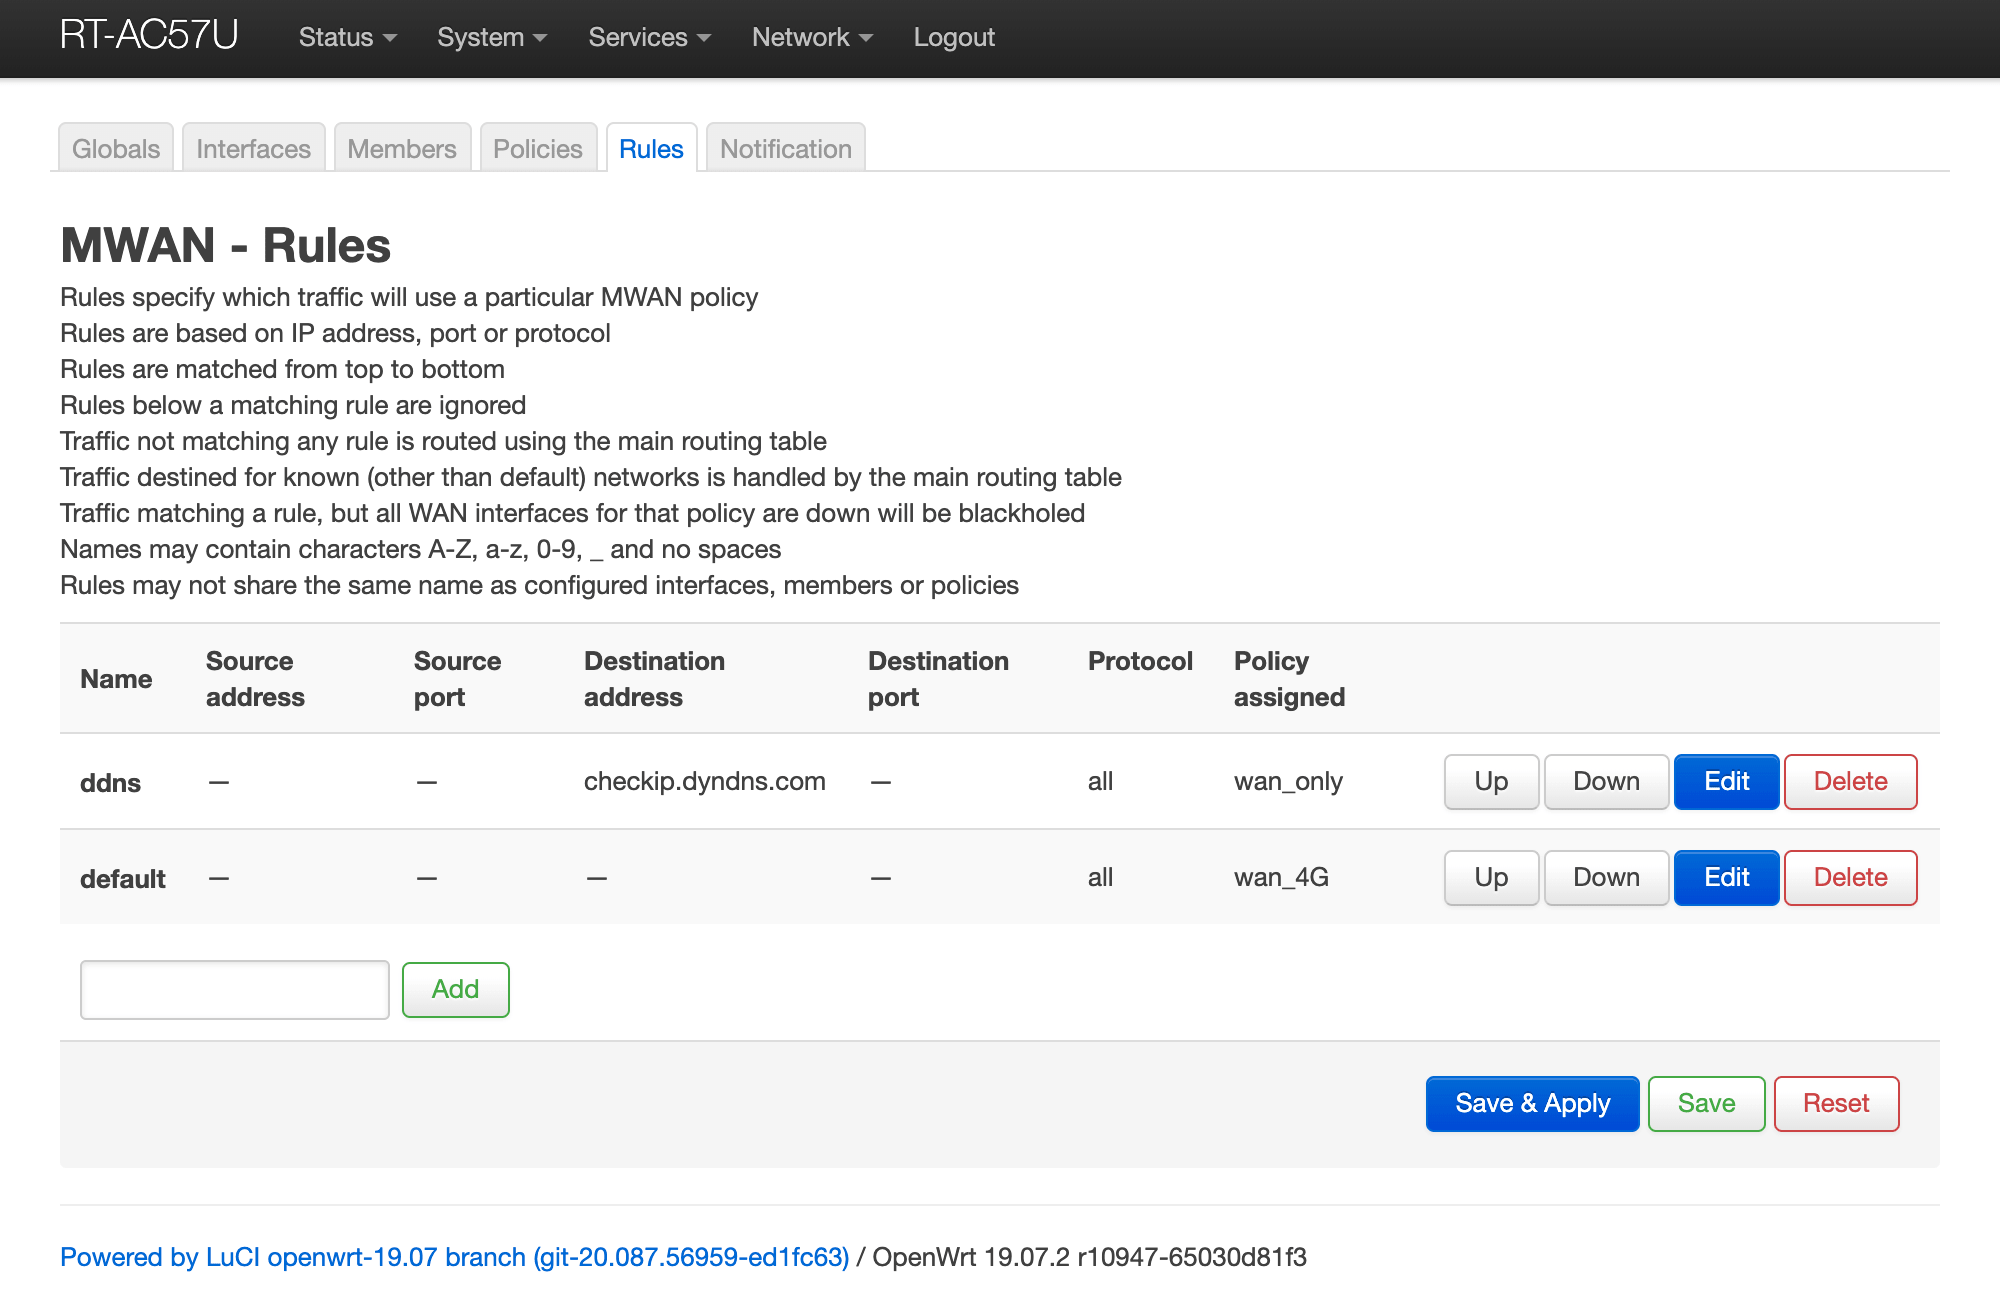
Next in Rules I added a rule called ddns.
In its settings I only specified Destination address to checkip.dyndns.com and policy assigned to wan_only.
All that’s left is to move the ddns rule to the very top of the list so that it’s used first.
Support for multiple internet connections with DDNS (when the above solution does not work)
In mwan3 version on OpenWrt 22.03 and newer, it is not possible to set the domain address in the rule (Rule) (here checkip.dyndns.com).
In this case the configuration returns a problem (Expecting: valid IP address or prefix).
Therefore, we cannot use the above method, but there is a solution.
Assuming that our connection has a permanent private IP address (in my case 192.168.8.2), by setting an appropriate rule (Rule) in mwan3 and preparing a simple script that will read our external IP address through a given interface (in my case 4G), we configure ddns appropriately to bypass these restrictions.
In the example with the Script option we will use the website icanhazip.com.
First, let’s check if we can correctly read the IP address from the terminal with the following command:
curl --interface 192.168.8.2 'http://icanhazip.com'In response, we should read our IP address, just as if we had visited this site directly from a browser using the above link.
If everything works, it’s time to prepare our script, which we will call getIP_4G and save directly to the /root folder.
printf "curl --interface 192.168.8.2 'http://icanhazip.com'" > getIP_4GTo make it run, we add execution permissions and run it for verification.
chmod +x getIP_4G
./getIP_4G
Now we are ready to configure the rest on the router side from a web browser.
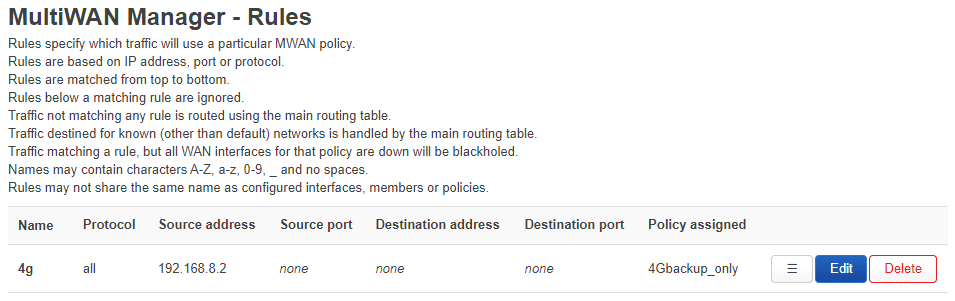
First, in the mwan3 settings (Network > MultiWAN Manager) we add a rule (Rule), in which the address from which we will communicate is the private address of our interface (in my case 192.168.8.2). We leave the rest blank by default, and as a policy we select communication only through our target interface (in my case 4Gbackup_only).
Now we move on to configuring our domain (Services > Dynamic DNS).
When editing (Edit) our configuration, we go to the advances settings tab and change the source of our IP address (IP address source) from the previously selected URL to a script (Script).
In the Script field below we enter the location of our script that we created earlier.
/root/getIP_4G
We save the changes (Save) and confirm everything with the Save & Apply button.
If our configuration was already running, then we click the Reload button to reload it, or the Start button to run it.
And so we should get our external IP address using the Script method.
To check this, by clicking the Edit button, going to the Log File Viewer tab and reading the log (by clicking Read / Reread log file) we should see something like this:
 104831       : #> /root/getIP_4G >/var/run/ddns/cf_dynamic.dat 2>/var/run/ddns/cf_dynamic.err
 104832       : Local IP '188.30.29.121' detected via script '/root/getIP_4G'
 104832       : Update needed - L: '188.30.29.121' <> R: '123.123.123.123'
 104832       : parsing script '/usr/lib/ddns/update_cloudflare_com_v4.sh'
...
 104835  info : Update successful - IP '188.30.29.121' send
 104835       : Waiting 600 seconds (Check Interval)
Automatic certificate update
Just like OpenWrt software, certificates also need to be refreshed from time to time. Therefore, it is worth adding a command to the schedule (Scheduled Tasks) that will do it for us from time to time (once a month).
Going to System > Scheduled Tasks we add the following line:
For curl
00 3 1 * * /usr/bin/curl -k --silent --remote-name --time-cond /etc/ssl/certs/ca-certificates.crt -o /etc/ssl/certs/ca-certificates.crt https://curl.se/ca/cacert.pem >/dev/null 2>&1For wget
00 3 1 * * /usr/bin/wget -q --timestamping --no-check-certificate -O /etc/ssl/certs/ca-certificates.crt http://curl.se/ca/cacert.pem >/dev/null 2>&1This will cause curl/wget to compare file to the file being downloaded, and if the file being downloaded is newer, it will be downloaded and updated. If the file is the same, the download will be ignored until the next time.
The OpenWrt built-in wget does not have an option to check the time (–timestamping) for files, to do this you need to install the latest version:
apk update
apk add wget
The whole thing will go live on the first day of every month at 3am.
I hope the above post was useful. I encourage you to add a comment if you have any problems.
Best regards.
Credits


Comments & Reactions