Filtered, Secure DNS with Cloudflare One, Zero Trust and OpenWrt
Cloudflare, let’s be honest, is an incredibly generous organization, offering a range of services that we rarely have to pay for. Individuals, families, small or medium-sized businesses can use their technology without having to spend money unless they need to.
Among the range of services, DNS servers (1.1.1.1) and DNS encryption service deserve recognition. In combination with their software available on a range of platforms, not only can we speed up our internet surfing, but we can also increase our security.
OpenWrt on the other hand is an incredible software designed to increase the security of our network device, which is the router, and also adds the ability to expand the capabilities of our hardware.
By combining Cloudflare with OpenWrt software and an additional software package, we can introduce Secure DNS to our network, which I wrote about some time ago.
Moreover, when we need to access our local network resources from anywhere in the world, we can use the Cloudflare Zero Trust service by creating a secure tunnel.
Zero Trust, offered as part of our Cloudflare account (and in the free version), is not just a “VPN” tunnel. Zero Trust also offers a number of other options. One of them is the ability to create “your own” secure DNS server.
Just like 1.1.1.1 without much configuration, it can secure our DNS queries, it doesn’t allow us to enter anything else.
On the DNS side, additional restrictions, security measures, or blockings can be introduced. This happens, not necessarily with our consent, when we use DNS servers provided by our Internet service provider.
What if we wanted to introduce these types of restrictions on our network, except that we would decide what is blocked and what is not?
We already have secure DNS using Cloudflare (1.1.1.1) and OpenWrt. If we have our Zero Trust tunnel set up, then we already have some of the infrastructure in place that will allow us to gain more control on our end.
Secure DNS from Cloudflare (1.1.1.1) by default will not block any sites that spread hate, share pornography, sell drugs or weapons to anyone. The Internet is a place where we can have a good time, but just like in real life, we can also encounter its dark side.
In the case of companies (but also within your household), we cannot afford for our employees to use the equipment entrusted to them for purposes that could expose us to serious legal consequences. Therefore, most companies have a so-called IT policy in place, informing their employees about the possibility of monitoring and blocking undesirable behavior.
While monitoring is not a problem, blocking may require additional procedures, hardware or specific software. What if I told you that the solution is within reach thanks to Zero Trust.
Well, as part of Zero Trust, we can set up our own secure DNS, which will be operated by Cloudflare, just like with the 1.1.1.1 service. As part of it, we will be able to add rules that allow us to block some of the Internet traffic, from the DNS level, that could expose us to serious consequences.
All of this is possible with the ability to manage in the Zero Trust (Cloudflare One) panel and track what’s happening. Plus, all of this is available for free (at least for our basic needs).
If our employee has a gambling problem and instead of working, he spends time (wasting his own and the company’s money) on betting, we can block it.
If another employee visits sites that could expose their device (that they use) or themselves to becoming a victim of phishing or other similar threats, we can also prevent this by introducing appropriate restrictions.
Of course, any restrictions are as good as the rules that are introduced to block them. The Internet evolves every day and they (the rules) have to be updated a little bit. It would be nice if we didn’t have to worry about this, but we would leave it to professionals.
And that’s where the fun is. Using available solutions, we will secure our network, specify what we want to block, and the rest will be taken care of by professionals - Cloudflare. Here’s how we can do it.
Below I will describe a method to implement filtered, secure DNS on the side of our OpenWrt router, however, it does not mean that this is the only method.
If our router does not have the ability to enhance it with OpenWrt software, we can still use the possibilities offered by Cloudflare.
In the case of devices using different connections, outside our home network, we can also implement the offered solution through dedicated applications, modifying network settings or changing our browser settings.
While I will mainly focus on the OpenWrt router, I will touch on other available solutions at the end. Since I have described some of the steps in my other posts about OpenWrt, I will not repeat myself too much, but I will refer to them in the appropriate step.
Secure DNS Installation
First, we need to install DNS over HTTPS support on our OpenWrt router according to the guide.
At this stage, we should have Secure DNS set using Cloudflare (1.1.1.1) and Google (8.8.8.8).
If everything works as I described in the link above, we can continue the fun.
Go to Cloudflare Zero Trust.
When we have a permanent (external) IP address (version 4)
If our router has a fixed IP address, we can use it to obtain additional IP addresses (version 4) for DNS servers, which we can set on our router interfaces. This is to protect DNS query leaks. When our encrypted DNS is not working, then by default our device will use the DNS addresses associated with the service, which will continue to filter queries.
First, go to the Gateway > DNS Locations tab.
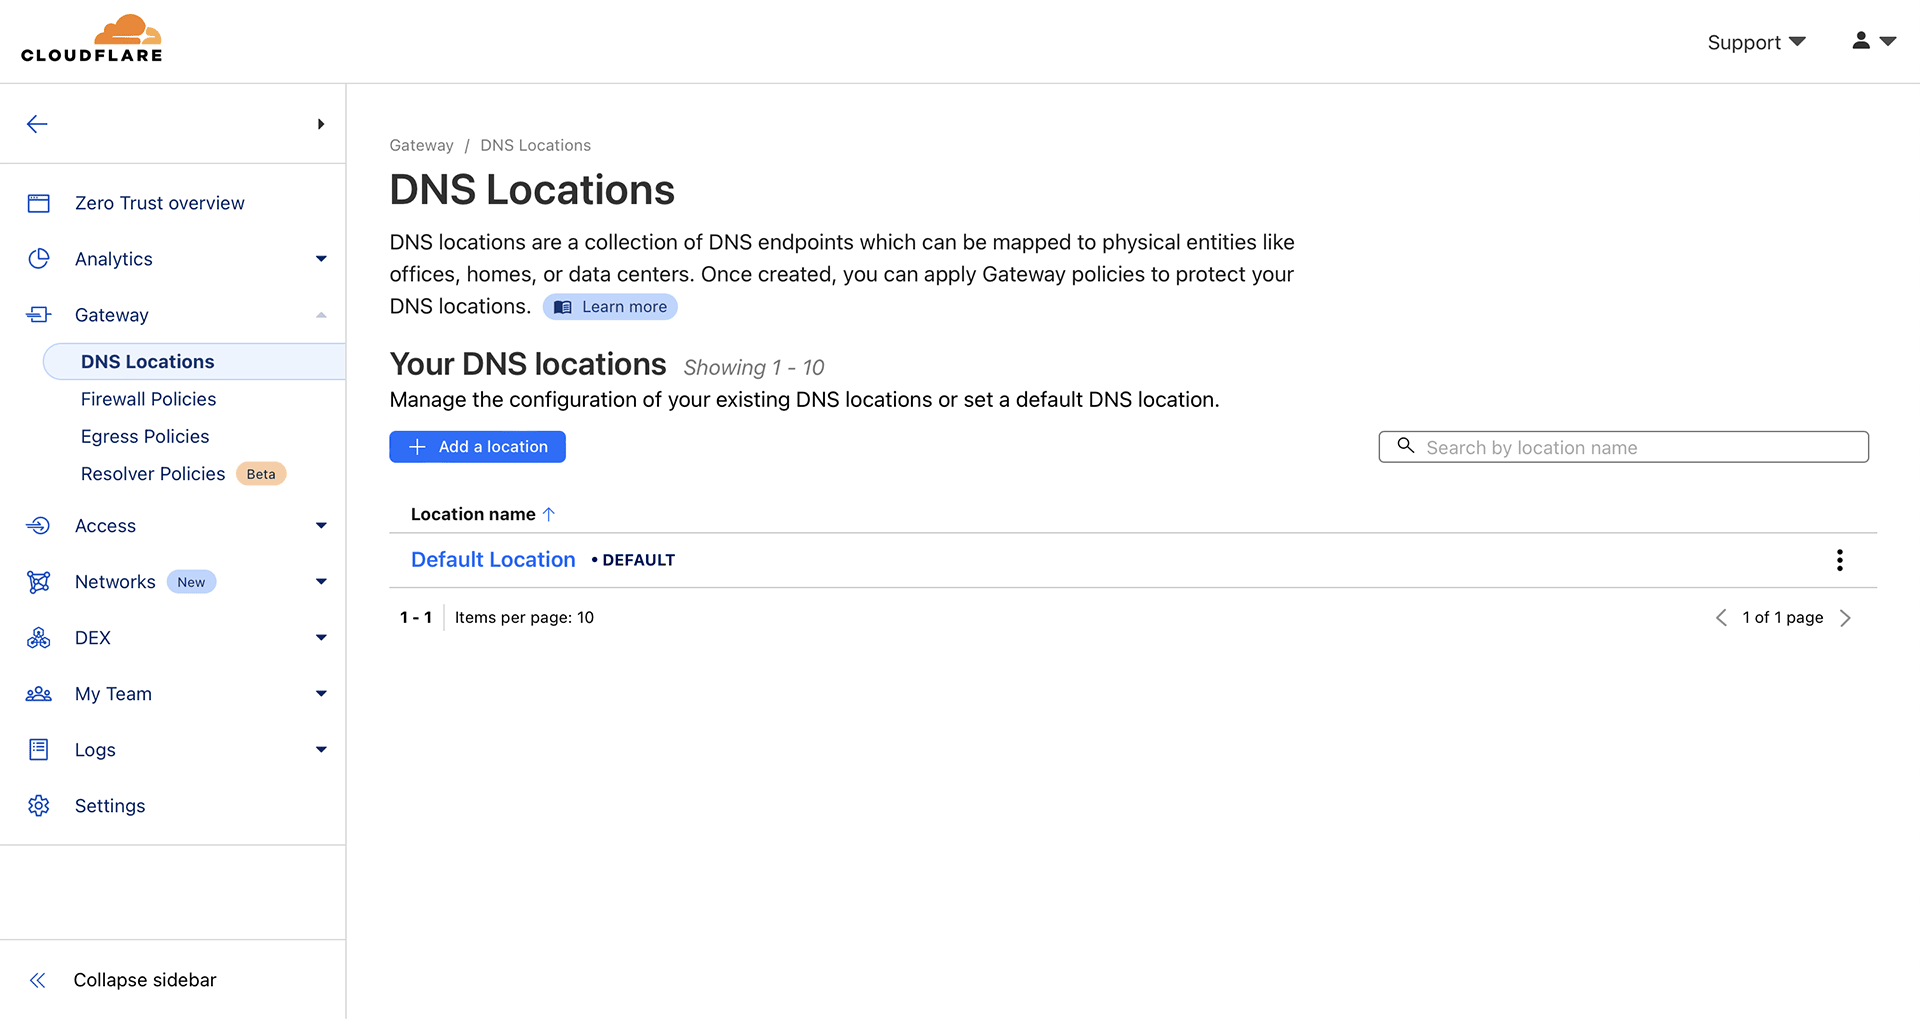
There we will already have the Default Location set, which we need to modify.
Click on the three dots on the right and select the option Edit.
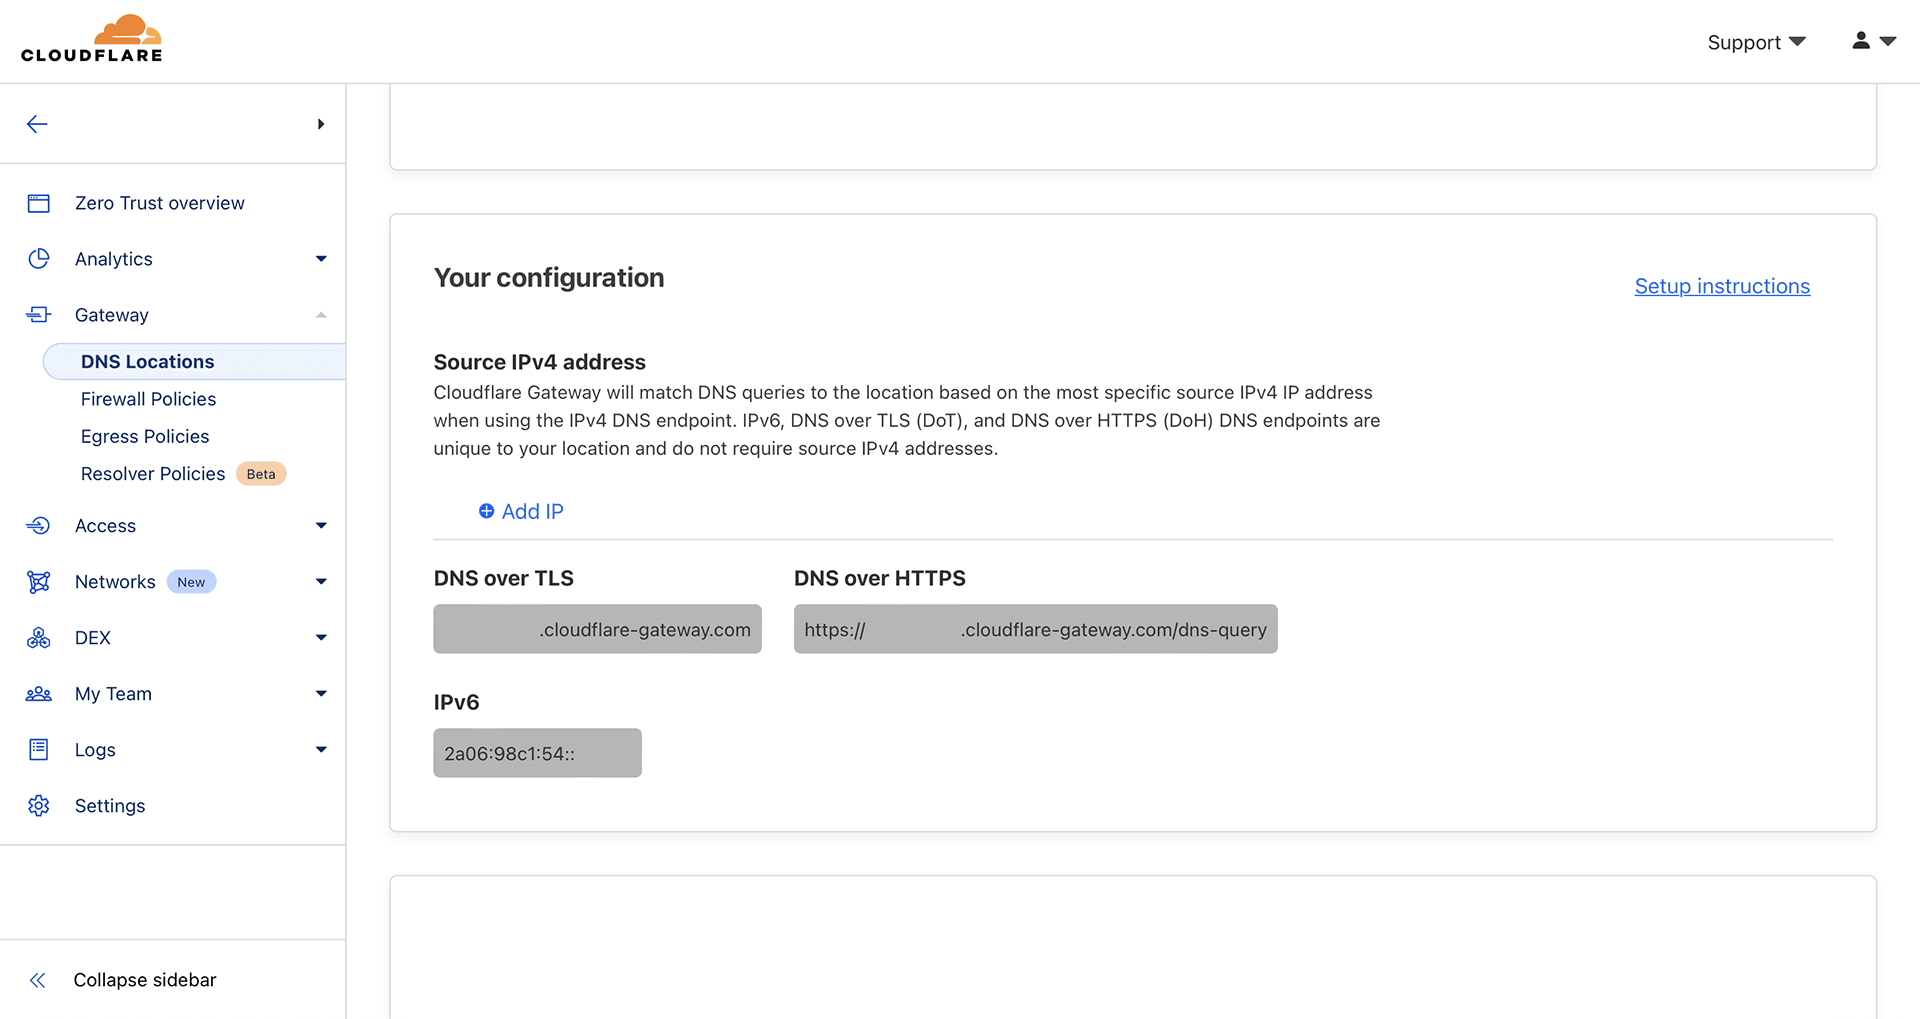
In the Endpoint protection tab, you can select IPv4 endpoint filtering and location matching by IP address. When we click on it, we should get our external IP address.
This step is optional. Turning this on will resolve DNS queries only by the source IPv4 addresses added below. DNS queries will match the location with the most specific source IP network. If you have a dynamic IP or more than one connection on your router, skip that step.
To make sure that this address is correct, let’s log into our router via SSH and execute the following command:
curl -s 'http://icanhazip.com'Sometimes it may happen that we have a secure DNS enabled, e.g. Cloudflare Warp, or we use Apple Private Relay and our original IP is filtered. DNS over HTTPS installed on our router can also affect this. During the setup it may be necessary to temporarily disable this service.
At this point we will save our configuration.
If we do not have a static IP address, or we don’t want to turn on IPv4 endpoint filtering and location matching, we also need to turn off IPv4 DNS in the DNS endpoints tab, which is a shared IP address. We will lose the option to use the below Individual address for configuring Secure DNS over IPv4 (unless you upgrade your Cloudflare Plan), but we will still have DNS over HTTPS, which can be more than enough.
Individual address for configuring Secure DNS
Go to Gateway > DNS Locations and click on Default Location.
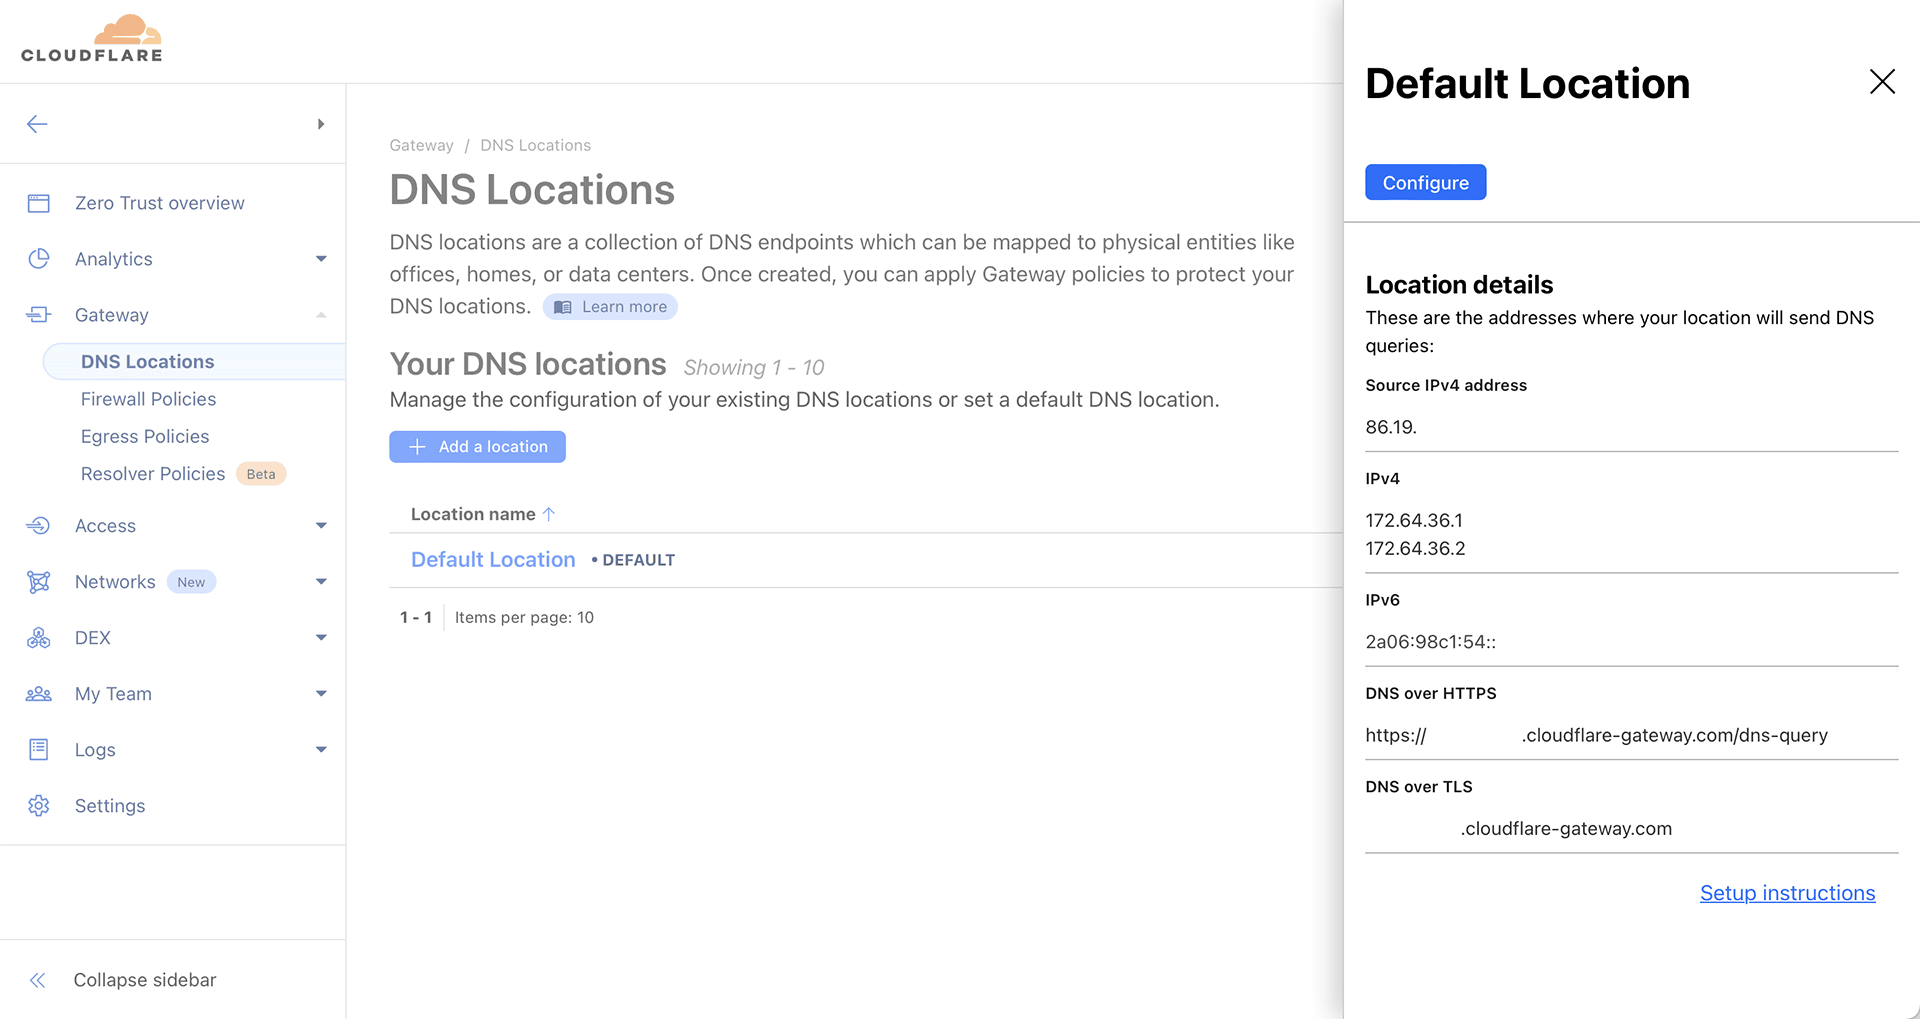
In the window that will appear on the right, we will see the addresses assigned to us.
If we have and have set our fixed IP address in the default location, as I described in the previous step, in the IPv4 section we will see the addresses of our DNS, which we will need in the next step (typically 172.64.36.1 and 172.64.36.2)
In the IPv6 section we will get the IP address of the DNS version 6 server assigned to us (in the form 2a06:98c1:54::)
In the DNS over HTTPS section we will receive a link to the configuration of a secure DNS server (in the form of https://{unique_link}.cloudflare-gateway.com/dns-query), which we will use on our router.
We will need all this in the next stage of configuration.
OpenWrt Router Setup - HTTPS DNS Proxy
We log in to our router from a web browser and go to Services > HTTPS DNS Proxy.
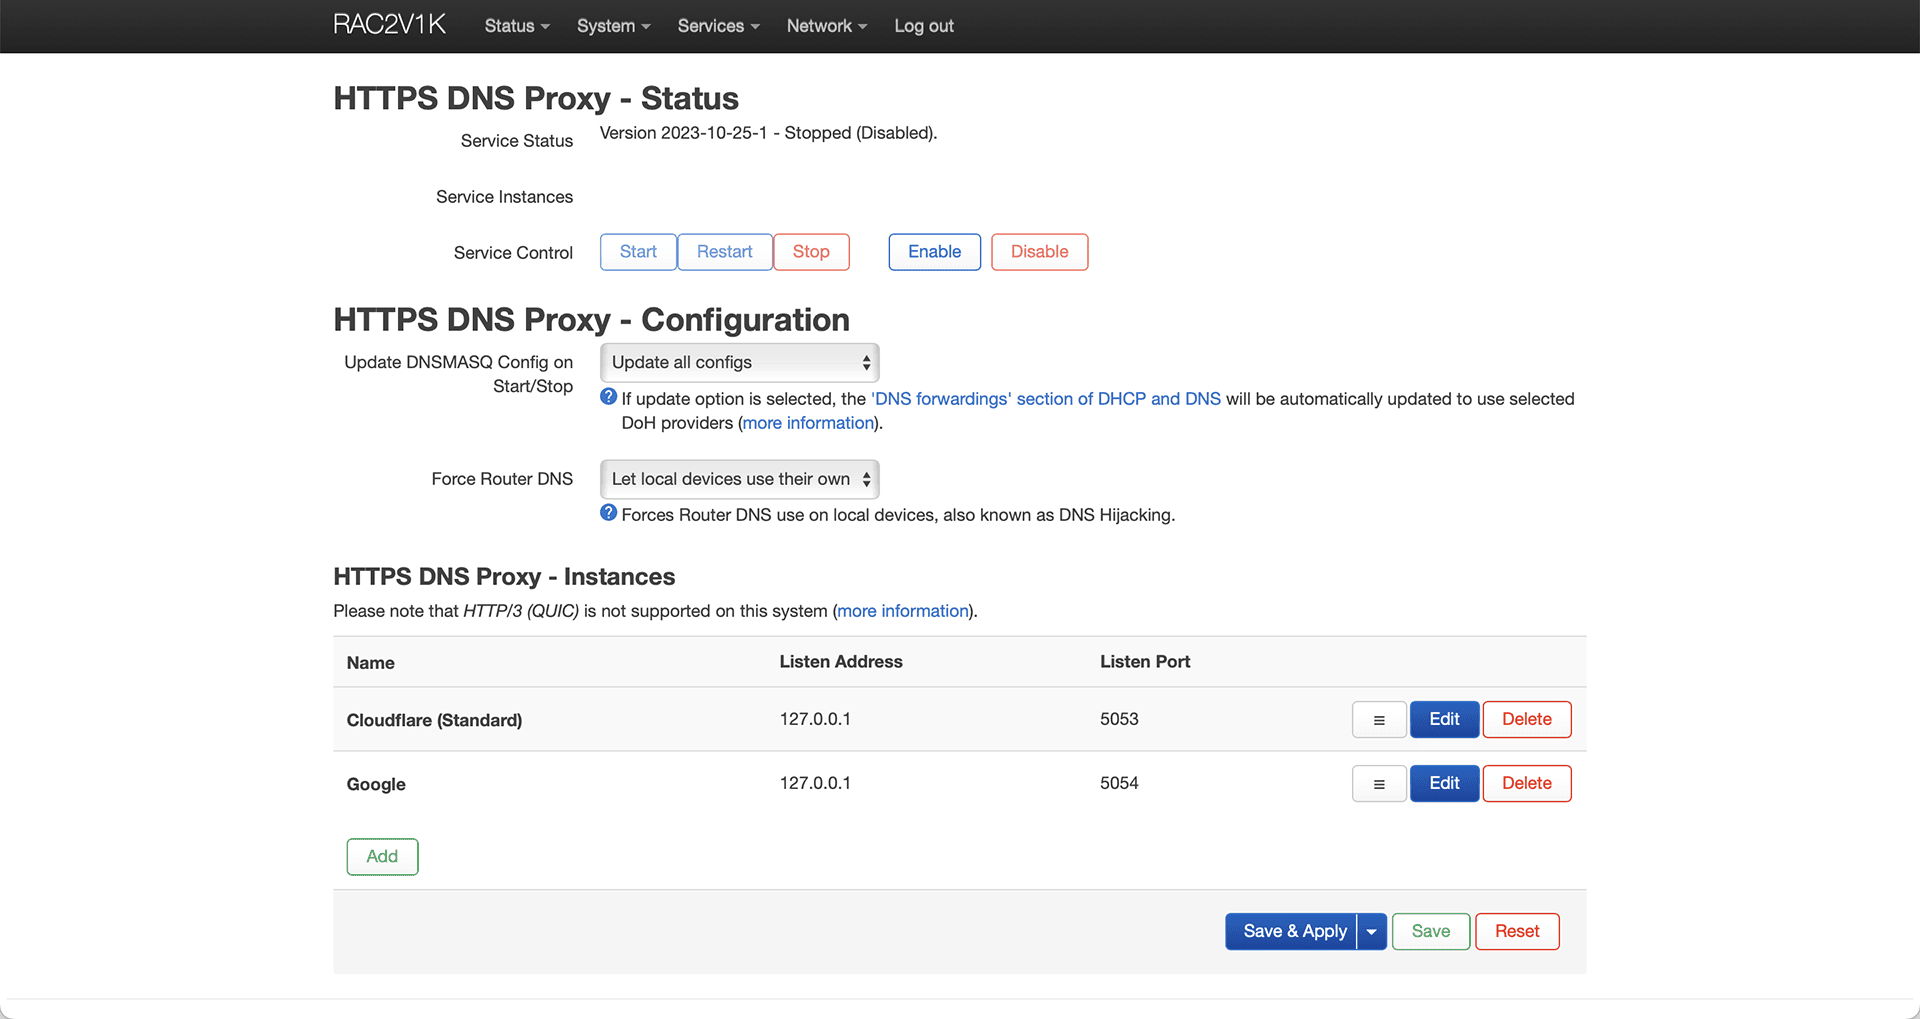
In the HTTPS DNS Proxy – Instances section, remove the default Cloudflare (Standard) and Google using the Delete button on the right.
Then click the “add” button (Add) and from the service provider (Provider) select the option at the very bottom of the list – custom (Custom).
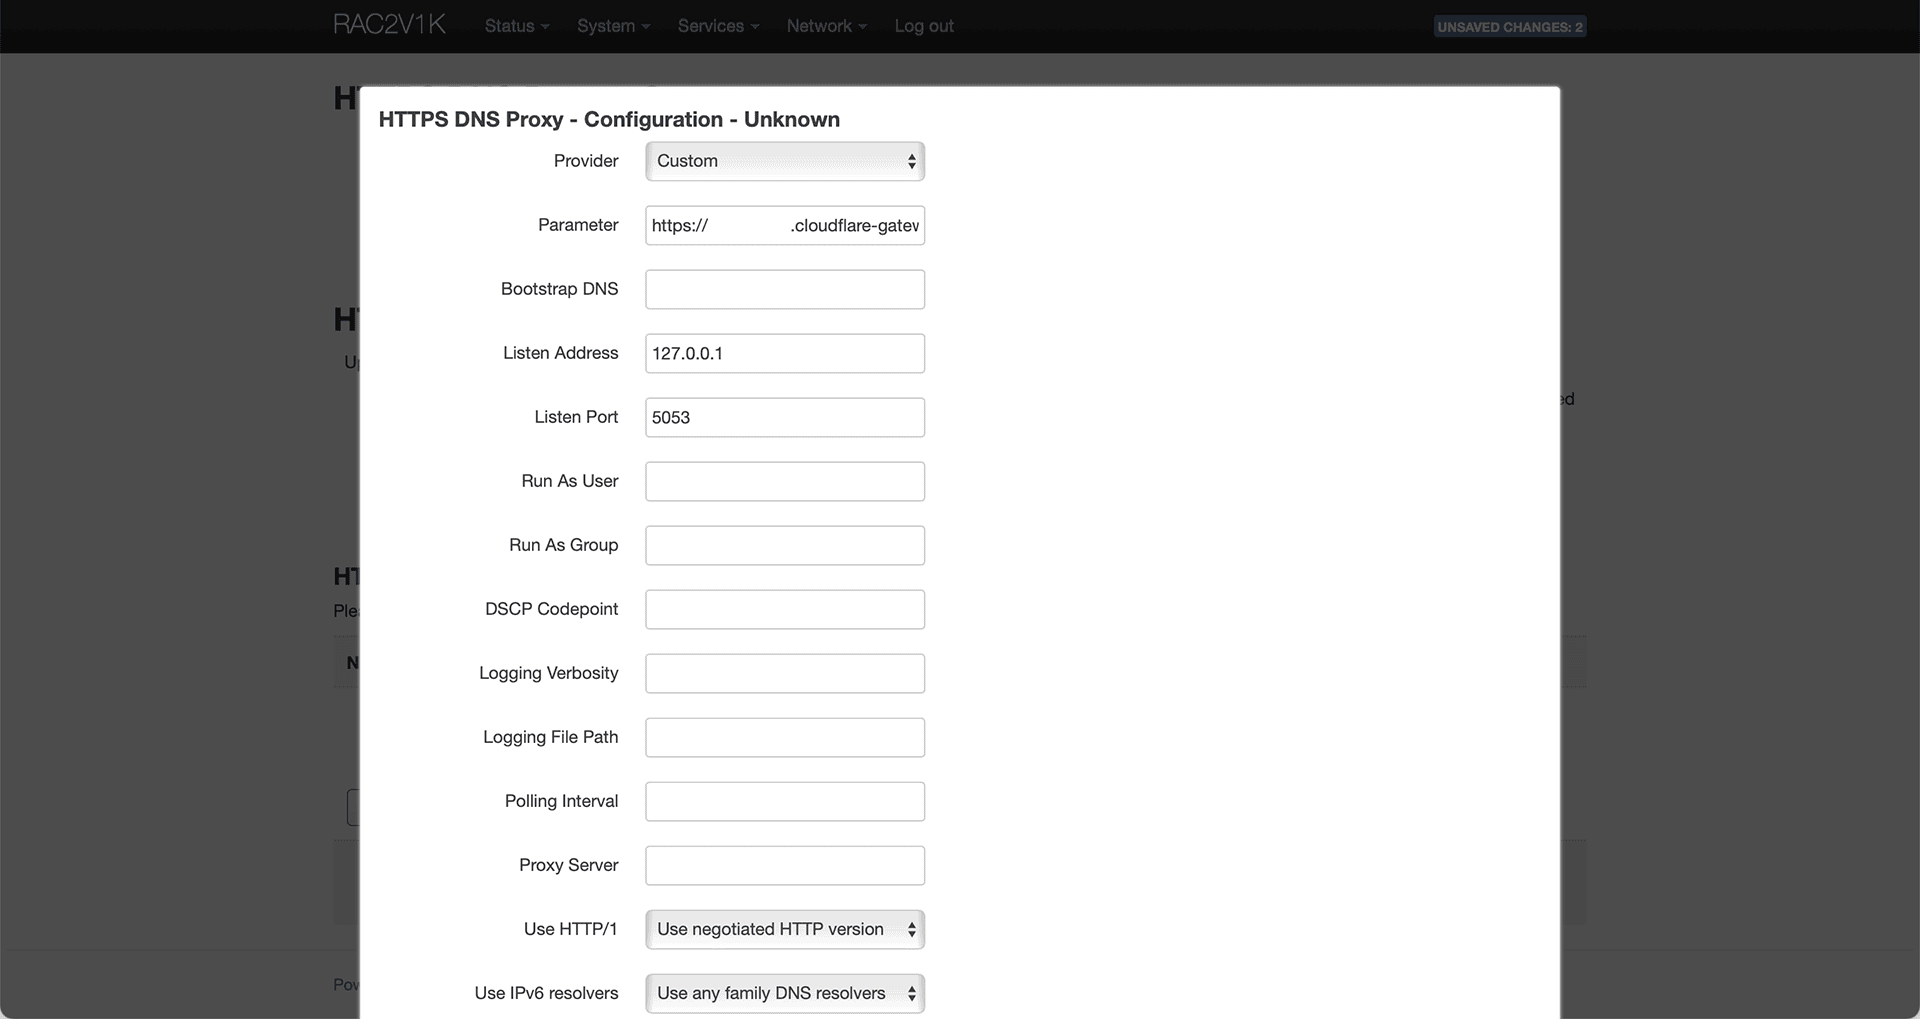
In the parameter section (Parameter) we paste the address that we read earlier in the DNS over HTTPS section on the Cloudflare side.
https://{unique_link}.cloudflare-gateway.com/dns-queryWe leave the listening address 127.0.0.1 and port 5053 as suggested.
Personally, I prefer to specify (type) it there.
Then click the green Save button.
On the next screen I click Save & Apply.
If our ISP also provides us with an IPv6 address, then it’s worth adding, similarly to the above setup, a DNS response over IPv6. Then, we add the same configuration, on the same listening port (
5053), but enter::1in the listening address.
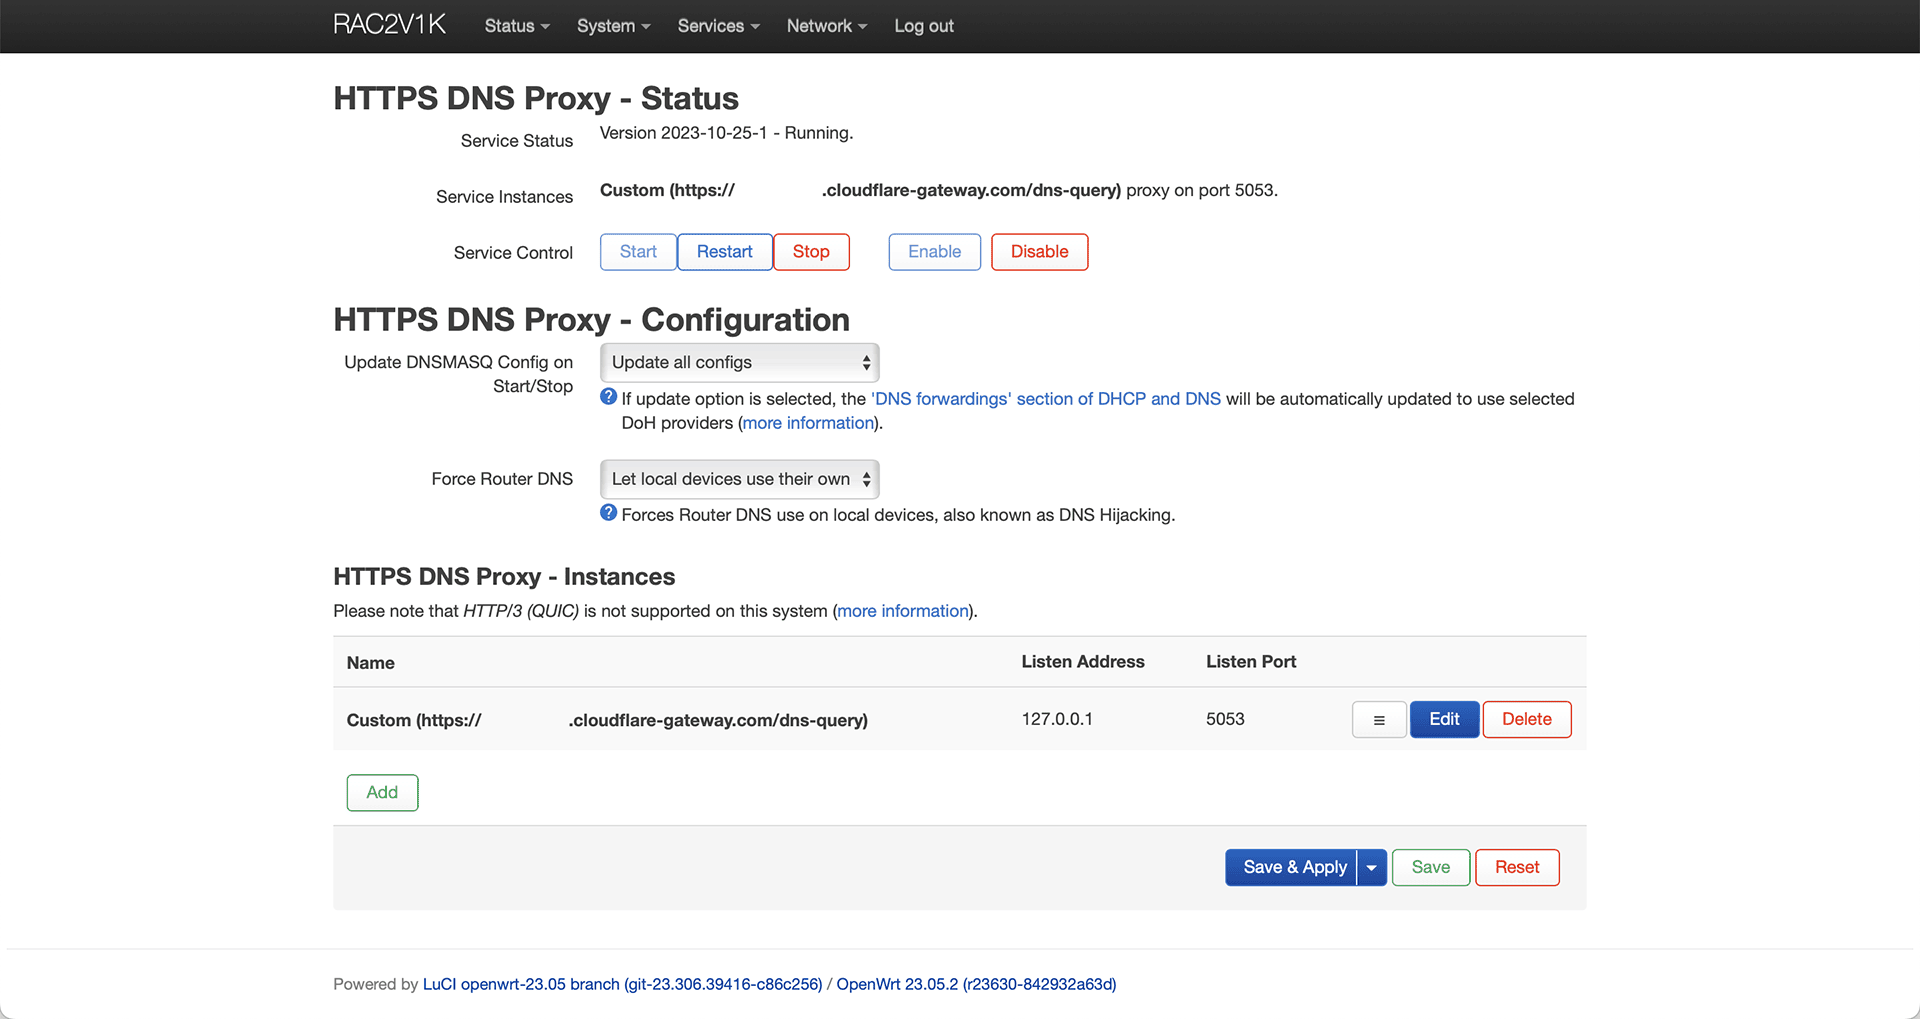
Finally, we make sure that our HTTPS DNS Proxy service is enabled (Enabled) in the Service Control section and started (Start).
This way, our personal secure DNS was enabled and we gained the ability to filter on the Cloudflare Zero Trust side, which I will discuss in a moment.
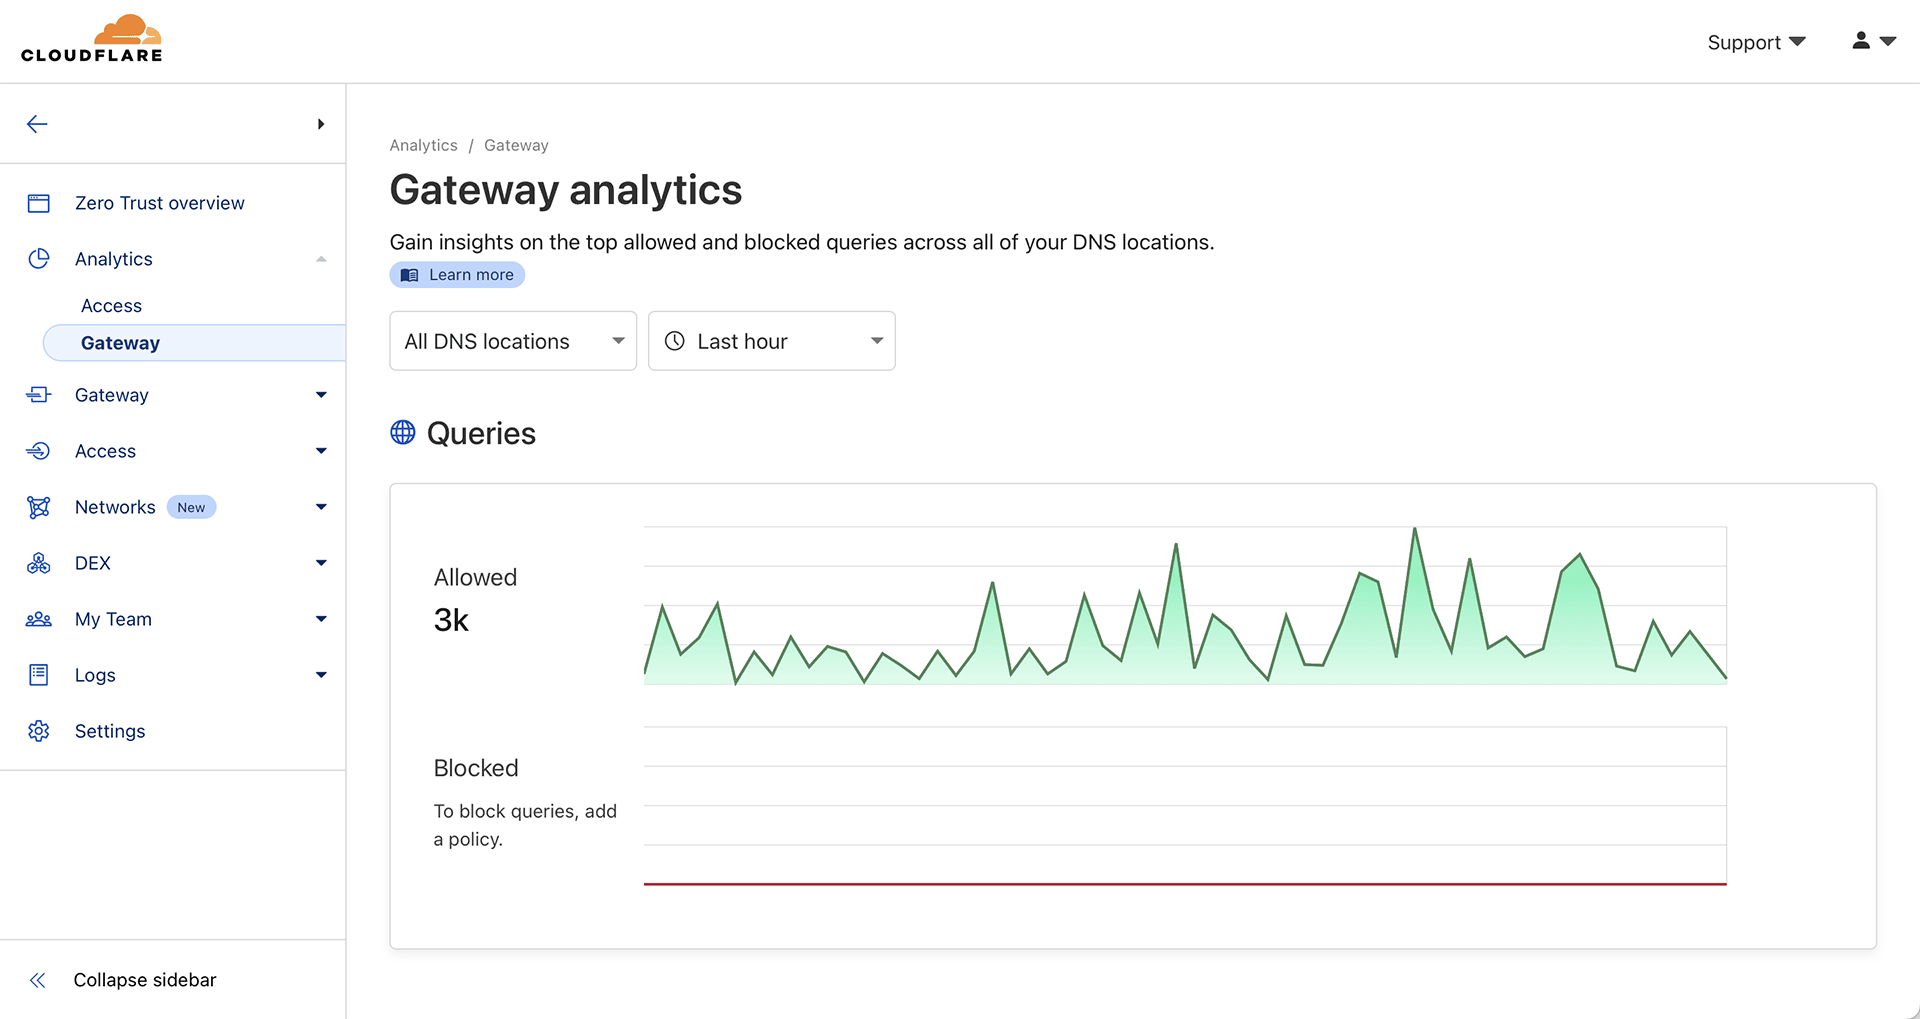
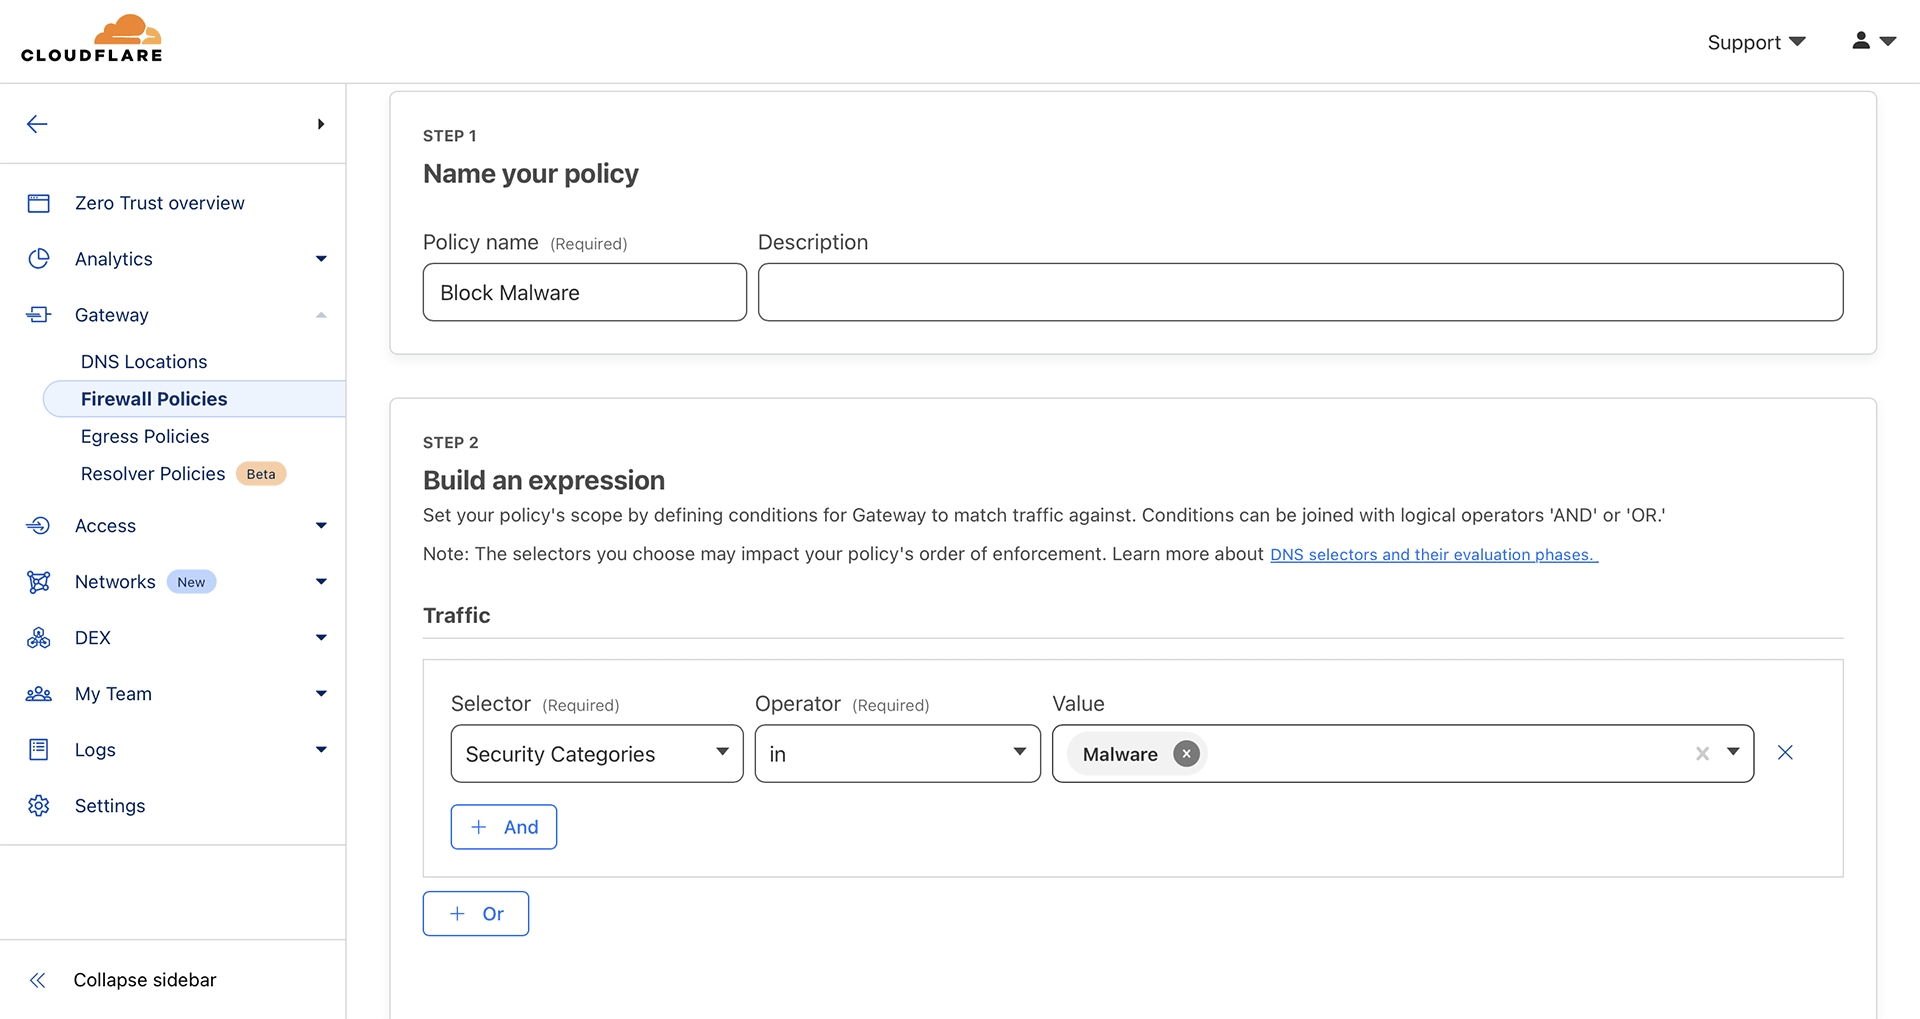
We can see that our DNS queries go through our personal secure DNS server in the Analytics > Gateway section on the Cloudflare Zero Trust page.
OpenWrt Router Setup - Network Interfaces
Our DNS queries work securely when our HTTPS DNS Proxy service is up and running. In case it goes down or stops working for some reason, it’s a good idea to have a backup plan.
If we have a permanent external IP address, it is worth using the DNS addresses obtained in the IPv4 and IPv6 sections.
To do this, in the administration panel of our router, go to the Network > Interfaces tab.
First, we click on the “edit” button (Edit) on our wan internet connection.
In the Use custom DNS servers field (in the Advanced Settings tab) we enter our DNS servers obtained earlier (172.64.36.1 and 172.64.36.2).
If you don’t see the Use custom DNS servers box, you probably have the Use DNS servers advertised by peer box checked. After unchecking it, you’ll see the option to enter addresses.
We finish by clicking the Save button.
Similarly, we change our wan6 interface with the IPv6 DNS address obtained during configuration (optional).
Additionally, we enter the IPv4 and IPv6 addresses (both) in the lan interface configuration.
We finish the whole thing by clicking the Save & Apply button.
This way we have everything set up. There is no need to change anything on the side of our clients (users and their devices).
Before we go any further, I recommend enabling one more feature in our HTTPS DNS Proxy package, namely DNS Hijacking.
DNS Hijacking in HTTPS DNS Proxy
Before I continued configuring filtering, I went back to the HTTPS DNS Proxy settings on my router and changed the Force Router DNS setting from Let local devices use their own to Force Router DNS server to all to ensure that all users (devices) were using the same secure DNS server.
Filtering
It’s time to add DNS query filtering for our users and their devices. To do this, we go to the Cloudflare Zero Trust panel.
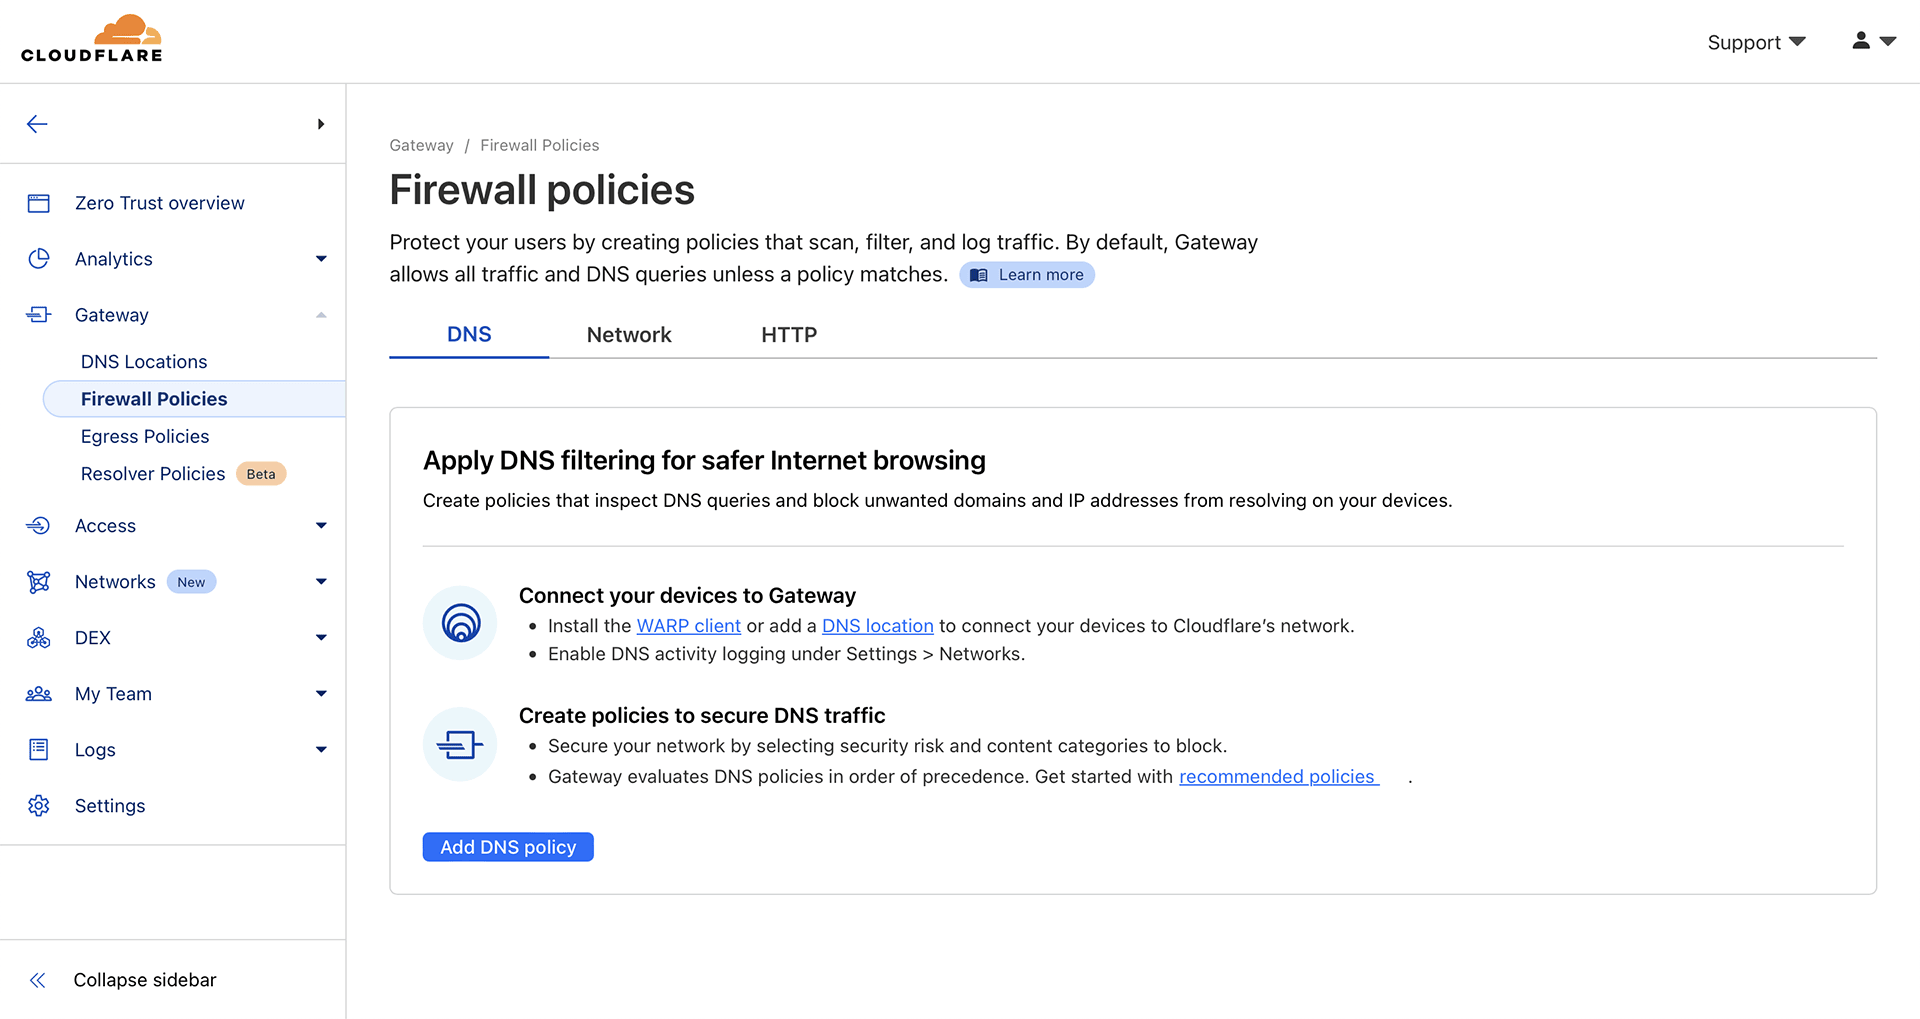
In the Gateway section, we go to Firewall Policies. Here, in the DNS section, we will add our rules.
Cloudflare has different methods of filtering traffic (Selectors). Personally, I will focus on two.
- Security Categories
- Content Categories
Within the security category, we have the ability to block things like traffic classified as Spam, Spyware, Phishing, or Malware.
These are the things we should pay attention to first.
Creating a new rule is very simple. Click the button to add a new rule (Add DNS Policy).
In the first step (Step 1) we enter the name. In the second step (Step 2), and in the part responsible for network traffic (Traffic) we press the button to add a condition that must be met (Add consition).
Then from Selector we select Security Categories. As operator as in (contains), from the Value option we select the type of block, for example Malware.
In the third step (Step 3) we select what should happen when the condition is met. In my case I select “block” (Block).
We finish everything by pressing the button to create a rule Create policy.
In this way, our rule has been enabled and our network traffic is filtered from the DNS server level.
The Content Categories have a few more options, such as blocking pornography, hate, and gambling.
You can read more about each category on the Domain categories page.
While it is possible to enable more than one value (Value) in a single rule, I personally recommend creating each one separately for each value. Sometimes it may happen that we accidentally block something that should not be blocked and by splitting the rules we will be able to track which rule is causing the problem and disable it as needed.
I personally created separate rules for each security category and enabled them in my network. As part of the blocked items analysis I would decide whether the rule worked or if it should be disabled.
Block Analysis and Cloudflare Radar
As your network traffic is analyzed, you can see in real time what is allowed and what is blocked in Analytics > Gateway.
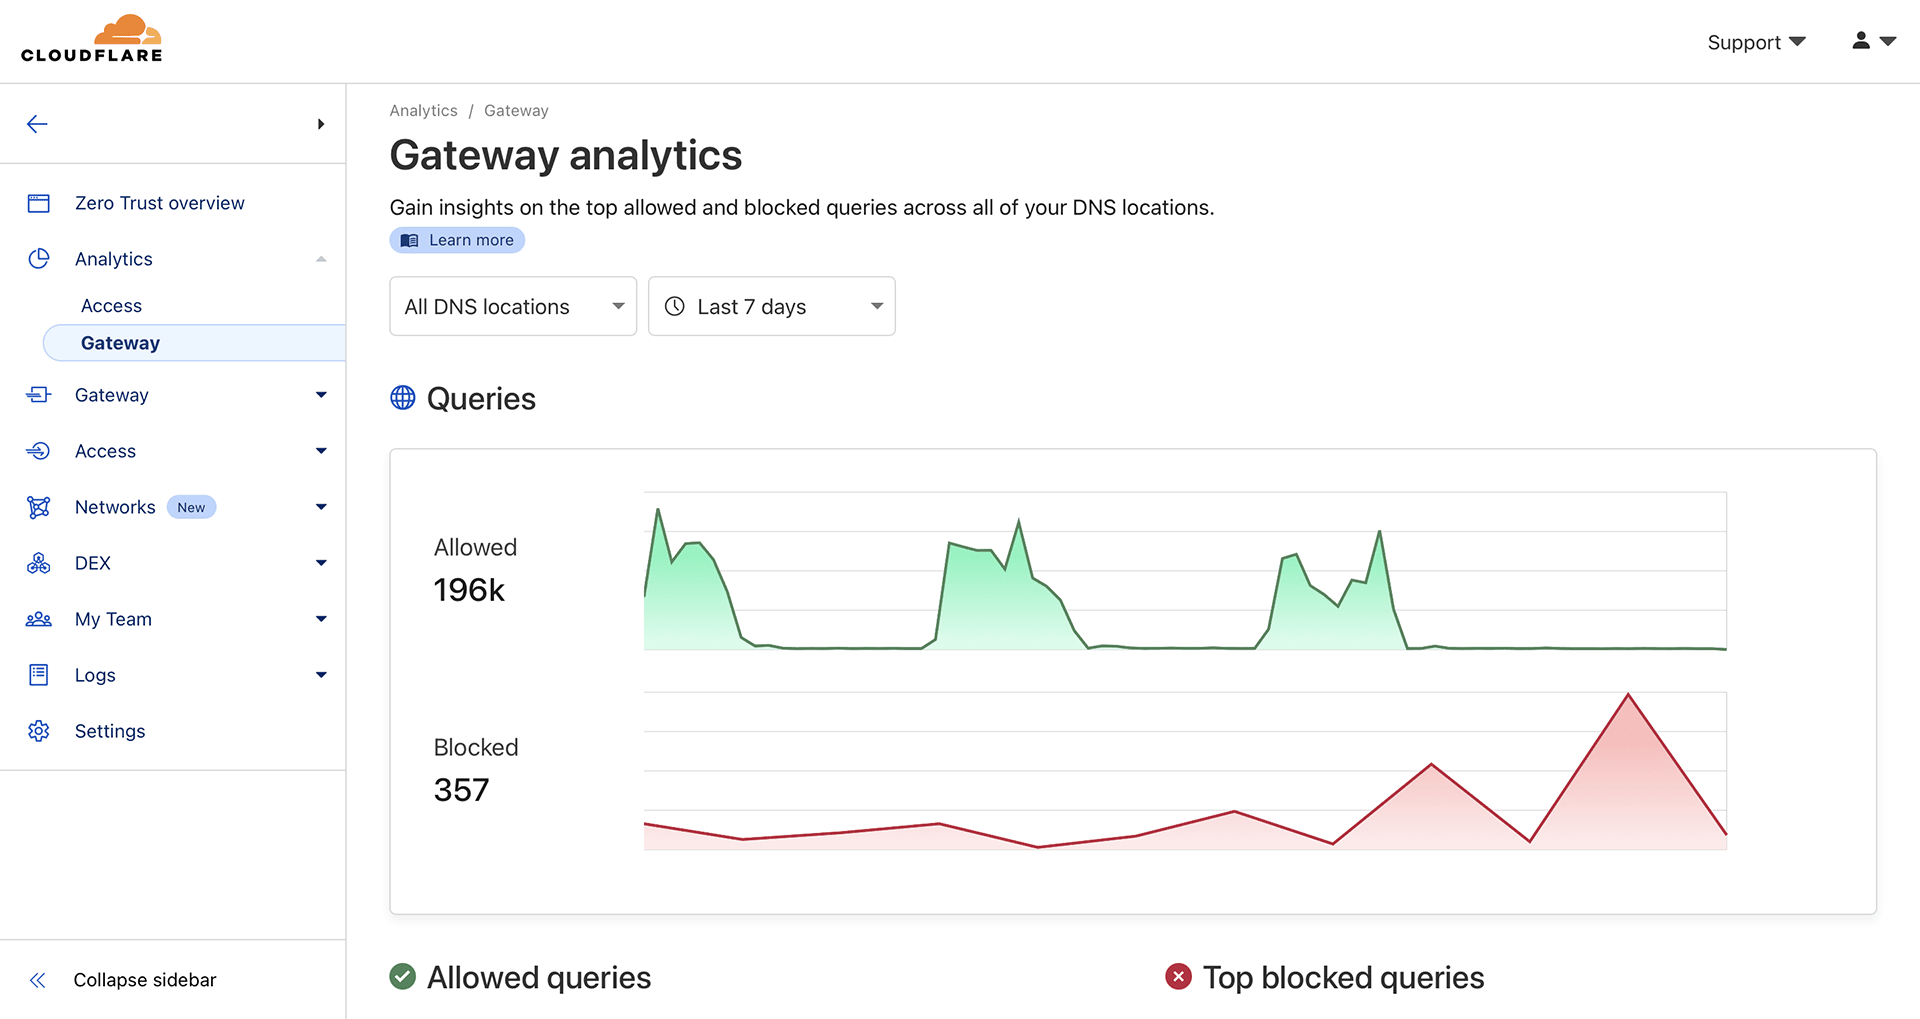
In the appropriate sections, you will be able to see the most frequent and allowed things, as well as the things that were blocked.
Easy-to-read graphs will allow you to analyze traffic in terms of different categories.
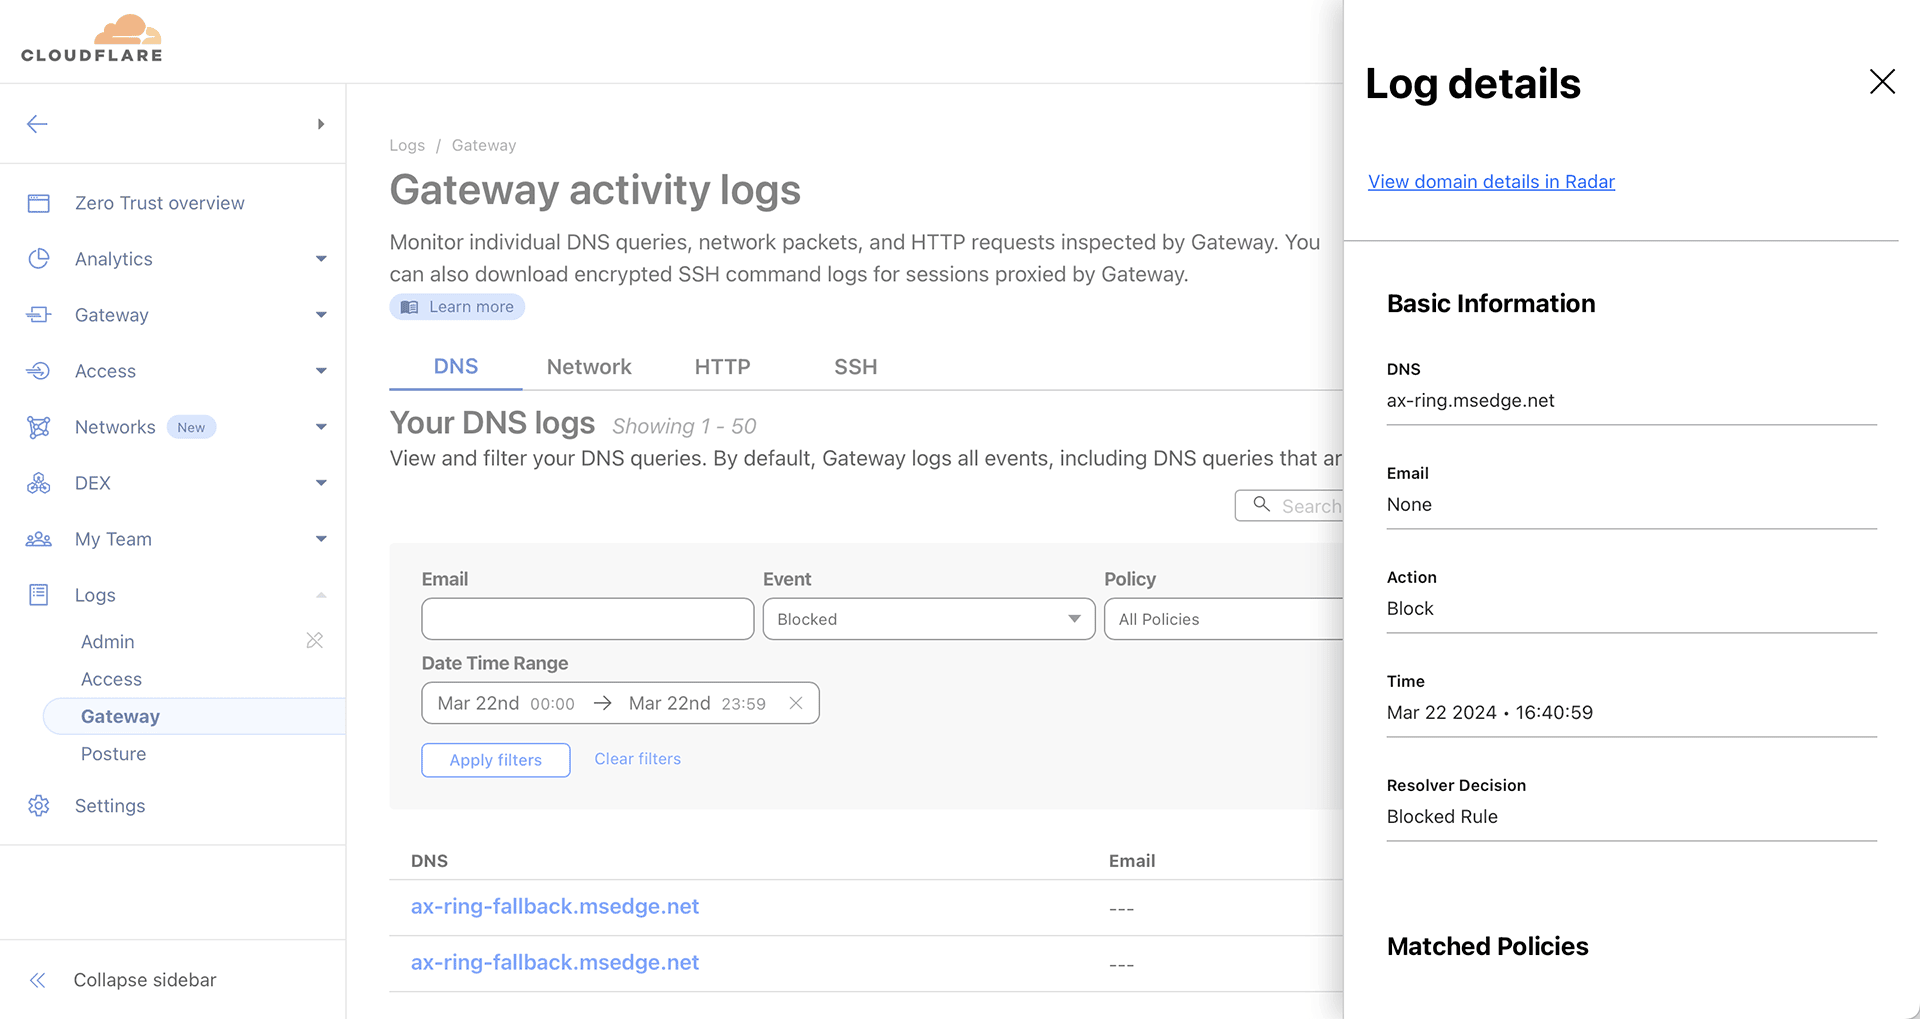
In the Logs > Gateway section you will be able to analyze in detail the elements that were blocked.

By clicking on individual items (domains), you can learn more about the block and which rule was used for this purpose. This is highly useful for analyzing rules that block more than we assumed they would.
An interesting thing is the View domain details in Radar option.
Cloudflare Radar lets you see what category a domain is classified into.
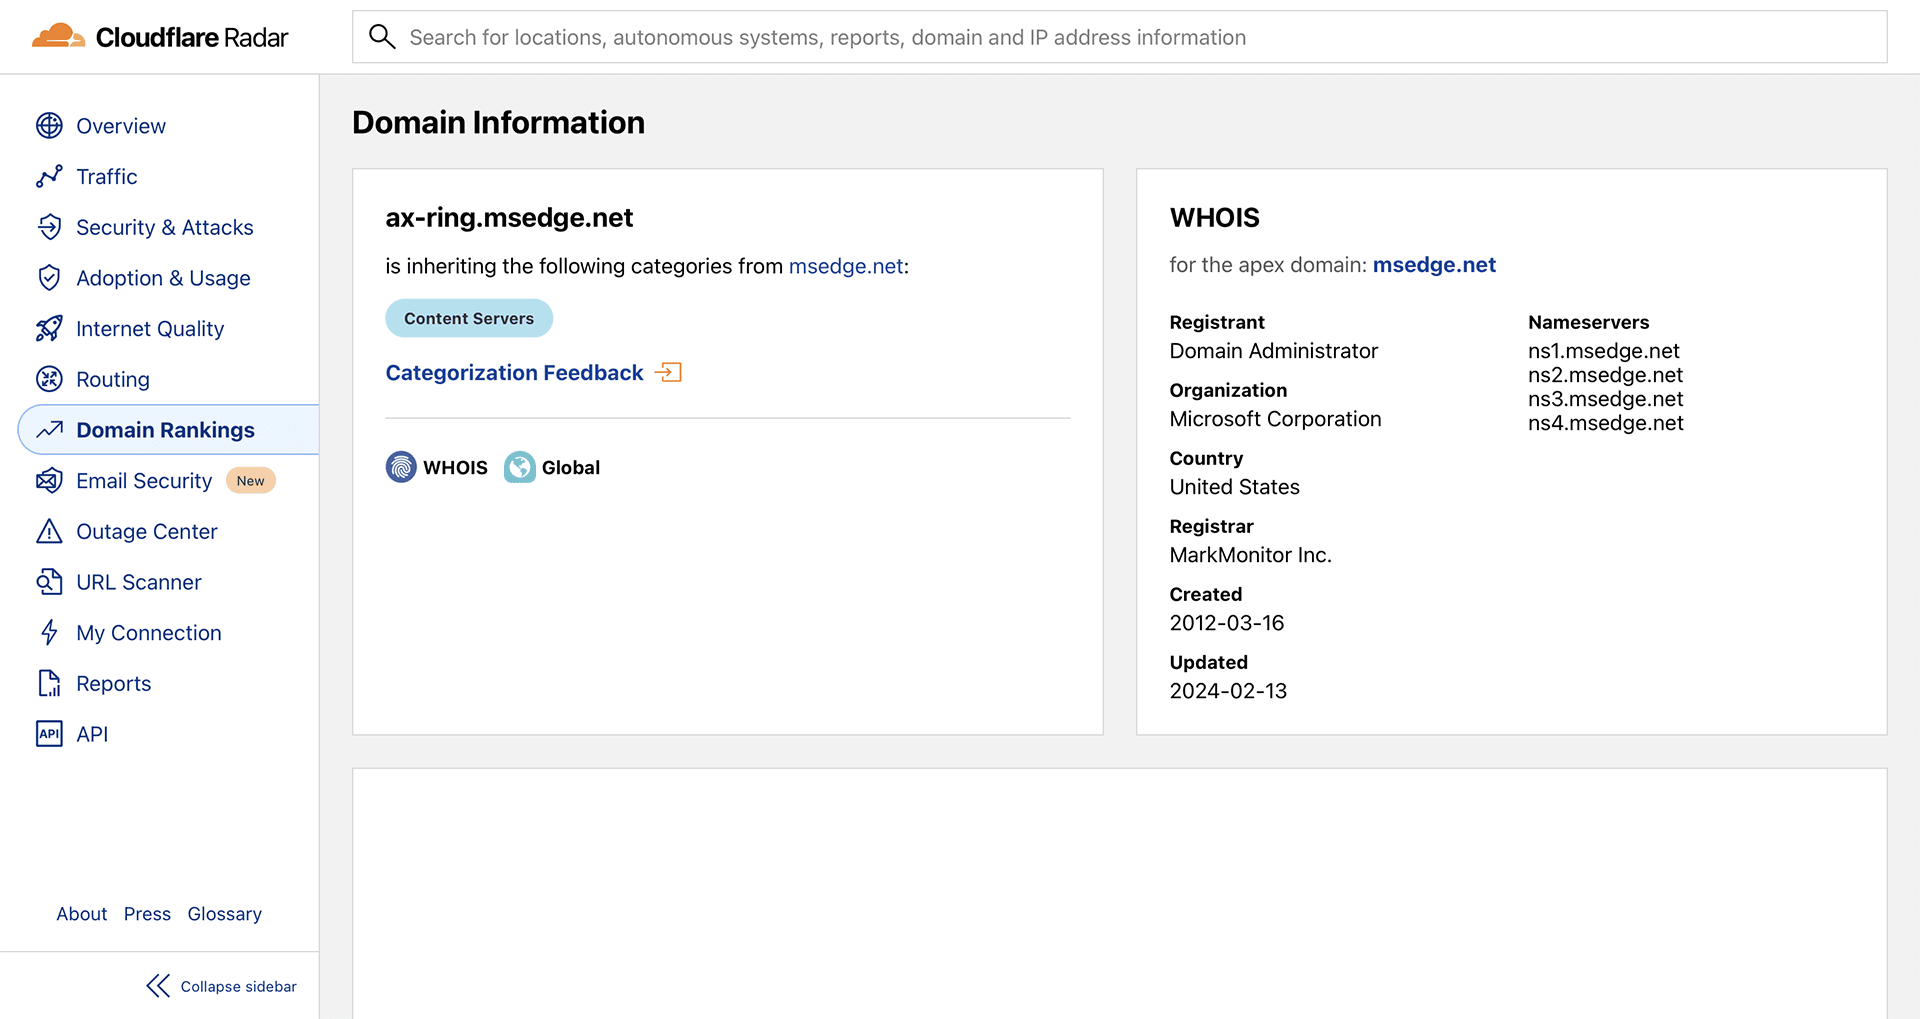
For example, my domain where I host my website is categorized as News & Media, Personal Blogs, and Technology.
If you choose to block any of these categories using Content Categories, you will also block my page.
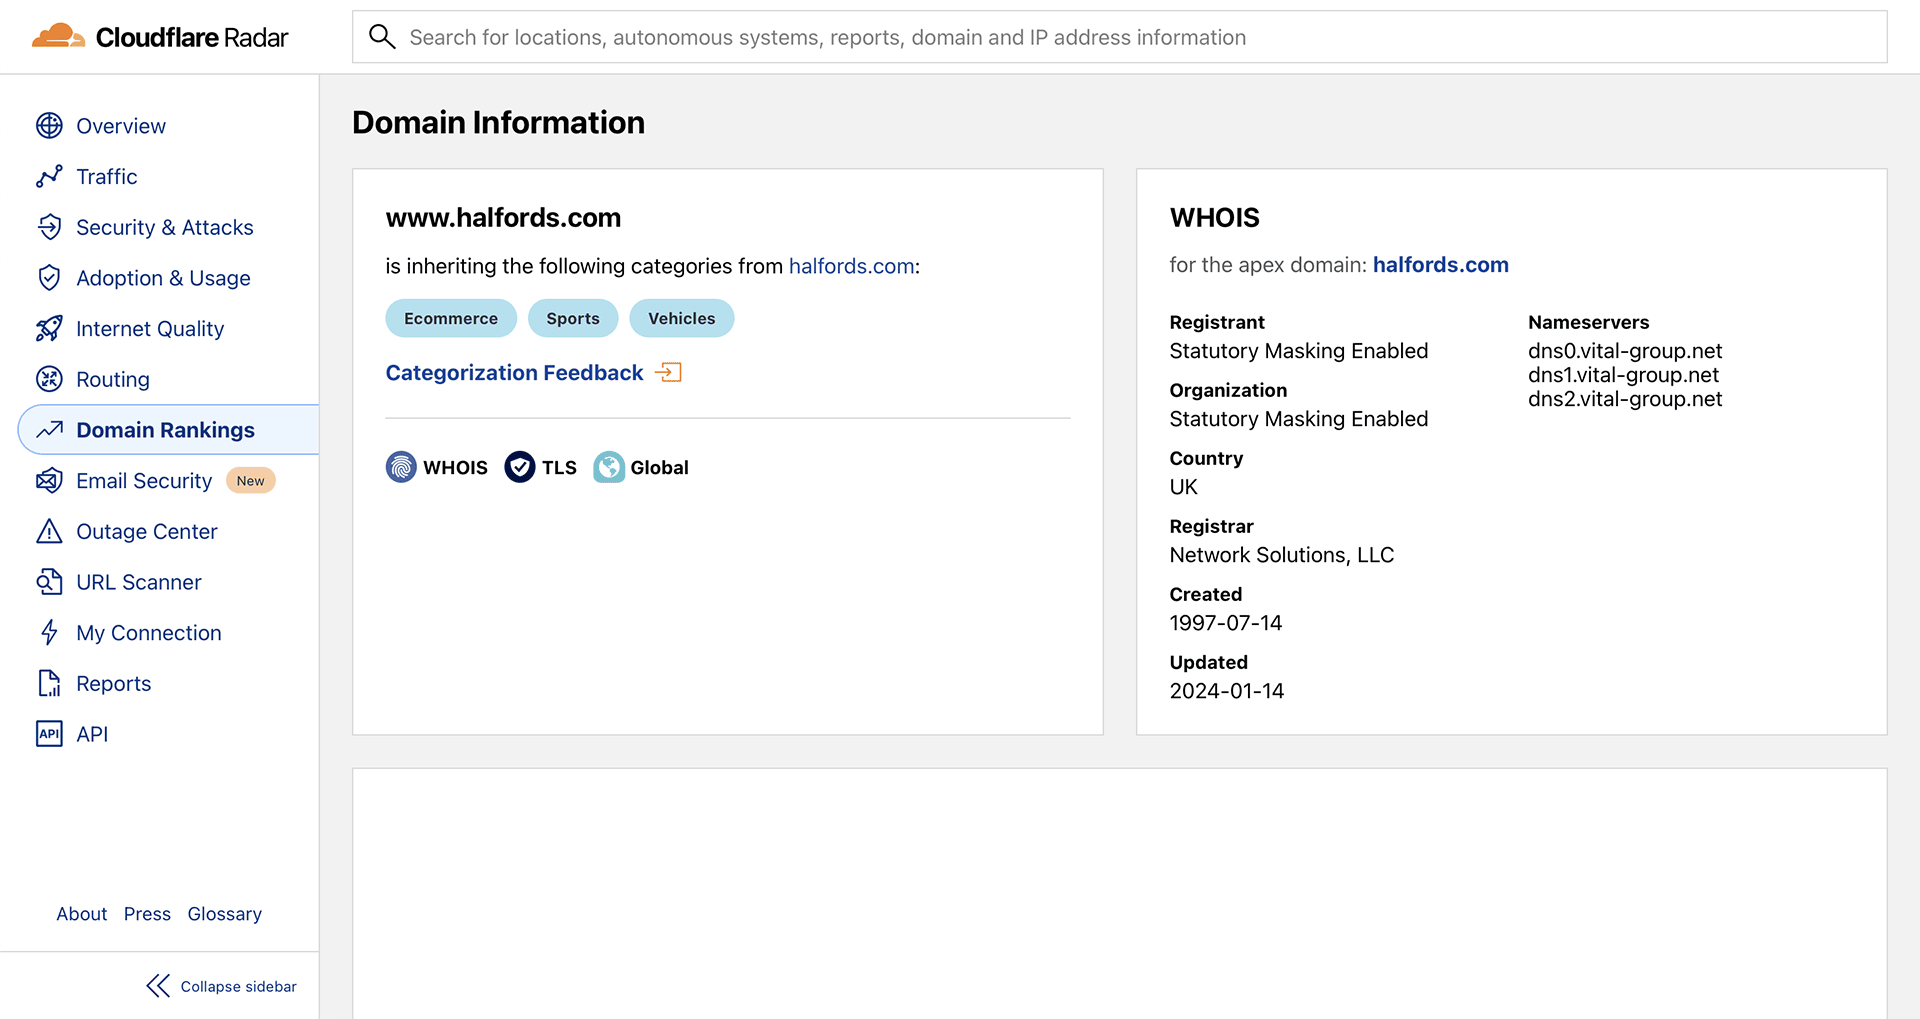
With Cloudflare Radar you can also analyze categories and send a report to Cloudflare via the Categorization Feedback link if a page is incorrectly categorized.
However, don’t expect much action from Cloudflare on your suggestions.
For example, www.halfords.com is tagged as Ecommerce and Vehicles. I can certainly agree with that, but lumping it into Sports is a bit misleading in my opinion.
Configure Filtered Secure DNS in your browser
If we do not have a router that we can configure for secure DNS with filtering, we can configure a web browser for these needs.
For example, Google Chrome (or Chromium-based Microsoft Edge) has an option to use secure DNS (Use secure DNS) in the Privacy and security section.
We can use the options available there or add a custom configuration (Add custom DNS service provider), where we can paste our address that we received at the beginning of our game:
https://{unique_link}.cloudflare-gateway.com/dns-queryIn this way, queries to websites directed from our browser will be safe and filtered according to established rules.
Setting Up Filtered Secure DNS in Windows 11
If we do not have the luxury of an OpenWrt router, and securing the traffic generated by the browser is insufficient, we can secure our DNS queries from Windows 11.
I’m not talking about the ability to add DNS addresses to network interfaces (cards), but about introducing the DNS over HTTPS option.
Changing the DNS addresses of network interfaces is something we should also do, but by going to the system settings (Settings), the “Network & internet” category (Network & internet), clicking on our network settings (Network properties), and then on the hardware settings (Hardware properties), we can introduce system-wide encryption of our DNS queries.
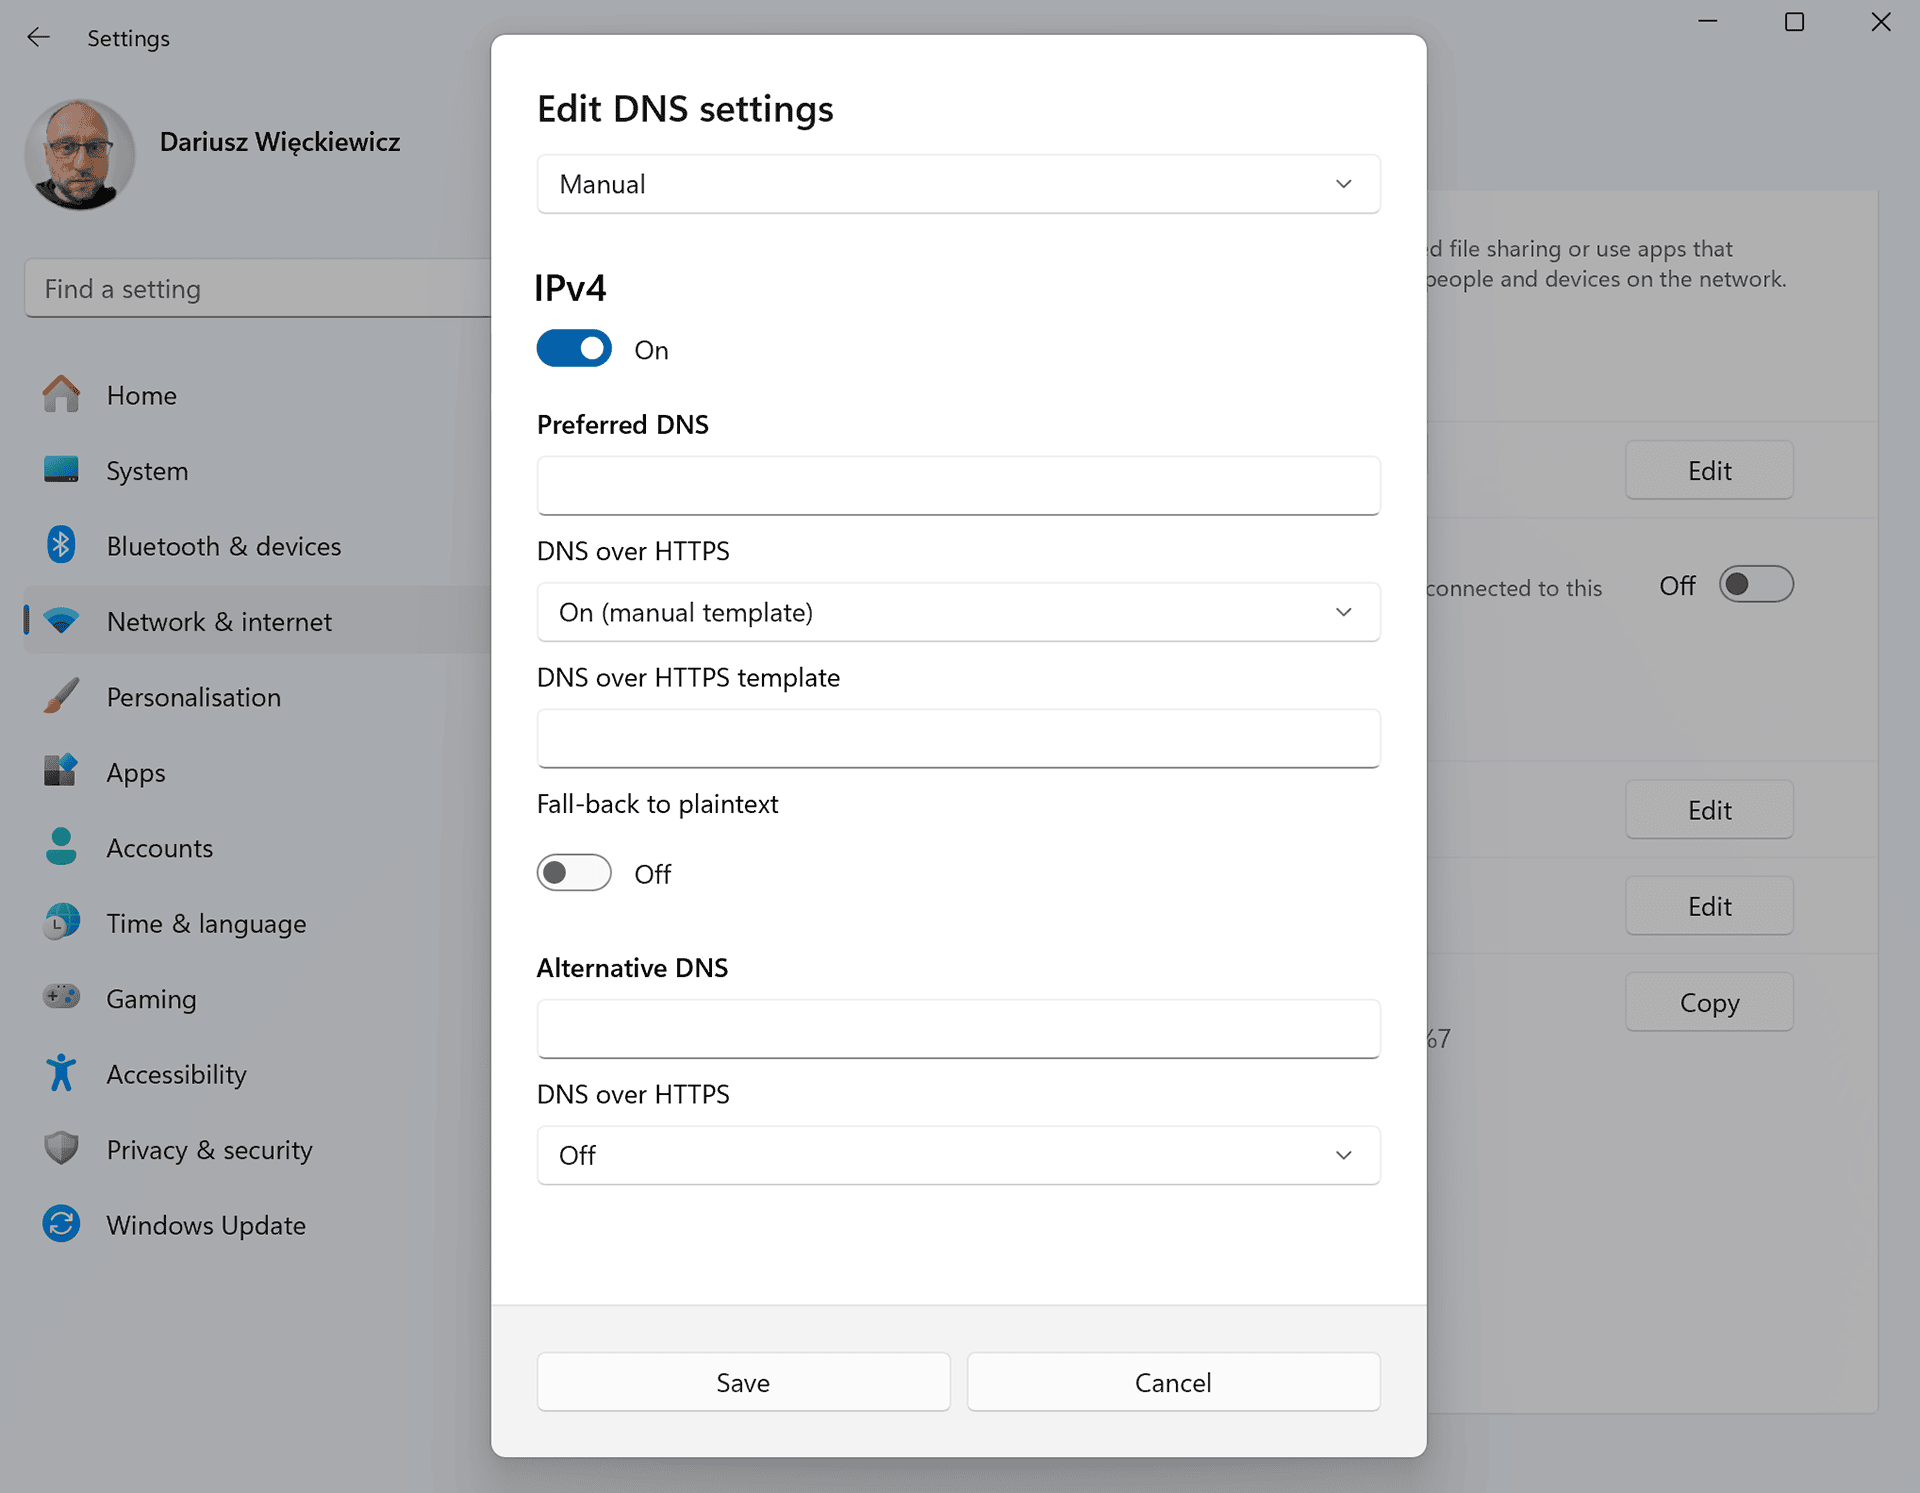
By clicking on the section responsible for the DNS server address (DNS server assignment), which by default are set to obtain this information automatically (from the router), we change them to setting it manually (Manual). Then we enable the settings for IPv4 and enter our DNS addresses, which we received from the Cloudflare website (172.64.36.1 as primary, 172.64.36.2 as alternative).
In the DNS over HTTPS section we change from disabled (Off) to enabled with manual configuration (On (manual template)).
In the field that will be presented to us, paste the address received from Cloudflare similar to this one.
https://{unique_link}.cloudflare-gateway.com/dns-queryWe do the same for IPv6 addresses.
In this way, not only do we have Secure DNS introduced, but we also have control over what is allowed on the network and what is not. This is convenient because we can easily limit the behavior of some users on our network.
Cloudflare Zero Trust is not just DNS servers. It is also the ability to create a secure tunnel (VPN), thanks to which we can connect to our local network from outside the home or company.
I wrote more about it in the entry: Adding Cloudflare Tunnel to OpenWrt Router (VPN Alternative).
Regards.


Comments & Reactions