Simple implementation of PWA on a website with a Mobile First Design approach
If you read my other post, you will find out that I recently rediscovered Progressive Web Apps (PWA).
Following this lead, I decided to implement it on the websites, where our main audience browses it from mobile phones. Later I decided to implement it gradually on all of my websites, independently of whether the main audience is on mobile or desktop. As you will see, PWA is quite useful for desktop users as well.
For all of the websites that I design, I am doing it with a mobile-first design approach in mind. Independently of how visitors are approaching it, it needs to look and work well in both environments (desktop, mobile and something in between).
But, Progressive Web Apps are not only about mobile-first. This implementation is adding nice functionality for desktop browsers, mostly Chromium-based like Microsoft Edge. This is why there is a word “apps” there and not just “progressive web”.
But first, let’s see how you can implement it on your website.
Believe me, it doesn’t require you “don’t know how” extensive WebDev knowledge. Everybody can do this. I did this on my static sites that are generating using Hugo but the approach is universal for everybody.
Implementation is divided in 4 sections covering graphics files needed, code that is pasted in <head>, service worker file and the JSON manifest.
Don’t worry if you don’t have experience with service workers for PWA (sw.js), it doesn’t matter. Same with JSON manifest. All are presented as simple as possible.
Further, depending on your needs, you can extend the functionality into real PWA scope, but not necessarily you need to!
Before you start
Along with adding PWA, you may want to read the first post about Simplified way of adding a favicon to the website as some elements, starting from basic graphic files and manifest, are described there and reused in PWA approach.
Graphic files
Firstly, you will need to have your logo fitted into a square. One file 192x192 and the other 512x512, and saved in the .png file.
If you prepared these files already based on adding them at the favicon implementation, you know that layer is as per dimensions specified above, but the image is smaller, roughly 88% and centred. All of them have a solid background, without any transparency, because transparent elements will be filled with black colour by default and all can look poor.
Some operating systems are using rounded icons. You will find that your logo in rounded format, even that is shrunk initially to 88% will still doesn’t look nice there.
You will need a so-called “maskable” icon.
For this purpose, head to Maskable Web App and load your icon (or logo) there. Specify colour for your background and use padding slider shrink in such a way, that will look nice inside the circle.
Rename them accordingly. In my instance, I will have favicon-192.png, maskable_favicon-192.png, favicon-512.png and maskable_favicon-512.png.
The manifest
In the manifest file (manifest.webmanifest) we will use our graphic files from the previous step and then fill some text in.
{
  "lang": "en",
  "short_name": "My PWA",
  "name": "My Super Duper Fancy PWA",
  "description": "The description of My My Super Duper Fancy PWA",
  "icons": [
    {
      "src": "/favicon-192.png",
      "type": "image/png",
      "sizes": "192x192"
    },
    {
      "src": "/maskable_favicon-192.png",
      "type": "image/png",
      "sizes": "192x192",
      "purpose": "maskable"
    },
    {
      "src": "/favicon-512.png",
      "type": "image/png",
      "sizes": "512x512"
    },
    {
      "src": "/maskable_favicon-512.png",
      "type": "image/png",
      "sizes": "512x512",
      "purpose": "maskable"
    }
  ],
  "start_url": "/?utm_source=pwa",
  "scope": "/",
  "background_color": "#ffffff",
  "theme_color": "#ffffff",
  "display": "standalone",
  "shortcuts": [
    {
       "name": "Shortcut 1",
       "description": "Shortcut to important page in my PWA",
       "url": "/shortcut1/?utm_source=pwa",
       "icons": [
        {
          "src": "/favicon-192.png",
          "type": "image/png",
          "sizes": "192x192"
        },
        {
          "src": "/maskable_favicon-192.png",
          "type": "image/png",
          "sizes": "192x192",
          "purpose": "maskable"
        }
       ]
    },
    {
      "name": "Shortcut 2",
      "description": "Shortcut to another important page in my PWA",
      "url": "/shortcut2/?utm_source=pwa",
      "icons": [
       {
         "src": "/favicon-192.png",
         "type": "image/png",
         "sizes": "192x192"
       },
       {
         "src": "/maskable_favicon-192.png",
         "type": "image/png",
         "sizes": "192x192",
         "purpose": "maskable"
       }
      ]
    }
 ]
}
Let’s go through the file now.
- lang - you specify the main language of your manifest file
- short_name - the name that will be displayed under the icon of your PWA when added to the Home Screen on a mobile device or when installed on a desktop.
- name - here you describe a longer, more descriptive name. If your name is short enough, you can omit the
short_nameparameter. - description - a description of your app or website. Typically followed what’s described in
<meta name="description" content=". - icons - here we specify our icons. Have a look at that maskable icon that got the additional parameter
"purpose": "maskable". - start_url - this is the URL that is used when we start our PWA from a shortcut. The
/mean that it’s showing the homepage and?utm_source=pwa1 is added to report back to analytics, how the website was accessed. - scope - Scope is a part of the address that the PWA is limited to. If for example, you will specify that starting the app is subfolder
/app/then the PWA will not be able to go outside that and show you what’s in the root folder/. - background_color and theme_color are a bit of customisation to match you website. The background refers to the general colour of your website background, typically specified in CSS for the
<body>element, wheretheme_colorrefers mostly to the colour of the browser navigation bar etc.
You may have this already specified in your head during web development like:
<meta name="theme-color" content="#ffffff">If you using the Light and Dark mode of your website, it may be like that:
<meta name="theme-color" content="#FEFAF8" media="(prefers-color-scheme: light)">
<meta name="theme-color" content="#010507" media="(prefers-color-scheme: dark)">
Sadly, on manifest we cannot specify different colours for light and dark mode but don’t worry, we will overwrite this, as we will serve our website in full-screen experience later.
- display - this potion is responsible for displaying the app in different modes. By default, it will display like a website open in the browser with all browser controls and address bar. We would like it in full screen, so we will specify the standalone option. This will bring the website full screen but preserve the top bar of the window, on desktop, or time, battery and wifi icons, on mobile.
There is also an option called fullscreen but is mostly reserver for use with real apps that go full screen. This is not working on all systems and is limited to the maximum value (fallback) of standalone.
Also, as you will notice, in Safari on iOS this option will not bring your PWA full screen, as Apple is using the value in <head> for this purpose which will be covered further.
- shortcuts - is an optional element to add handy shortcuts to some important part of your website, for example, for
/contact/for or/shop/. They only appear when the app is installed (on desktop) or added to Home Screen (mobile, Android mostly).
Remember, that for links, they need to be in the scope specified. For tracking use purpose, add to them ?utm_source=pwa, so you will know from what source the user visit that part of your website.
We saving our manifest in a root directory of our website along with graphic files.
The code in the head
In the <head> of our website we need to load the manifest that we created.
<link rel="manifest" href="/manifest.webmanifest">As mentioned at the manifest stage, for Apple devices, the display parameter is not always respected so we need to add the following:
<meta name="mobile-web-app-capable" content="yes">This will force us to put our PWA, when launched from the icon, into a full-screen experience.
Other web browsers, like Firefox, may need that as well.
Another option is specific for Apple devices that add Launch Icon Title (if not respected through manifest), similar to short_name`.
<meta name="apple-mobile-web-app-title" content="My PWA">Than:
<meta name="apple-mobile-web-app-status-bar-style" content="black-translucent">This will direct the appearance of the Status Bar. Its very similar to theme_colur but more for iOS/iPadOS.
Available options are:
- default - which is white background with black text (and symbols)
- black - black background with white text (and symbols)
- black-translucent - transparent background with white text and symbols.
There is no real option (for now) to set a specific value for light and dark mode, hence black-translucent is something that you may look at if you got implemented prefers-color-scheme on your website.
The last thing to add to your <head> is a call for Service Worker. This is an essential part of every PWA, but don’t worry, we will not use it. Even that, we still need it, hence add the below as well:
<script>
    if ('serviceWorker' in navigator) {
        navigator.serviceWorker.register('/sw.js');
    };
</script>
The code in the head - Summary
Our entry in <head> will look as follow:
<link rel="manifest" href="/manifest.webmanifest">

<meta name="mobile-web-app-capable" content="yes">
<meta name="apple-mobile-web-app-title" content="My PWA">
<meta name="apple-mobile-web-app-status-bar-style" content="black-translucent">
<script>
if ('serviceWorker' in navigator) {
    navigator.serviceWorker.register('/sw.js');
};
</script>
The Service Worker
“Service workers are a fundamental part of a PWA. They enable fast loading (regardless of the network), offline access, push notifications, and other capabilities.”
The service workers in PWA have a wide range of use. It can add the ability for you to make your PWA work (by serving static content from memory - cache) even if you are offline.
Because I will not go into the depth of SW here, as this can be a new (and long) post, let’s just add a dummy one that will be a base for further development if needed.
self.addEventListener("fetch", event => {

});
This file (sw.js) needs to be saved in the root directory along with others.
The service worker file, even if that is empty, still will serve its purpose by prompting for App installation in Chromium-based browser and on Android.
We did the hard bit, so let’s see how this is working.
Here is an example based on implementation on Yummy Recipes UK website.
Verification and The Result
By loading our website in a Chromium-based browser and opening DevTools (right-click on the background of the loaded website and click Inspect) we can see in the Application tab how the manifest is declared and icons used.
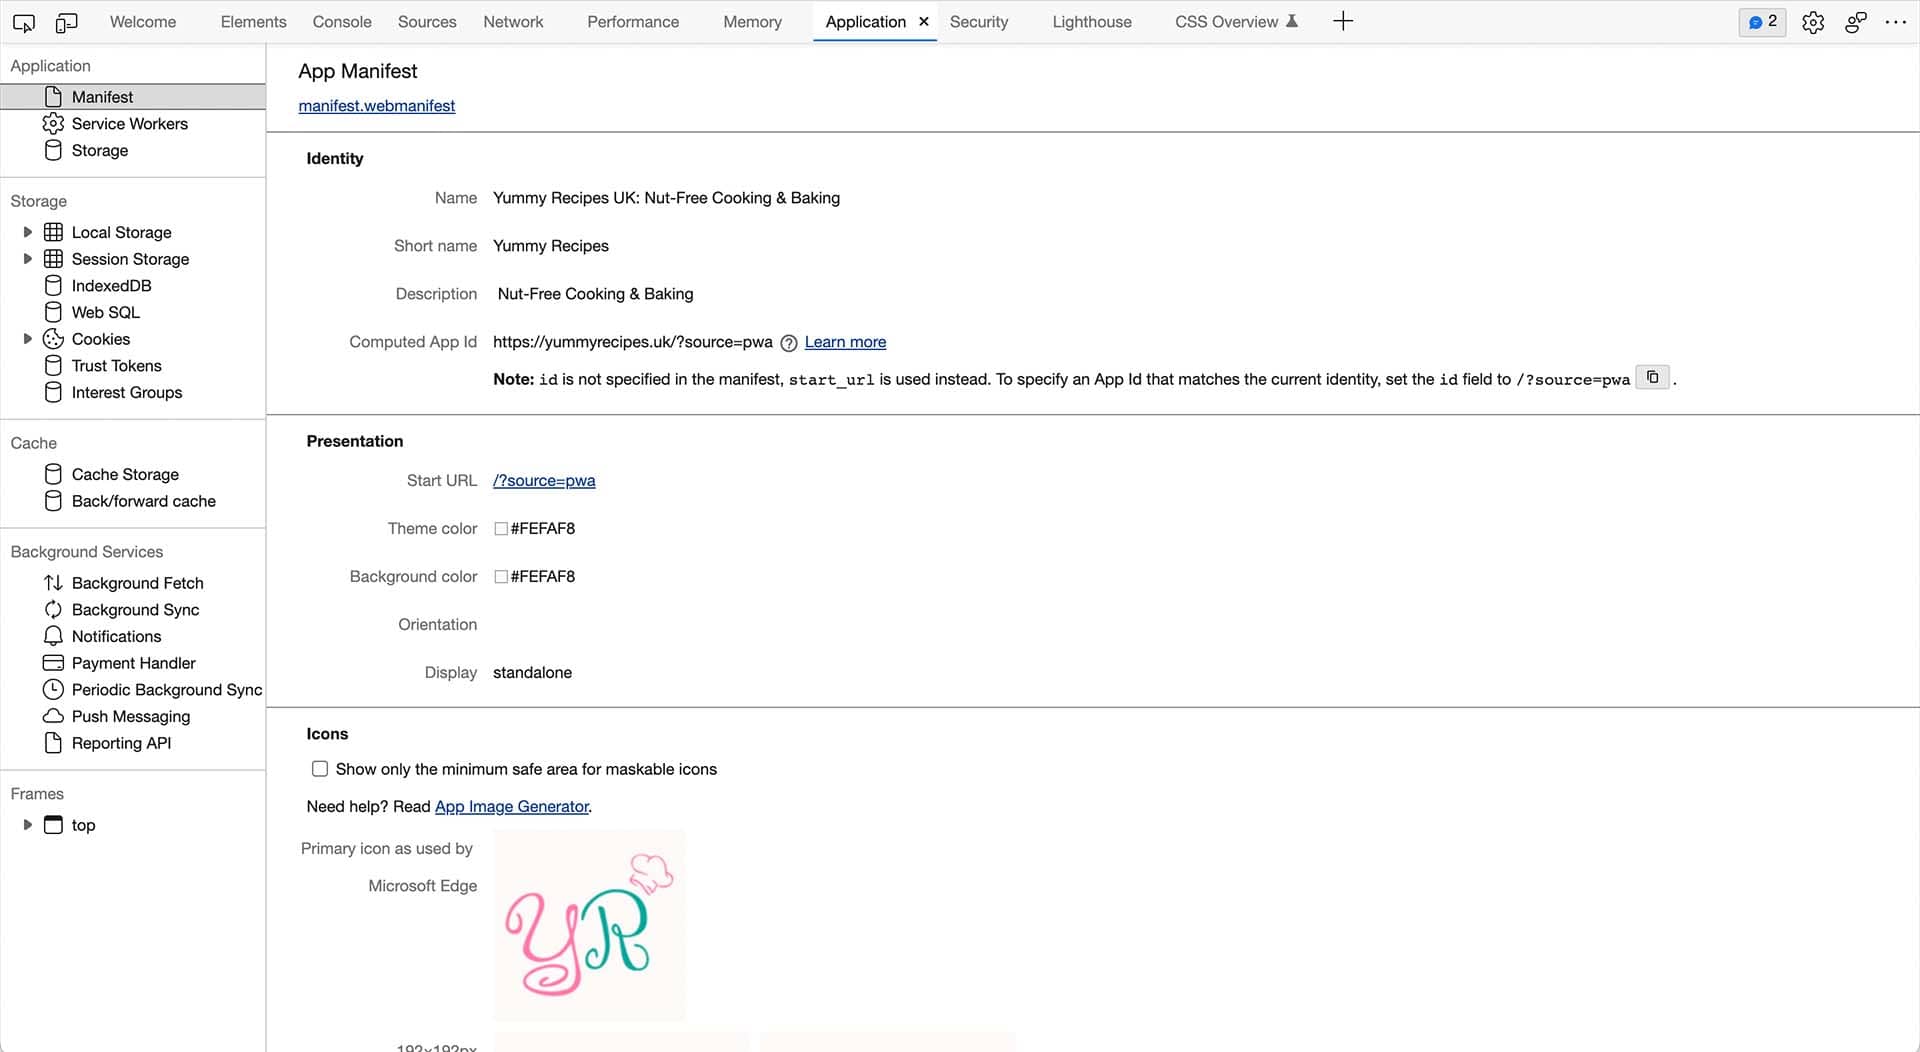
You can also verify how maskable icons will look by ticking Show only the minimum safe area for maskable icons. In our example, these will be the ones on the right side, and you will see, how poorly they would look if we will not specify separate files (on the left).
![]()
By selecting Service Workers from the left side of the menu you can see that our simple sw.js file is loaded and working as expected.
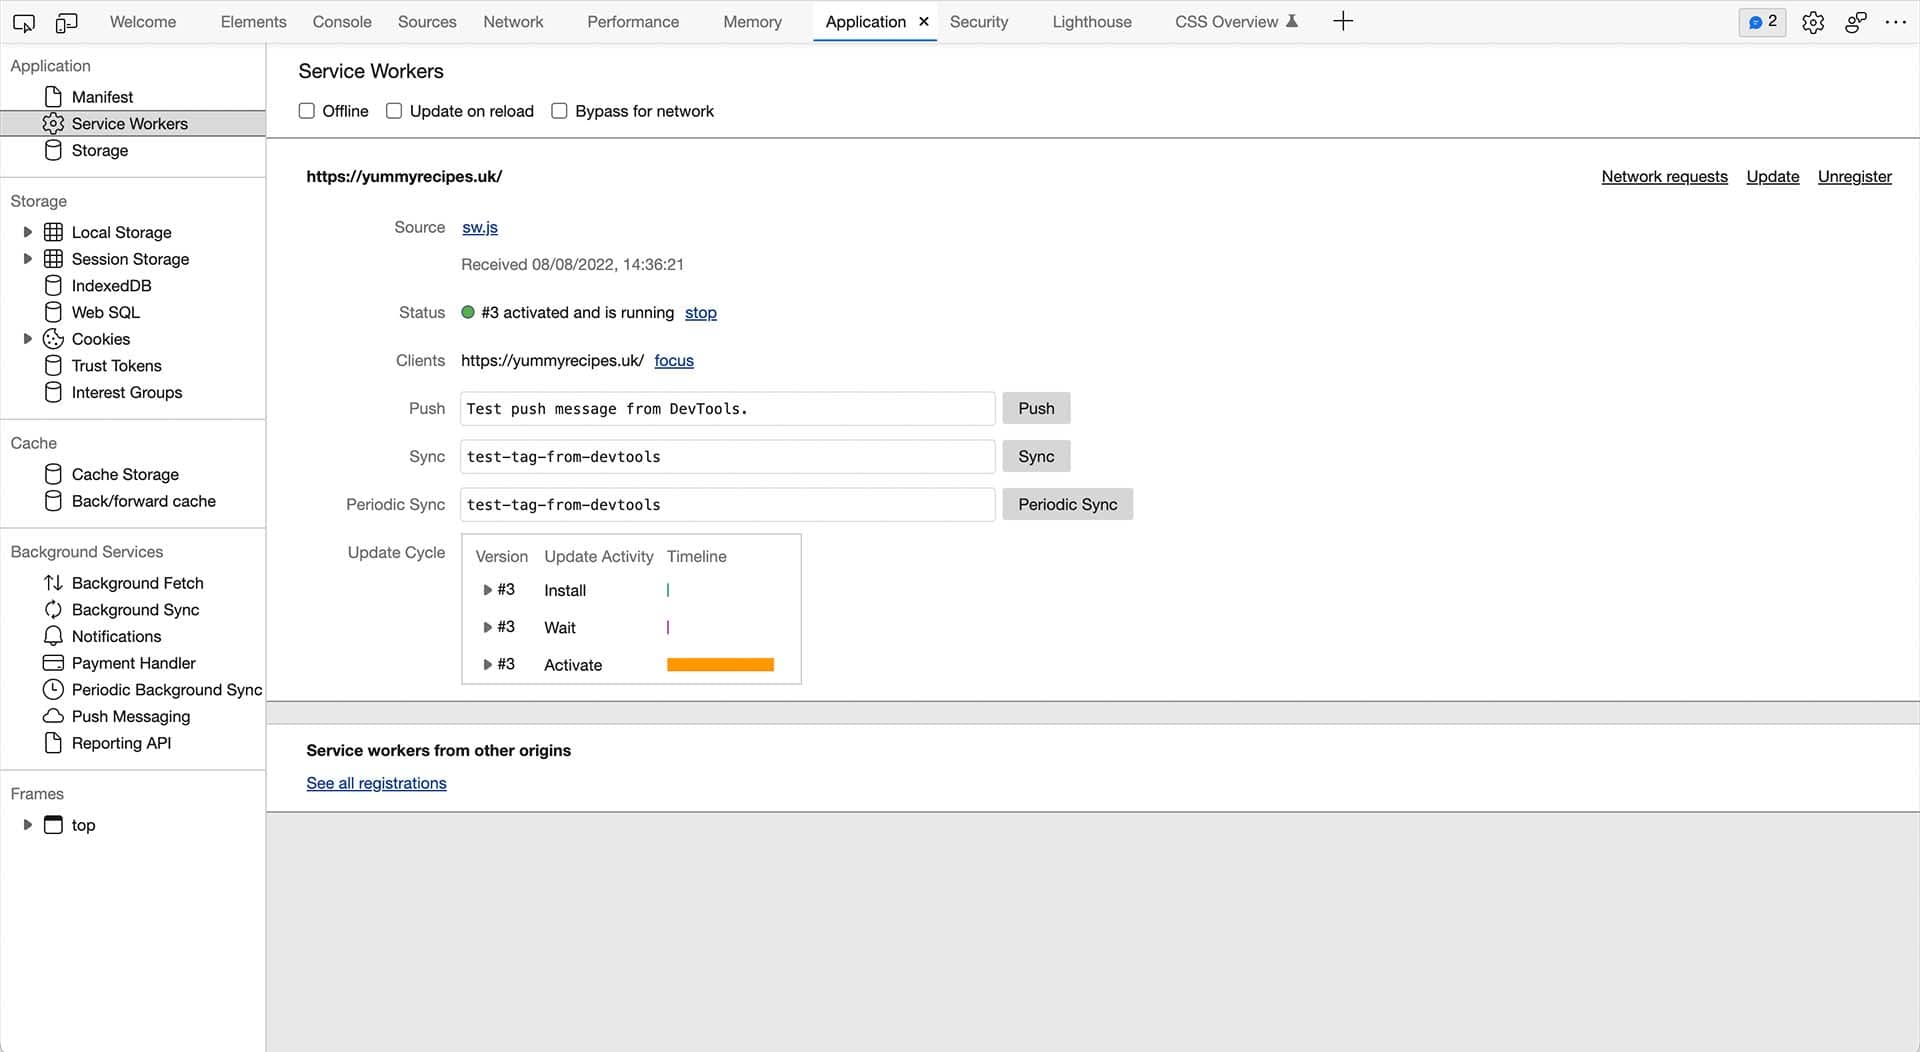
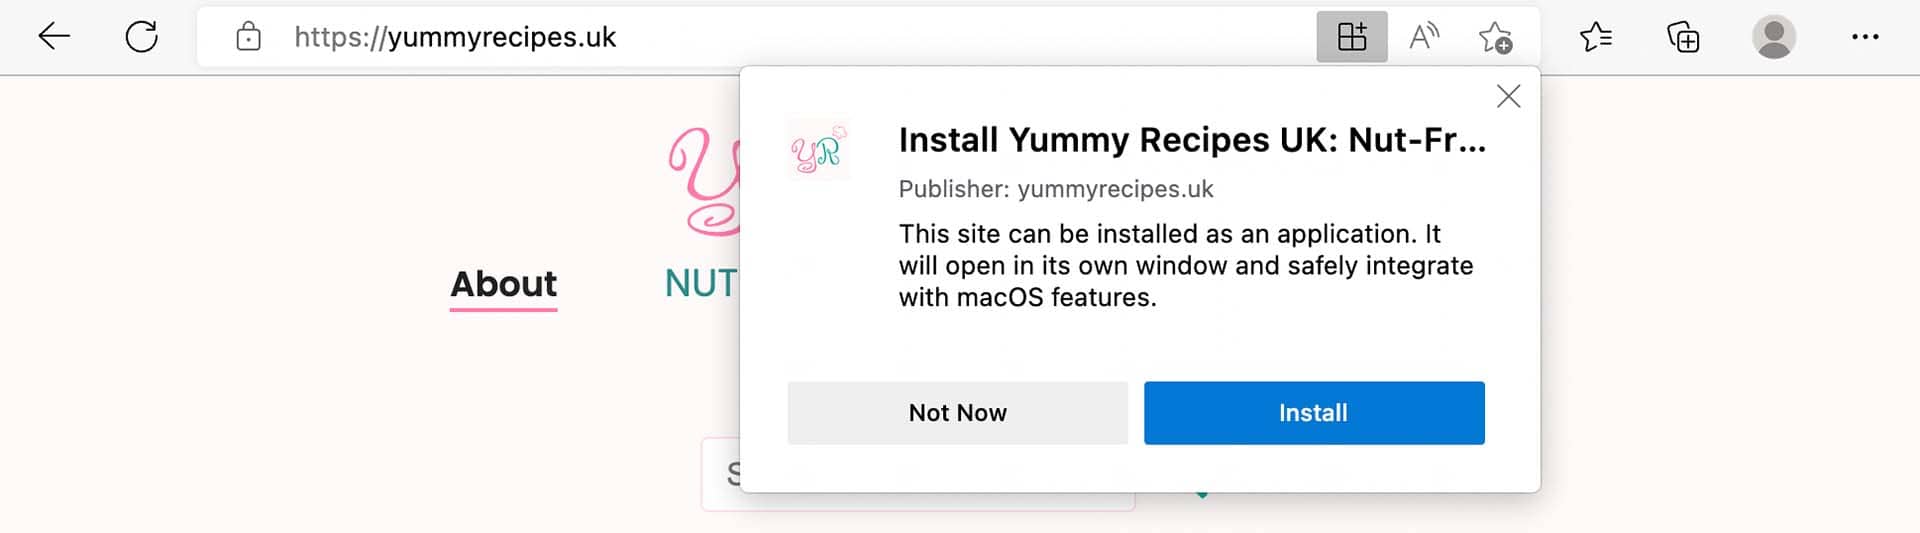
Despite the that this solution is very simple and a service worker is a simply dummy file, a Chromium-based browser will see, that we implement PWA, and ask us if we want to install it in our system in the address bar (App Available).

We can also do that by clicking on a specific button for adding apps.
Similarly to the above, where the browser will suggest adding the app to our system, we will be prompted to do that when browsing from Android.
Here how this will look like.

As I am not using any Android device, I did my test using LabmdaTest.com.
Real-Time Testing > Browser Testing > Android, Samsung, Galaxy S20, Google Chrome.
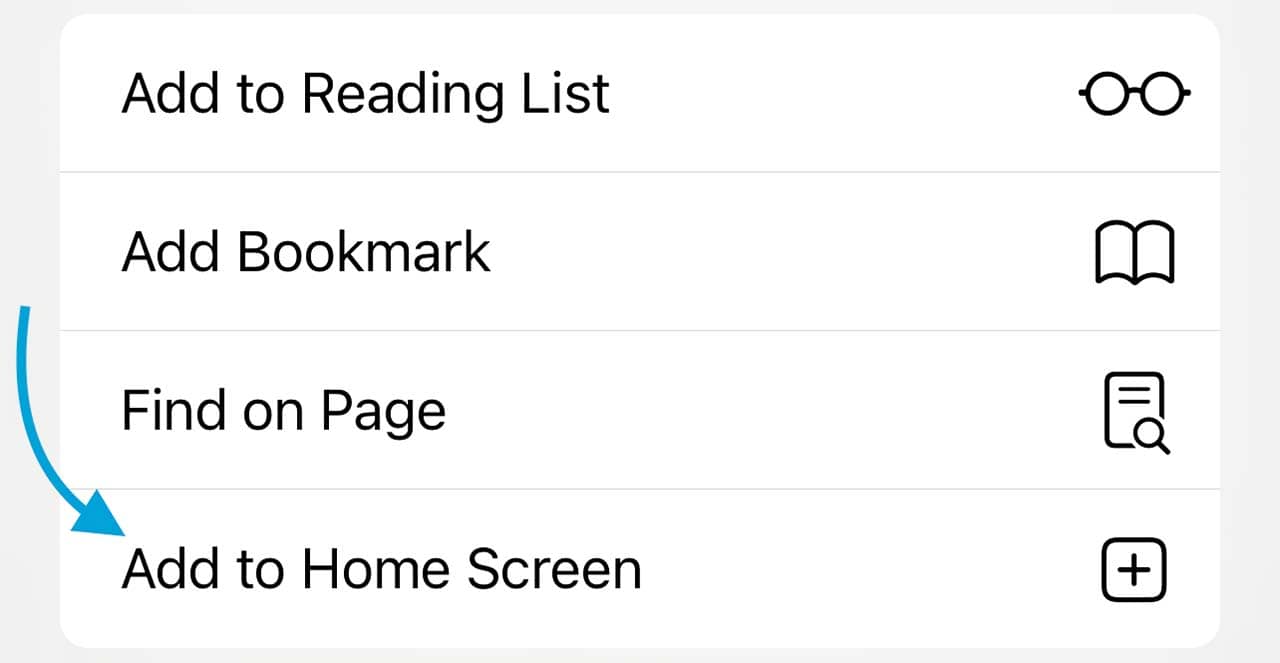
On iOS and iPadOS we will not have such prompts. We need to use Share Sheet to add our app to Home Screen.
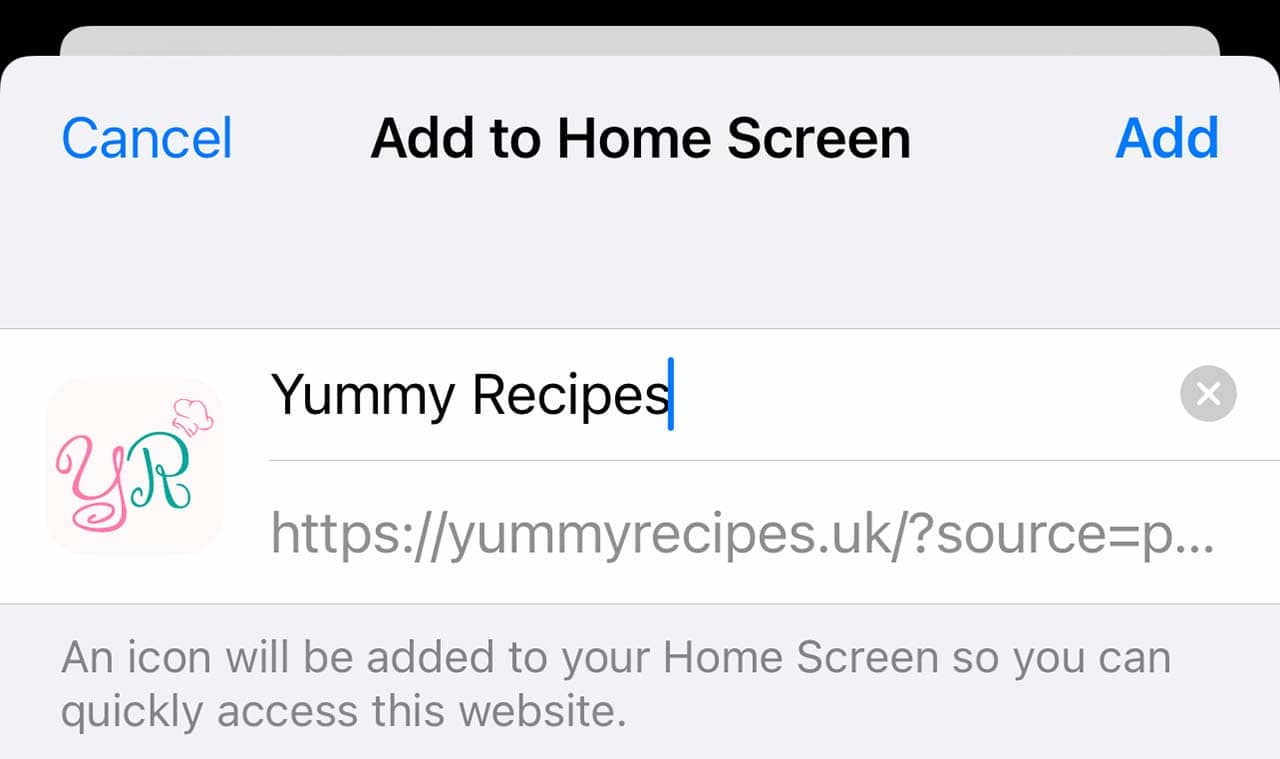
Once we launch our website, it will be brought nicely with a full-screen experience.

In such simple way, we got implemented PWA into our website.
Without any external services, this can be implemented anywhere and developers with specific knowledge can use the full potential of service workers to push this even further.
What you may notice, some apps that are natively distributed through Google Play or Apple App Store are just a cover for PWA that is running in the background.
Optimising Resources
There is one more thing before you finish.
Once we have all worked nicely, we shall do one more thing to make this solution even better.
You need to remember that the manifest file will be loaded along with the website. Icons specified there also will be downloaded in the background.
We need to remember to optimise these resources.
Where most hosting companies will compress text, the graphic can be served as they are.
It’s always good to optimise the icons that we generated as you will see that you may reduce their size dramatically.
It’s better to serve 8kB favicon in 512x512 resolution than 60kB prior, especially when you will not see the difference on screen.
To do that, use one of the below websites:
- Compressor.io – optimize and compress JPEG photos and PNG images
- Optimizilla – Online Image Сompressor
- Squoosh – ultimate image optimizer
In my initial post and screenshots I referred to
?source=pwawhich I later changed to?utm_source=pwato work better with Google Analytics in my minimal approach. ↩︎


Comments & Reactions