Another (free) approach to Windows 11 on Mac with Apple Silicon - VMware Fusion 13
I used to use Parallels Desktop and with my hand on my heart, I can tell that this is one of the best software to run Windows 11 on Mac with Apple Silicon.
There is a big problem for me, however. Parallels Desktop is a bit expensive in long term. As expensive the life become recently, everybody is trying to save some pennies, even me. I cut unnecessary subscriptions by some and Parallels has been one of them (along with Bitdefender in favour of free Avira). I recalculate the use of Windows on my macOS device and the conclusion was that I am paying and not using it.
I know that from time to time I will need to head to Windows so I went into the path of using UTM for that.
As much as UTM is great and free, the performance of Windows is a bit poor. Struggles with updates and missing functions put me a little behind. I always want to try something new. Between Parallels and UTM there was always VMware Fusion however I never spend too much time trying it in full.
Recently VMware Fusion 13 gained official support for Windows on Macs with Apple Silicon.
After the recent update of my Installation of Windows 11 using UTM with Windows 11 Version 22H2 (22621.674), I returned to the problem of missing Microsoft Store and decided to give up for a bit until I found a post How to install Windows 11 on Apple Silicon Macs with free VMware Fusion Player in my Feedly reading list. What appealed to me was the mention of the fact that the application includes a free personal license option. Interesting!
I decided once again to give it a try. The last time I tried (in beta) it wasn’t straight forward and I went with UTM. Let’s see if following the guide from 9to5mac I will be able to get Windows 11 with decent working performance and support for Microsoft Store.
If you want to know how to generate Windows 11 ISO file (ARM) without the need of installing Parallels Desktop like mentioned in the 9to5mac article, see my post Installing Windows 11 on macOS
Installing VMware Fusion
I followed step 1 and visited VMware Fusion Player 13 page where I logged on my account (if you don’t have, create one) and then registered for a personal account to get the licence.
All sounded great but there was one problem. Despite that site state as below:
“Fusion Player offers a Personal Use License, available for free with a valid CustomerConnect account. Home users, Open Source contributors, students, and anyone else can use Fusion Player Free for Non-Commercial activity.”
Each time when I try to register for this product to get a licence I was asked to fill in the Tell Us About Your Company section which was a bit nonsense. I am trying to get this for personal use hence there is no Company to fill. Even during the creation of a new account I come against this hurdle.
Following the suggestion from the post Registering personal product requires company name and phone number I put my name into the company field and the rest as other or anything that doesn’t match. I finished by clicking the Start Trial button despite that I am not starting any trial!?
Thanks to that I received my Personal Licence key and the option to download software.
Once the software has been downloaded, installed and typed the licence on the first run, just after confirmation of EULA. Then I looked back to the step of installation from 9to5mac.
Installing Windows 11 (22H2)
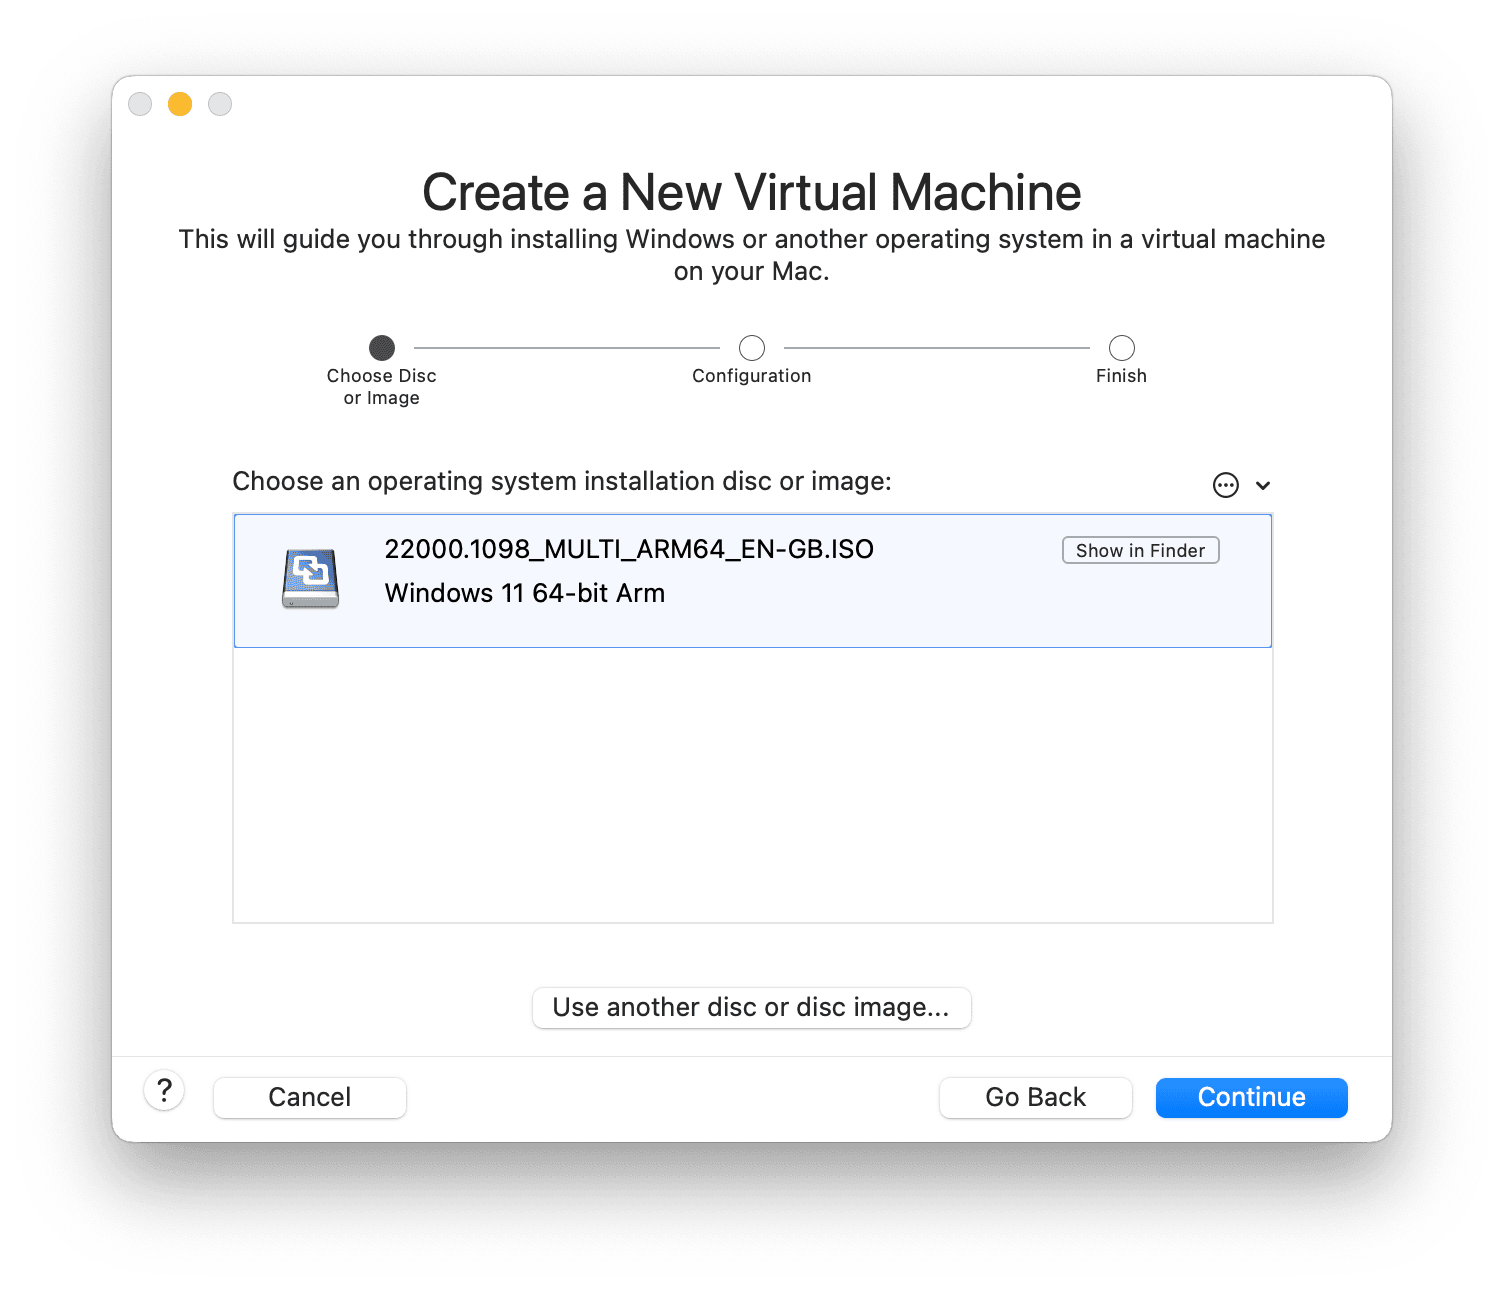
From the window where we read Select the Installation Method press the button stating Install from disc or image.
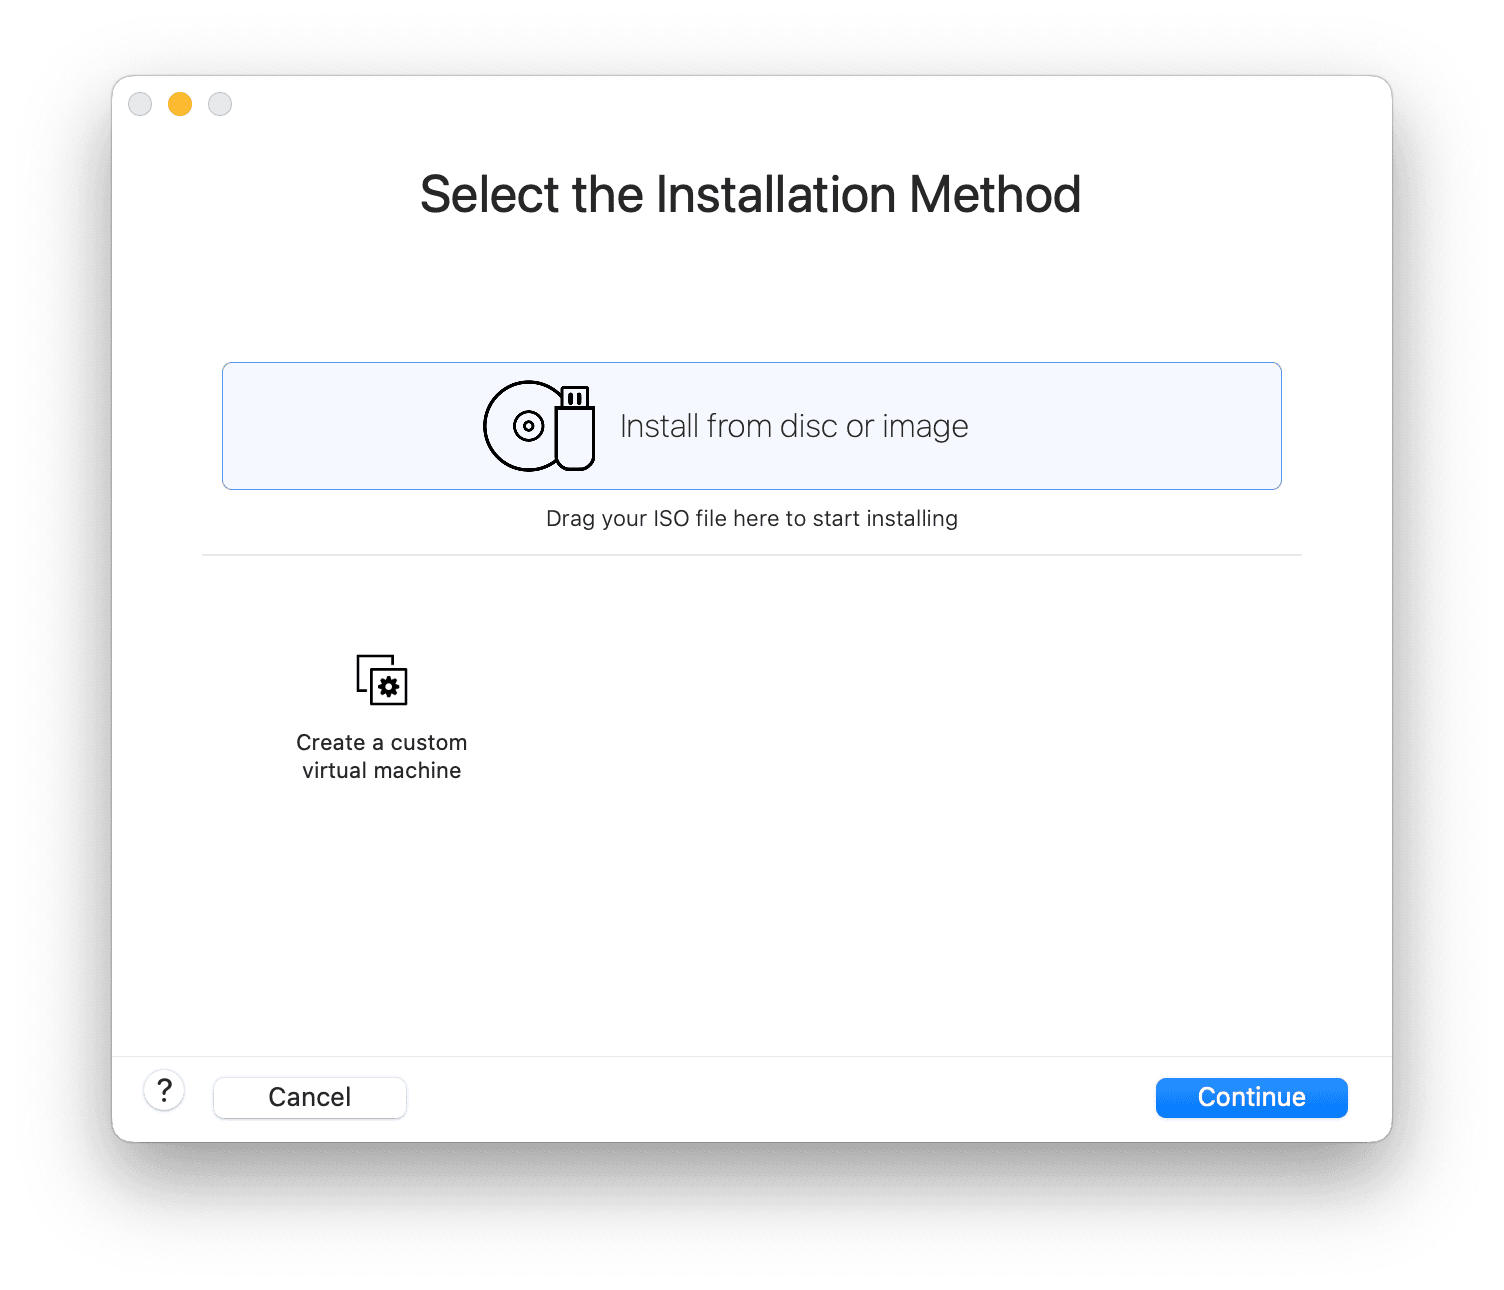
In the next stage drop the ISO image (22621.674_MULTI_ARM64_EN-GB.ISO) and press continue.
Spoiler Alert: read further but do not proceed with installation from the 22H2 (22621.674) version. At a later stage will explain why.
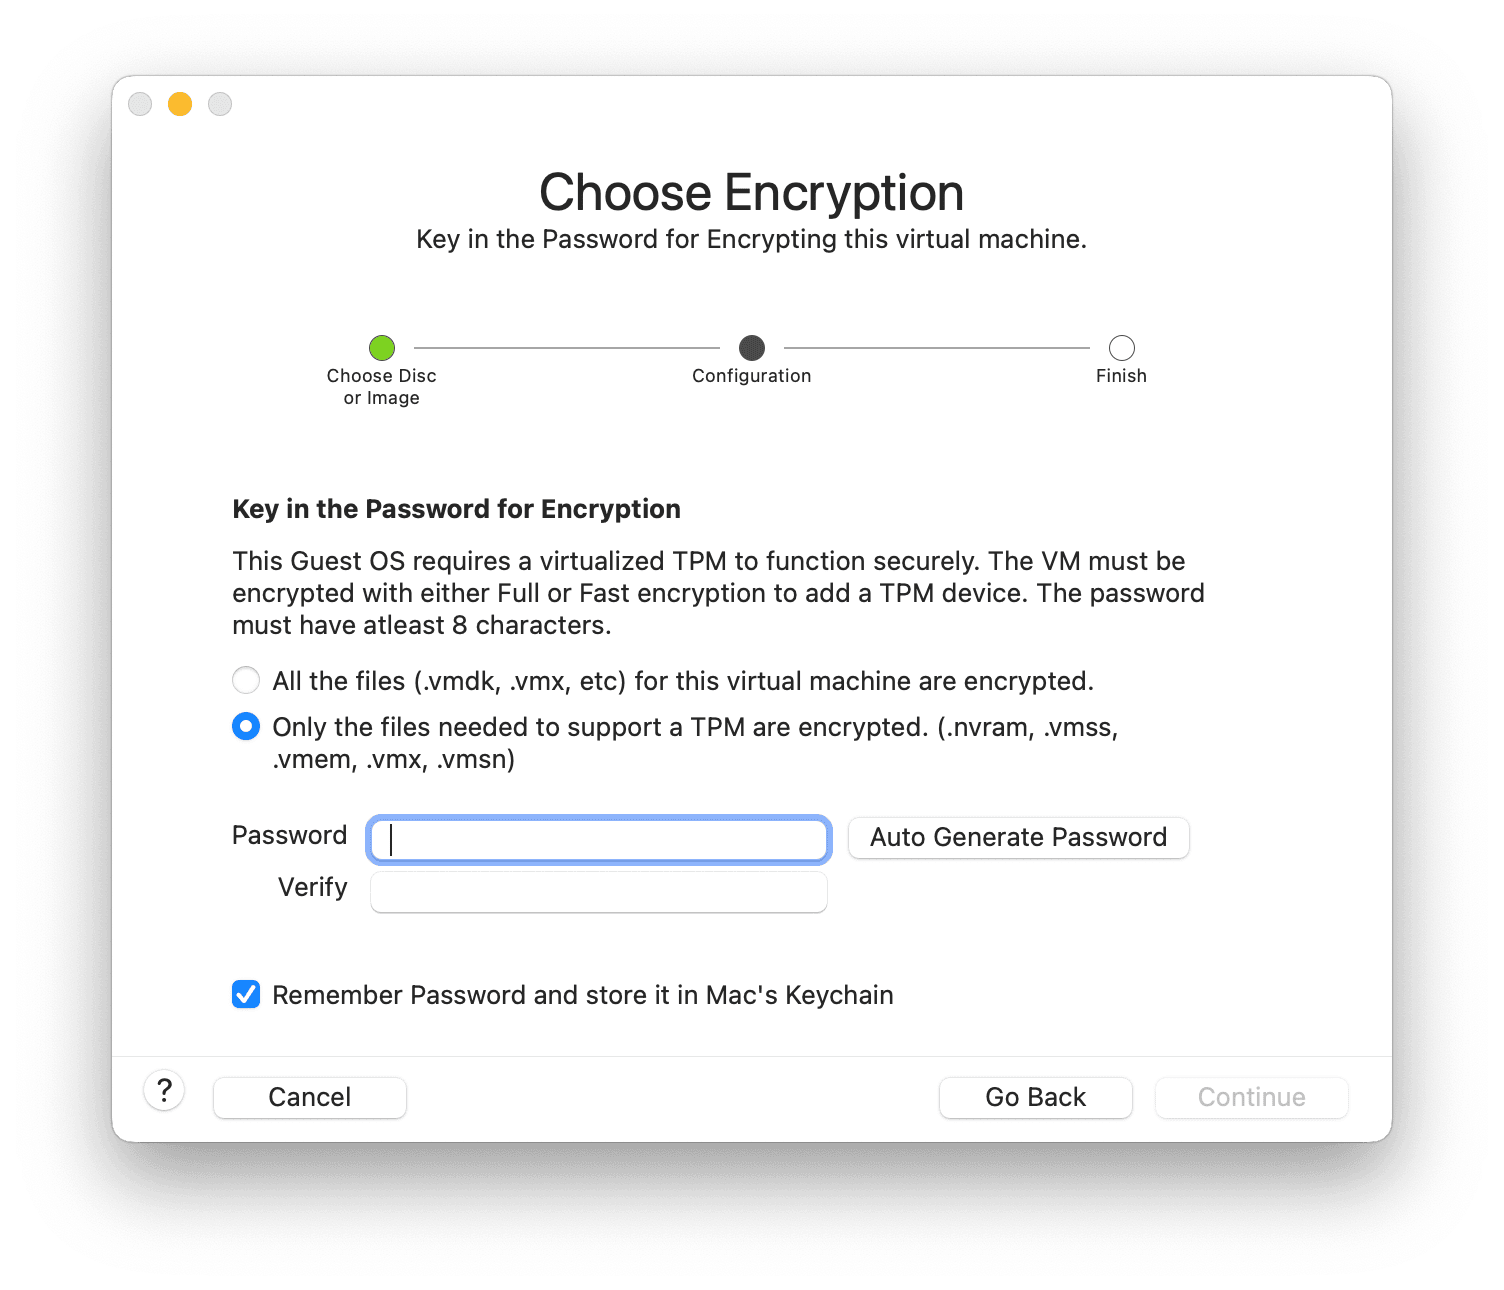
Because Windows 11 require to use of TPM even in a virtual environment, on stage Choose Encryption I need to type my encryption password.
I was a bit lazy and chose the option Auto Generate Password with the tick Remember Password and store it in Mac’s Keychain, which does not happen for some reason so I saved it into my notes just in case.
You may be asked at some point to enter this password so worth to have this saved as without it you cannot regain access to the virtual machine.
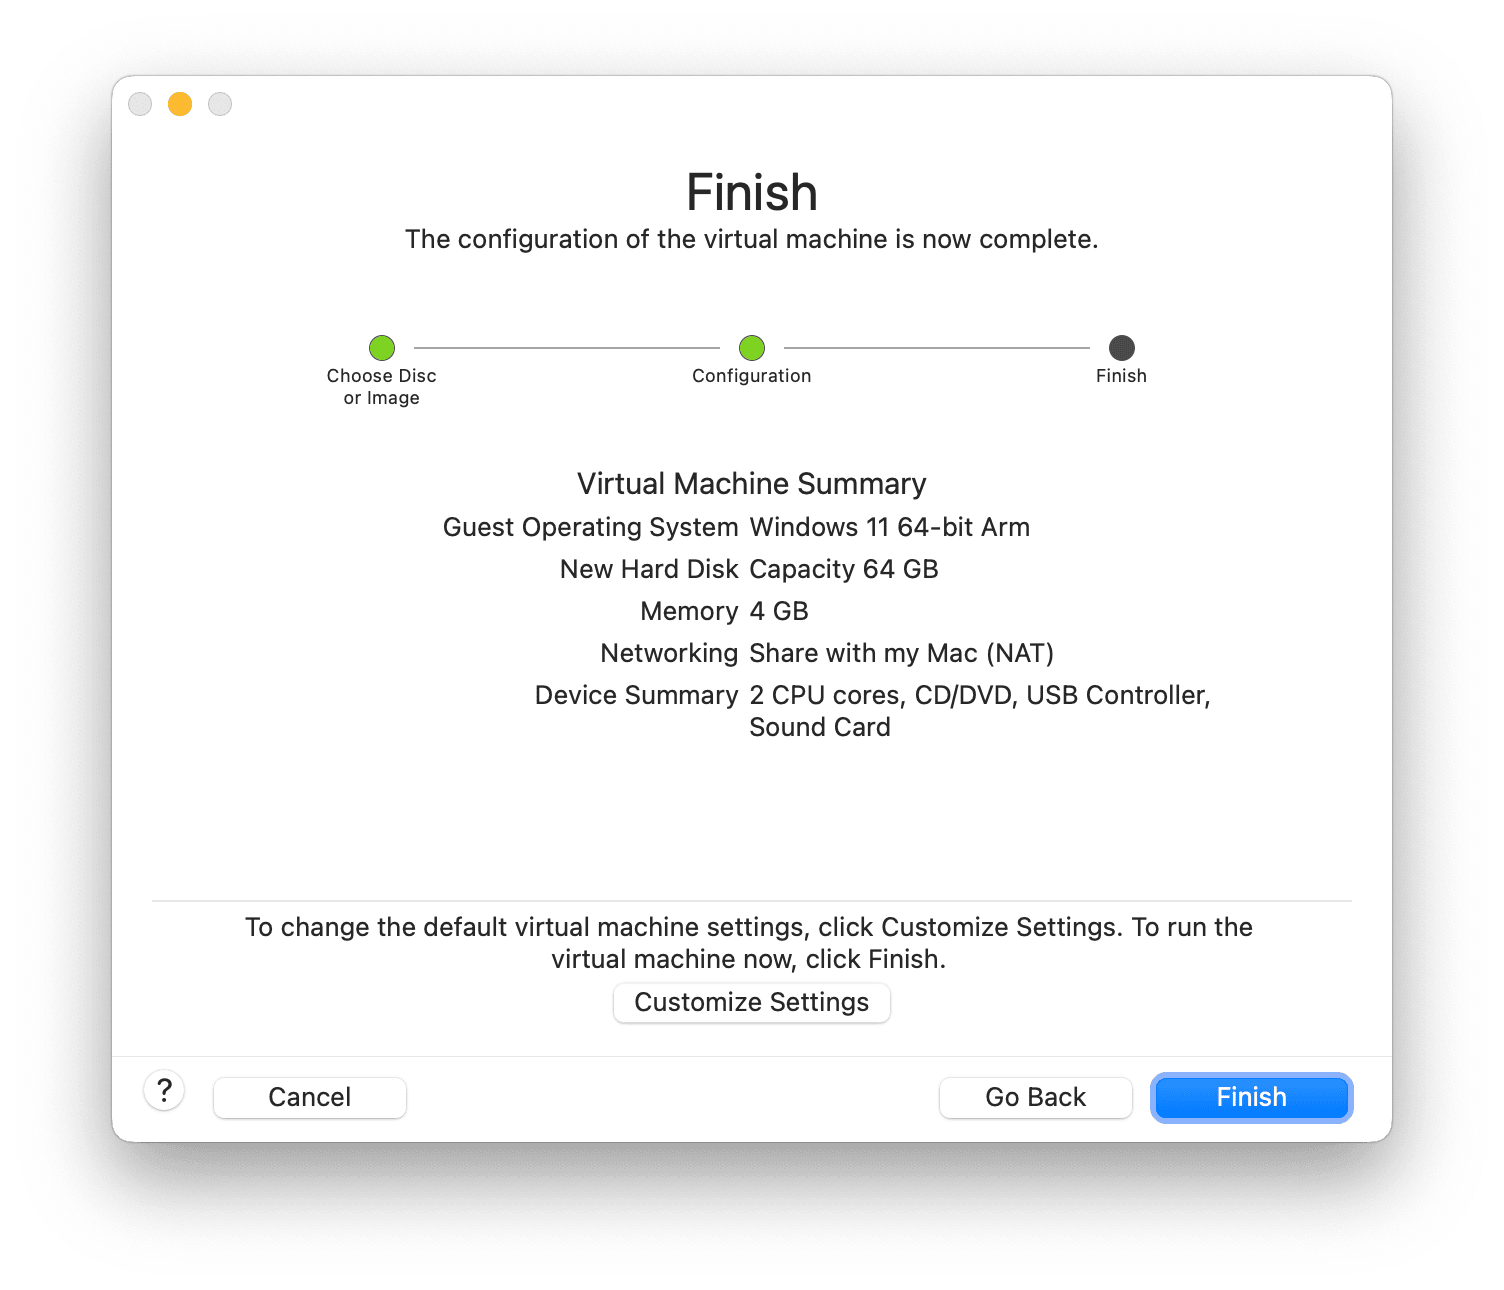
In the last step, I just customised a couple of things using Customize Settings, like storage, which I changed from the default 64GB to 128 GB (do that as well).
Once that is done pressed the big play button to start the machine.
And so on I followed step-by-step instructions to install the system.
When asked to enter Windows 11 licence key I chose “I don’t have a product key” and on the next screen, depending on what licence key we have, selected Windows 11 Core or Windows 11 Pro. When on further screen I selected Customised: Install Windows only (advanced) from Which type of installation do you want?
After the first restart, as warned in step Configure Windows 11, install network and display drivers, we need to do some adjustments to get through the initial setup and later add drivers through VMware tools.
Windows 11 require a network connection to get through the installation process and by default there are no Network drivers available in Windows 11 for the VMware environment.
On the screen Is this the right country or region? press Shift+fn+F1 to get to the terminal where you need to type the command OOBE\BYPASSNRO. Once we hit Enter the installation will restart and we will be able to Continue with limited setup, without the internet connection and need to connect to Microsoft Account at that stage.
Once (almost) all done and once we will see our Windows 11 desktop, straight away I noticed the lack of availability of Microsoft Store, exactly as it was in UTM.
That makes me think, maybe the image that I have been using in my previous UTM approach and here is wrong.
Looking back into the 9to5mac post, when they download ISO through Parallels they get version 22621.525. I used 22621.674 from the UUP dump. Then, I looked closely at their screenshots. In their taskbar, there was no Microsoft Store icon either.
I tried with
22621.525as well with the same result.
The last know version of Windows 11 ARM with working Microsoft Store on UTM straight after installation was Windows 11 21H2 so I decided to install it and see if I can upgrade to 22H2. With working TPM emulation on VMware Fusion (and increased default storage to 128GB), this shall not be a problem, at least in theory.
Starting with Windows 11 (21H1)
I have installed Windows 11 21H2, but before I head to upgrade I need to install the missing network and display drivers.
To do that I need to install VMware tools.
VMware Tools is installed through PowerShell.
Before VMware Tools can be run in the system we need to allow PowerShell to run RemoteSigned scripts.
Open Start Menu, type PowerShell, hover over the result and from the right part of the Menu Start choose Run as administrator.
Set-ExecutionPolicy RemoteSigned
Confirm the above PowerShell command with option A (Yes for All).
Once that is done, from the VMware macOS menu bar select Virtual Machine > Install VMware Tools.
VMware Tools will mount a virtual DVD drive.
Head to your computer, click on the DVD drive and start the installation by right-clicking on the setup file select Run with PowerShell. Confirm any further prompt and wait until it finishes.
During the installation, the screen can go black.
Once the PowerShell window closes reboot your system and we shall be able to see the internet connection.
Before I proceed any further I activated my Windows with my licence.
As mentioned in my post Trying Parallels Desktop alternative - UTM, despite having a Microsoft Store icon in the system, there was no possibility to run it, as each time the app crashed. Running wsreset -i from PowerShell didn’t help much.
At that time the solution was to enrol on the Insider program to get this sorted but this time I will not be doing that.
I head to Windows Updates and installed what was there.
I re-run twice my wsreset -i command and Microsoft Store was back and operational. Then I head to the Library and select the Get updates button followed by Update all. At this time Microsoft Store updates itself as well.
I returned to Windows Updated and selected Receive updated for other Microsoft products from Advanced options. After heading back to Windows Update I re-check what’s available and let it update itself.
Update to Windows 11 (22H2)

Despite the WhyNotWin11 showing only in red issue with DirectX and in orange processor compatibility, we got TPM 2.0 and Secure Boot sorted! This shall allow us to do an update from 21H2 to 22H2. Let’s see if that’s the case.
Firstly, I update all that was available via Windows Updates and see if a prompt to upgrade to 22H2 appears. Sometimes it takes time before this will appear, but I don’t want to wait and decided to speed things up.
I downloaded and generated ISO for 22621.674 from the UUP Dump website.
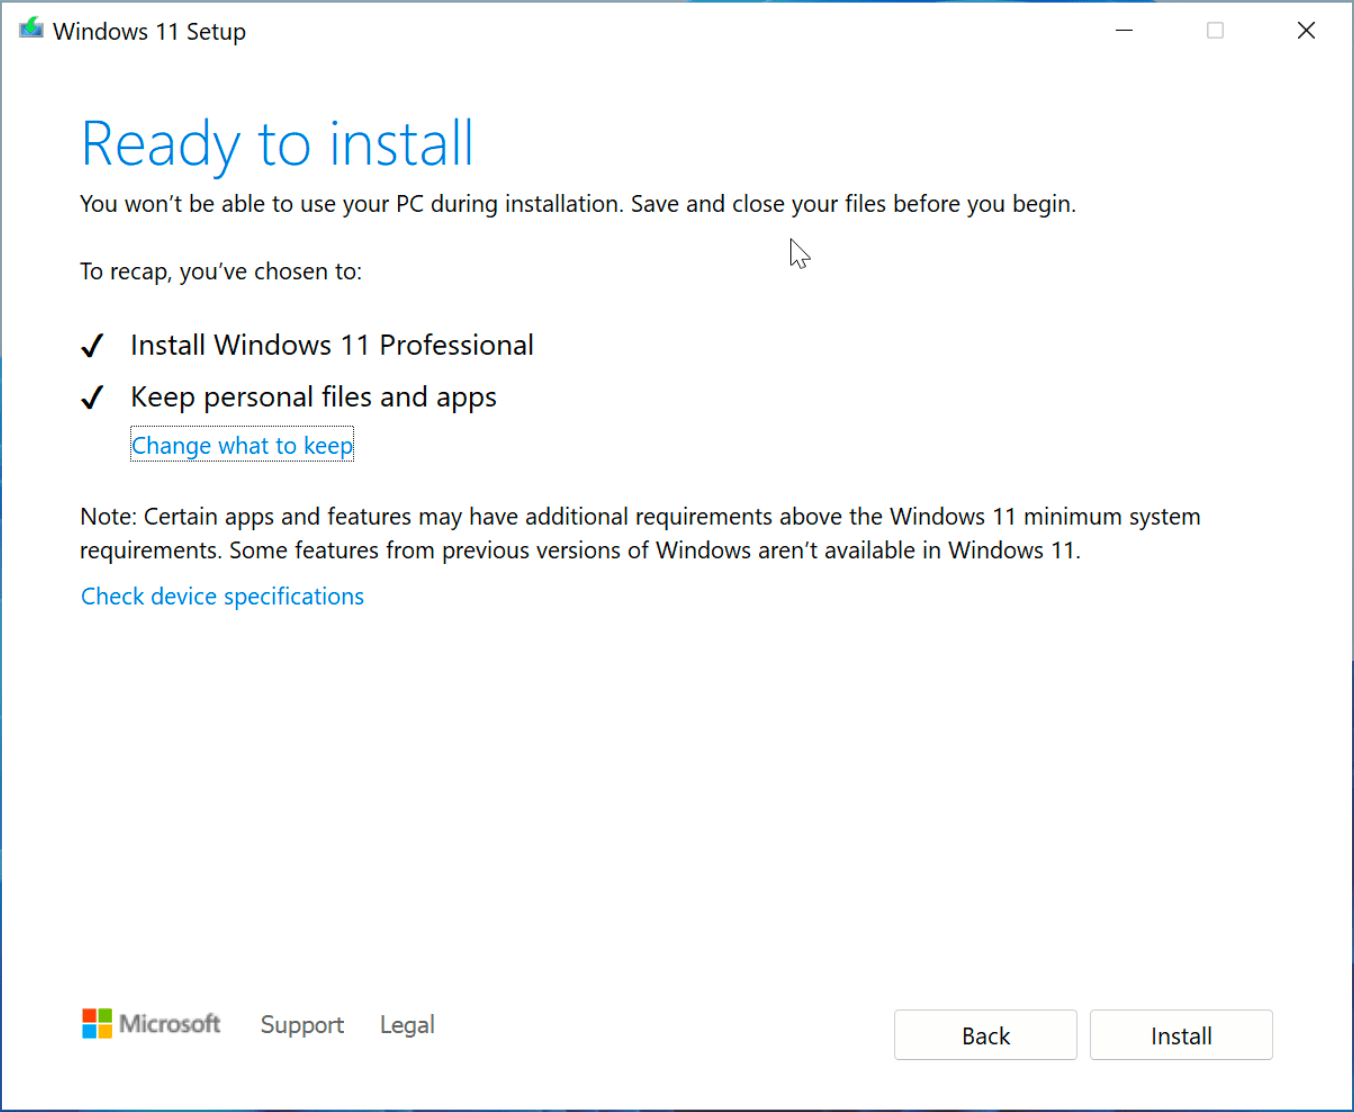
I mounted ISO as a virtual DVD drive inside VMware and started by just double-clocking setup.exe and following onscreen instructions.
No errors or incompatibility were reported at that point and the installer started Getting updated before installation can commence, followed by Ready to install screen.
Let’s go then…
After a short while and reboot all have been installed and see the Hi screen and This may take a few minutes.
In the end, I successfully finished with Windows 11 (22H2) and Microsoft Store! Not to mention that there is no issue with updating to the latest Windows, hence that a huge… and free.
Final step that I did was a bit of cleanup using the Disk Clean-up utility to remove the remains of 21H2 (25.4GB!).
What’s not working as expected with VMware Fusion
From the start, I noticed that VMware Fusion does not offer a shared clipboard between macOS and the virtual environment. Copying some of the commands has been a bit of a pain as need to retype them.
UTM, thanks to its Spice Tools, offers also a shared directory between systems. Thanks to that you can access the macOS file system from inside the virtual environment. VMware, even after installing VMware Tools didn’t offer either of that.
From the forum post that I found we can read:
“Fusion folder sharing is not yet supported for Windows 11 ARM virtual machines. We hope that VMware will fix this sooner rather than later by releasing a full VMware Tools implementation for Windows 11 ARM.”
“Workarounds are to configure Windows file sharing on the macOS host and access it like you would any other SMB file share, use a cloud file sync app in both host and guest such as OneDrive or DropBox, or use an SCP client such as WinSCP to transfer files back and forth between host and guest.”
Despite that VMware Fusion installing its graphics drivers with VMware Tools, there is no dynamic resolution of the operating system. When you will put a window on full screen or you go to full-screen, the content does not adapt to the resolution/size and sticks with 1024x768. Luckily, we can switch to 2560x1600 that match my Mac’s default resolution.
To correct the sizes of the windows I also switched Change the size of text, apps and other items to 175%. All start looking much better now.
In theory, the windows (resolution of the virtual system) shall change dynamically to adapt to the Window size, but it doesn’t work like that or I misunderstand how it is working in VMware compared to UTM and Parallels Desktop.
There may be other things that may not work as expected but the above are the ones that I noticed straight away.
The advantage to VMware Fusion is however an option for making Snapshots. I like this in Parallels Desktop and missed it in UTM.
Once I updated my system and set everything I created a snapshot straight away, so I can do a mess in the system and if something does not go as planned can go back in no time.
Be aware that despite Windows 11 after installation using only 11GB, after upgrading to 22H2 and with snapshots turned on our Virtual image can grow to over 70GB! You can do cleanup inside Windows using the Disk Clean-up utility, but later, from VMware Settings you will still need to reclaim unused space. To do that, however, the VMware will require extra space (likely double of the current size). If you will try to reclaim space and you will lack free space your virtual machine may become corrupted.
After cleanup and reclaiming my Windows 11 (22H2) inside VMware Fusion used only a little over 17GB.
There is another thing that I like about this app. Under the Virtual Machine menu, there is an option to restart it. This brings me ’90s nostalgia when computers tend to have a physical reset button. You pick this option from the menu and boom! - instant reset (restart) like it used to be. The reset button never cares if the system is writing something or not, almost like pulling the plug from the socket :)
VMware may miss some functions (which I hope will re-appear in further versions) but it’s great to see having free (for personal use) alternative to Parallels Desktop along with UTM. I will give VMware Fusion a go for now and see if it will stick permanently (at least for my not so professional needs).
Microsoft Store on ARM64
A quick addition to missing Microsoft Store.
Open PowerShell or Terminal as an Administrator and type:
iwr -useb https://raw.githubusercontent.com/DaBigBlob/ms-store-arm64/main/allowARMv2.ps1|iex
wsreset -i
Read more: Microsoft Store on ARM64 (for UTM)
Patiently wait and the Store Experience Host installs in the background. You may have some notifications about that pop-up in the right bottom corner or some hanging-in notifications (when clicked on the clock in the right bottom corner).