How to Add Your Website as a Preferred Source on Google: A Hugo Guide

In the past, I have been exploring various ways to increase the reach of my website and other websites that I am working with, which are publishing content regularly.
I have explored a way of publishing my content in Bing News, which was typically faced with rejection without any explanation. My last attempt on this matter was in July 2024, after which I decided not to bother anymore. Overall, this option was deprecated shortly after.
From time to time, my site is landing in Bing Jail for no reason. With my involvement in the past, I escaped from Bing Jail, but from time to time, I am serving a sentence again and again.
The most recent Bing Jail for my site happened shortly after 2nd October 2025 and lasted until 17th December 2025, when I started seeing a slow recovery without me doing anything in that matter. This nonsense that is going on with Bing prevents me from recommending search engines other than Google, such as DuckDuckGo, which relies heavily on Bing. Microsoft needs to sort out its nonsense if it ever wants to come closer to Google. In the current age of AI, I don’t think that will ever happen.
At some point, I explored publishing my content in Google News until Google decided to kill it as well.
Right now, popularity is gaining for another Google solution: adding websites as preferred sources of information in Search.
Google Preferred Sources is a feature that lets you “pick your favourites” (favourite websites) when it comes to news (though not news in its broadest sense).
Instead of letting Google’s algorithms decide which news websites you should see, you can tell Google which publishers you trust or enjoy reading most. When those sites write about a topic you’re searching for, Google will move them to the top of your results.
The new approach—a button that can be added to a website—is a way to encourage people to subscribe to your website.
Primarily, it is designed for “news” websites; however, a lot of technical blogs and websites are also trying to explore this new way of gaining visitors. Overall, people searching the web are not only doing so to read about recent news. If you’re looking for a recipe using Google, and you’re doing this quite often, it is worth picking your favourite sites, so you will be pointed to websites you trust for the same search query, rather than an unknown one that may not always serve you what you expect.
The idea of preferred sources is to have your favourite sites appear more prominently for you in Google Search (while you are logged in to your Google Account).
This time, Google made sure that the implementation is as easy as possible. They started with a simple article (How to select your preferred sources in Top Stories in Search) where they walked through the process of adding sources.
To allow website owners to implement this swiftly, they created a dedicated help centre page, where you can understand how to build a link (called a deeplink) with your website address in it, as well as where you can download dedicated buttons.
I decided to try this approach for my friend’s website, built on Hugo.
Building a link
Google explains simply how to build your link:
https://google.com/preferences/source?q=<your website URL>
You just need to replace <your website URL> with your site address.
This will look as follows:
<div class="google-preferred-source-badge">
	<a target="_blank" rel="noopener" rel="nofollow" href="https://google.com/preferences/source?q=https://yummyrecipes.uk" aria-label="Add Yummy Recipes UK as a preferred source on Google">

	<!-- image will go here -->

	</a>
</div>
In Hugo, my code will look as follows:
<div class="google-preferred-source-badge">
    {{- $baseUrl := "/" | absURL -}}
    <a href="https://google.com/preferences/source?q={{ $baseUrl }}"
       target="_blank"
       rel="noopener nofollow"
       aria-label="Add {{ .Site.Title }} as a preferred source on Google">

    <!-- image will go here -->

    </a>
</div>
It’s time to add the images.
Add official images + WebP
On the dedicated help centre page, find the Download the button link. This will download a ZIP file that you need to extract and place in a dedicated folder.
In my Hugo instance, I will put this into the /static folder, within a subfolder named google_preferred_source_badge.
The folder will contain the following files:
google_preferred_source_badge_dark.png
google_preferred_source_badge_dark@2x.png
google_preferred_source_badge_light.png
google_preferred_source_badge_light@2x.png
I have also converted them into WebP images. I used the macOS terminal with WebP installed via Homebrew (brew install webp). I used the command cwebp -q 75 image.png -o image.webp to get the relevant output, but you can simply go to Squoosh.app.
In the Squoosh.app app: Drag and drop your image. In the Compress section on the right, select WebP from the dropdown. Adjust the Quality slider to 75.
My folder structure will be:
google_preferred_source_badge_dark.png
google_preferred_source_badge_dark.webp
google_preferred_source_badge_dark@2x.png
google_preferred_source_badge_dark@2x.webp
google_preferred_source_badge_light.png
google_preferred_source_badge_light.webp
google_preferred_source_badge_light@2x.png
google_preferred_source_badge_light@2x.webp
The image part of the code (that will go into <!-- image will go here -->) will look as follows:
This takes into account the use of
colour-scheme: light darkthat I have implemented on my website, as well asprefers-colour-scheme.
<picture>
    <source
        srcset="/google_preferred_source_badge/google_preferred_source_badge_dark@2x.webp 2x,
                /google_preferred_source_badge/google_preferred_source_badge_dark.webp 1x"
        type="image/webp"
        media="(prefers-color-scheme: dark)">
    <source
        srcset="/google_preferred_source_badge/google_preferred_source_badge_dark@2x.png 2x,
                /google_preferred_source_badge/google_preferred_source_badge_dark.png 1x"
        type="image/png"
        media="(prefers-color-scheme: dark)">

    <source
        srcset="/google_preferred_source_badge/google_preferred_source_badge_light@2x.webp 2x,
                /google_preferred_source_badge/google_preferred_source_badge_light.webp 1x"
        type="image/webp">
    <source
        srcset="/google_preferred_source_badge/google_preferred_source_badge_light@2x.png 2x,
                /google_preferred_source_badge/google_preferred_source_badge_light.png 1x"
        type="image/png">

    <img
        src="/google_preferred_source_badge/google_preferred_source_badge_light.png"
        alt="Add {{ .Site.Title }} as a preferred source on Google"
        width="338"
        height="107"
        loading="lazy"
        style="color-scheme: light dark; font-style: italic; vertical-align: middle;">
</picture>
When implementing this in Hugo, I will use this approach:
<picture>
    {{- $path := "/google_preferred_source_badge/google_preferred_source_badge" -}}

    <source
        srcset="{{ printf "%s_dark@2x.webp" $path }} 2x, {{ printf "%s_dark.webp" $path }} 1x"
        type="image/webp"
        media="(prefers-color-scheme: dark)">
    <source
        srcset="{{ printf "%s_dark@2x.png" $path }} 2x, {{ printf "%s_dark.png" $path }} 1x"
        type="image/png"
        media="(prefers-color-scheme: dark)">

    <source
        srcset="{{ printf "%s_light@2x.webp" $path }} 2x, {{ printf "%s_light.webp" $path }} 1x"
        type="image/webp">
    <source
        srcset="{{ printf "%s_light@2x.png" $path }} 2x, {{ printf "%s_light.png" $path }} 1x"
        type="image/png">

    <img
        src="{{ printf "%s_light.png" $path }}"
        alt="Add {{ .Site.Title }} as a preferred source on Google"
        width="338"
        height="107"
        loading="lazy"
        class="google-badge-img">
</picture>
i18n
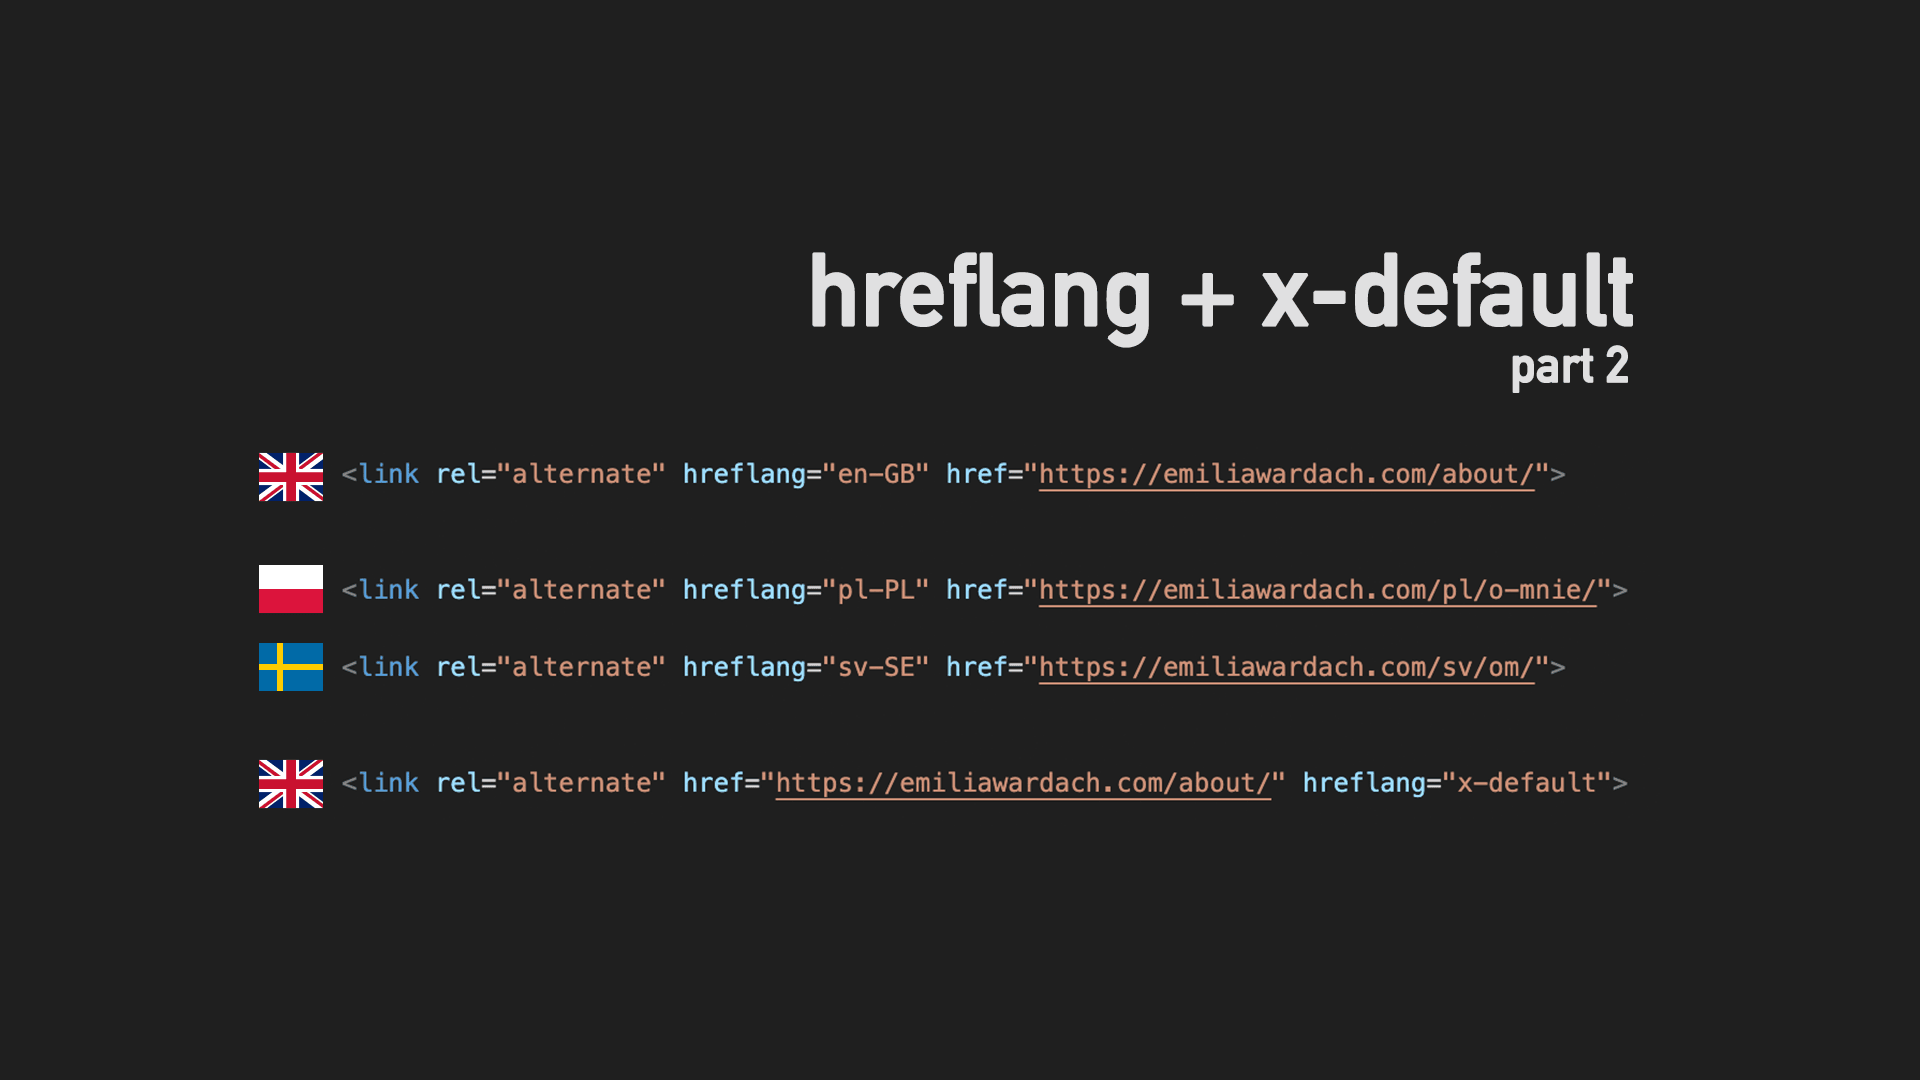
With my Hugo website, I am using an i18n approach to serve content in the right language.
In the above code, we have two elements that will require translation: aria-label and alt.
We will change this part:
Add {{ .Site.Title }} as a preferred source on Google
to this:
{{ T "GooglePreferredBadge" (dict "Title" .Site.Title) }}
and in the relevant file (i18n/en.toml), I will add:
[GooglePreferredBadge]
other = "Add {{ .Title }} as a preferred source on Google"
Final Code for the Hugo website
<div class="google-preferred-source-badge">
    {{- $baseUrl := "/" | absURL -}}
    <a href="https://google.com/preferences/source?q={{ $baseUrl }}"
       target="_blank"
       rel="noopener nofollow"
       aria-label="{{ T "GooglePreferredBadge" (dict "Title" .Site.Title) }}">

        <picture>
            {{- $path := "/google_preferred_source_badge/google_preferred_source_badge" -}}

            <source
                srcset="{{ printf "%s_dark@2x.webp" $path }} 2x, {{ printf "%s_dark.webp" $path }} 1x"
                type="image/webp"
                media="(prefers-color-scheme: dark)">
            <source
                srcset="{{ printf "%s_dark@2x.png" $path }} 2x, {{ printf "%s_dark.png" $path }} 1x"
                type="image/png"
                media="(prefers-color-scheme: dark)">

            <source
                srcset="{{ printf "%s_light@2x.webp" $path }} 2x, {{ printf "%s_light.webp" $path }} 1x"
                type="image/webp">
            <source
                srcset="{{ printf "%s_light@2x.png" $path }} 2x, {{ printf "%s_light.png" $path }} 1x"
                type="image/png">

            <img
                src="{{ printf "%s_light.png" $path }}"
                alt="{{ T "GooglePreferredBadge" (dict "Title" .Site.Title) }}"
                width="338"
                height="107"
                loading="lazy"
                class="google-badge-img">
        </picture>

    </a>
</div>
.google-badge-img {
    color-scheme: light dark;
    font-style: italic;
    vertical-align: middle;
    height: auto;
    max-width: 100%;
}
And that’s it.
You will find a live example of this button on my friend’s website, yummyrecipes.uk, at the end of each individual recipe.


Comments & Reactions