Building your own Attended Sysupgrade server for an OpenWrt router
As it happened, Attended Sysupgrade with the latest version of OpenWrt 25.12, since it became the default approach to update OpenWrt devices, started seeing a spike in popularity.
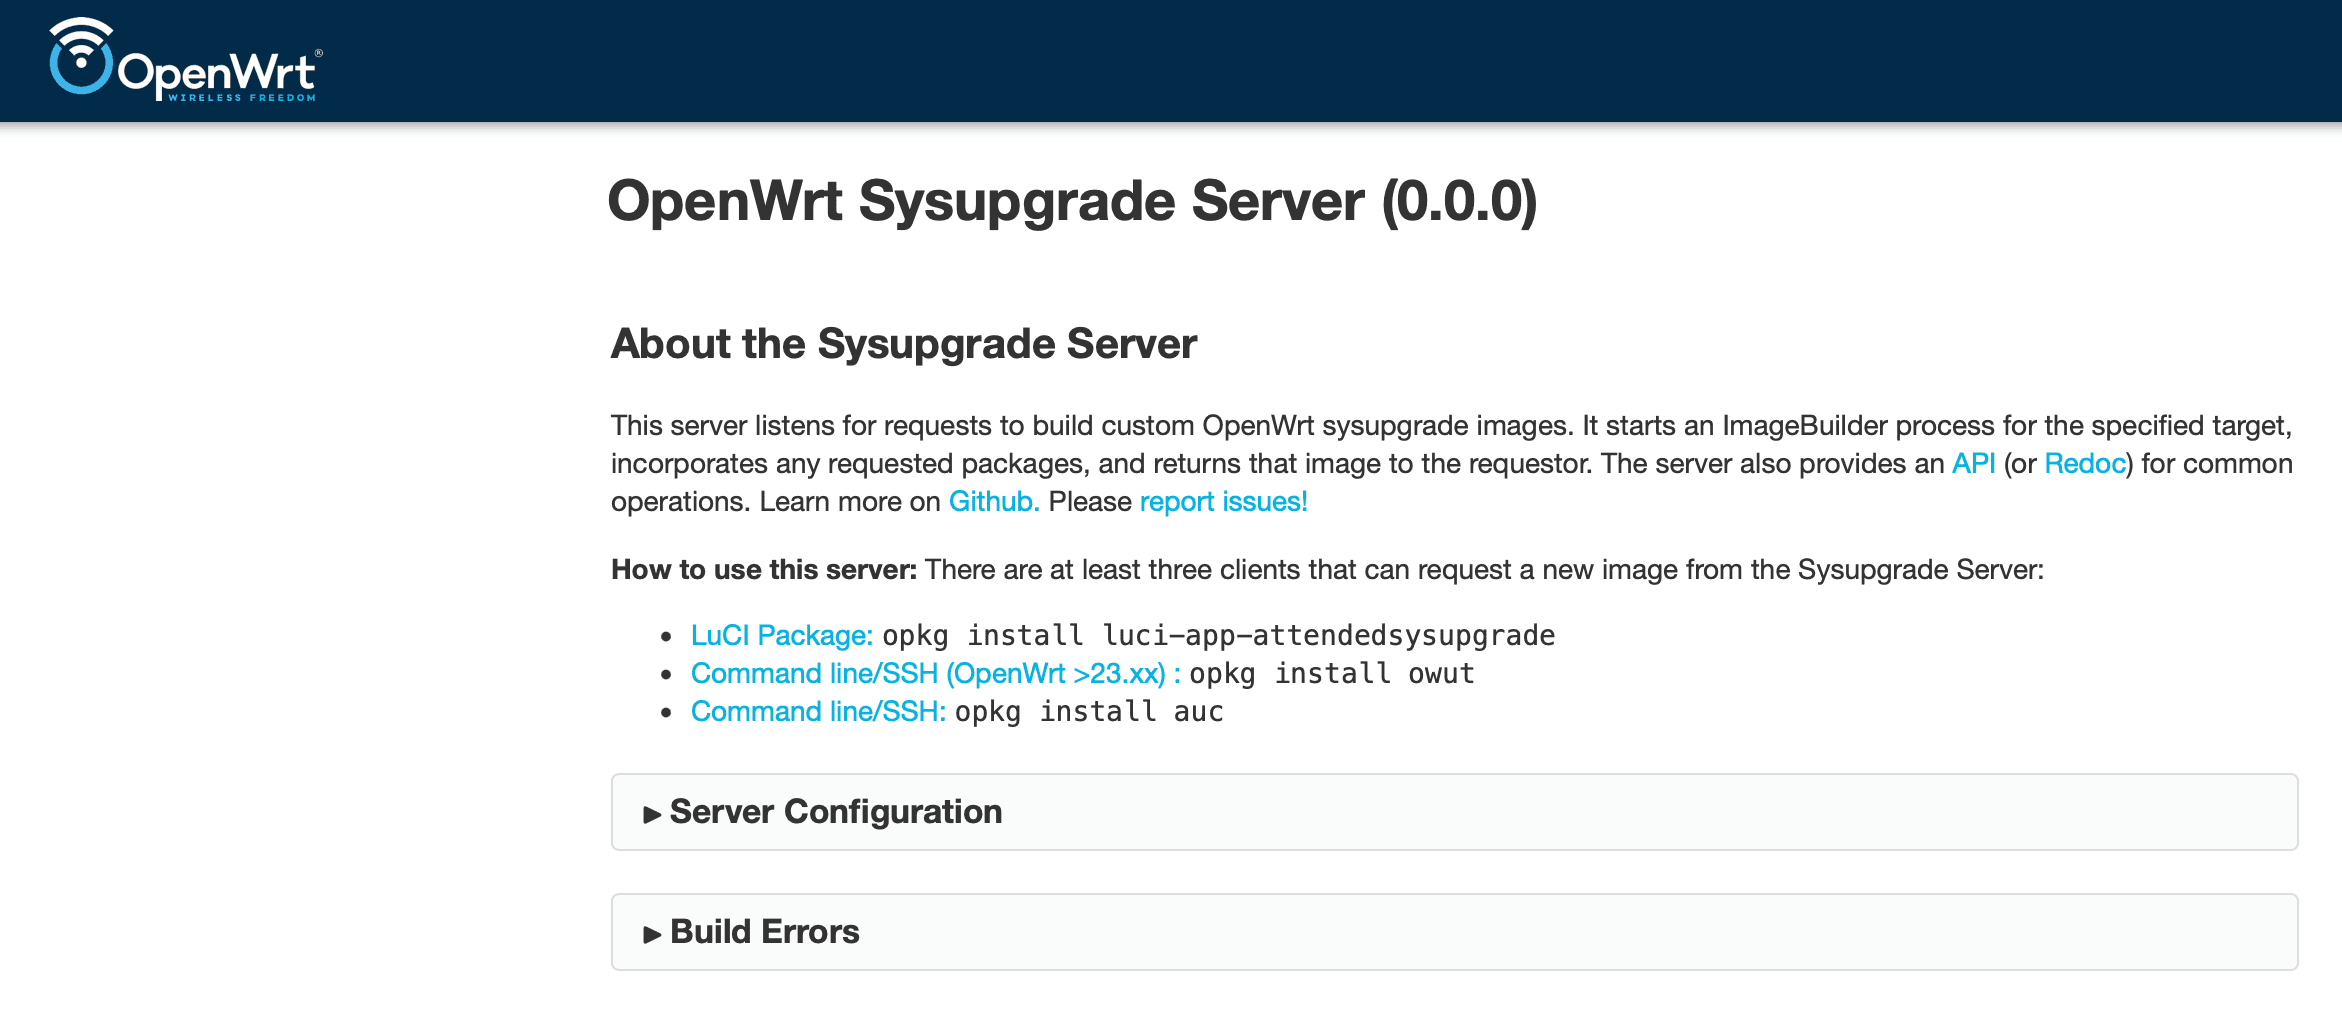
When I first tried this, I was either 1st in the queue or just a few users behind. Days later, when the next version (25.12.1) was released, this jumped to around 200-300. Now, with another release (25.12.2), the servers cannot handle it anymore.
Server response: server overload, queue contains too many build requests: 1001
Following a discussion with one of my visitors, it was suggested that I use someone else’s server for Attended Sysupgrade, but there is always a catch to that. The recommended server uses SNAPSHOT builds as default, which I do not recommend for a production or business environment. While you can play with it on a home router, in business, you need to rely on stability.
I have been thinking that maybe I will create my own server for that purpose. I already have a small mini-PC at home (and at work) — a Chromebox repurposed as an Ubuntu Server running Docker. My usage is not massive, and there is plenty of computing power available.
At the time of writing, I am using an Asus Chromebox 3 with ChromeOS removed and full UEFI installed using the MrChromebox.tech solution.
Because of that, I have been thinking: why not build my own solution for Attended Sysupgrade when I need it, to avoid waiting?
As Attended Sysupgrade is gaining popularity, I do not see the situation improving anytime soon. For some companies that need to keep their devices updated to comply with legal requirements, waiting is not an option.
Building an Attended Sysupgrade server is another learning curve to add to my wide range of skills.
Digging into that, I found a confirming answer: Yes, I can build my own solution, and my devices are more than capable of that.
Before I go any further, I need to understand how this all works.
How a local Attended Sysupgrade (ASU) actually works
When you request a sysupgrade, the server doesn’t compile the firmware from scratch (which takes hours). Instead, it uses the OpenWrt ImageBuilder. The ImageBuilder simply takes pre-compiled packages (.ipk files) and combines them into a final firmware image for your specific router.
Having analysed the performance of my devices, the process will likely take just few minutes to complete locally, compared to waiting hours in the public queue.
Installing the official Attended Sysupgrade (ASU) Docker image
The good news is that OpenWrt maintains an official Dockerised version of the Attended Sysupgrade server. That’s a big win!
You need to have Docker installed on your designated device before moving forward. I will not be covering that here and will assume you have this sorted already.
Attended Sysupgrade (ASU) requirements
The ASU architecture requires:
- A Redis database: To queue the build jobs and cache previously built images.
- The ASU server: The web/API interface that your router talks to.
- The ASU worker: The “muscle” that actually spins up temporary ImageBuilder containers to compile the firmware.
Create a Docker Network
Because we will be dealing with three separate containers, they need a shared network to communicate with one another.
sudo docker network create asu-network
Start the Redis Cache
This spins up a lightweight Redis instance and attaches it to our new network.
sudo docker run -d \
  --name asu-redis \
  --network asu-network \
  --restart unless-stopped \
  redis:alpine
Start the ASU server (API)
This is the container our router will interact with. I map the internal port 8000 to my preferred port for this purpose, 8123.
sudo docker run -d \
  --name asu-server \
  --network asu-network \
  -p 8123:8000 \
  -e REDIS_URL="redis://asu-redis:6379/0" \
  -e PUBLIC_PATH="/app/public" \
  -v asu-data:/app/public \
  --restart unless-stopped \
  openwrt/asu:latest \
  uv run uvicorn --host 0.0.0.0 asu.main:app
Start the ASU worker
This container waits for jobs in the Redis queue and executes them.
The command below must map the
/var/run/docker.sockfile. This allows the worker container to talk to the host machine’s Docker daemon so it can spin up the isolated OpenWrt ImageBuilder containers required to pack your firmware safely.
sudo docker run -d \
  --name asu-worker \
  --network asu-network \
  -e REDIS_URL="redis://asu-redis:6379/0" \
  -e PUBLIC_PATH="/app/public" \
  -e CONTAINER_SOCKET_PATH="/var/run/docker.sock" \
  -v asu-data:/app/public \
  -v /var/run/docker.sock:/var/run/docker.sock \
  --restart unless-stopped \
  openwrt/asu:latest \
  uv run rqworker --logging_level INFO
Verifying the setup
Once all three commands have been run, you can check that everything is working by opening a browser and navigating to your device’s IP address, for example:
http://192.168.1.12:8123/api/distros
If it returns a bit of JSON text showing the supported OpenWrt distributions, your server is alive and kicking!
Mine returned:
{"detail":"Not Found"}
If you see that, or something similar, your Docker container is up, running, and successfully answering web requests on port 8123.
If you head directly to the address below (without /api/distros), you will land on a similar interface to the official sysupgrade.openwrt.org.
Connecting our router to our local ASU server
Now that we know our local server is alive and working well, we can point your OpenWrt router to it.
- Log into your router’s OpenWrt LuCI web interface.
- Navigate to System -> Attended Sysupgrade.
- Click on the Configuration tab.
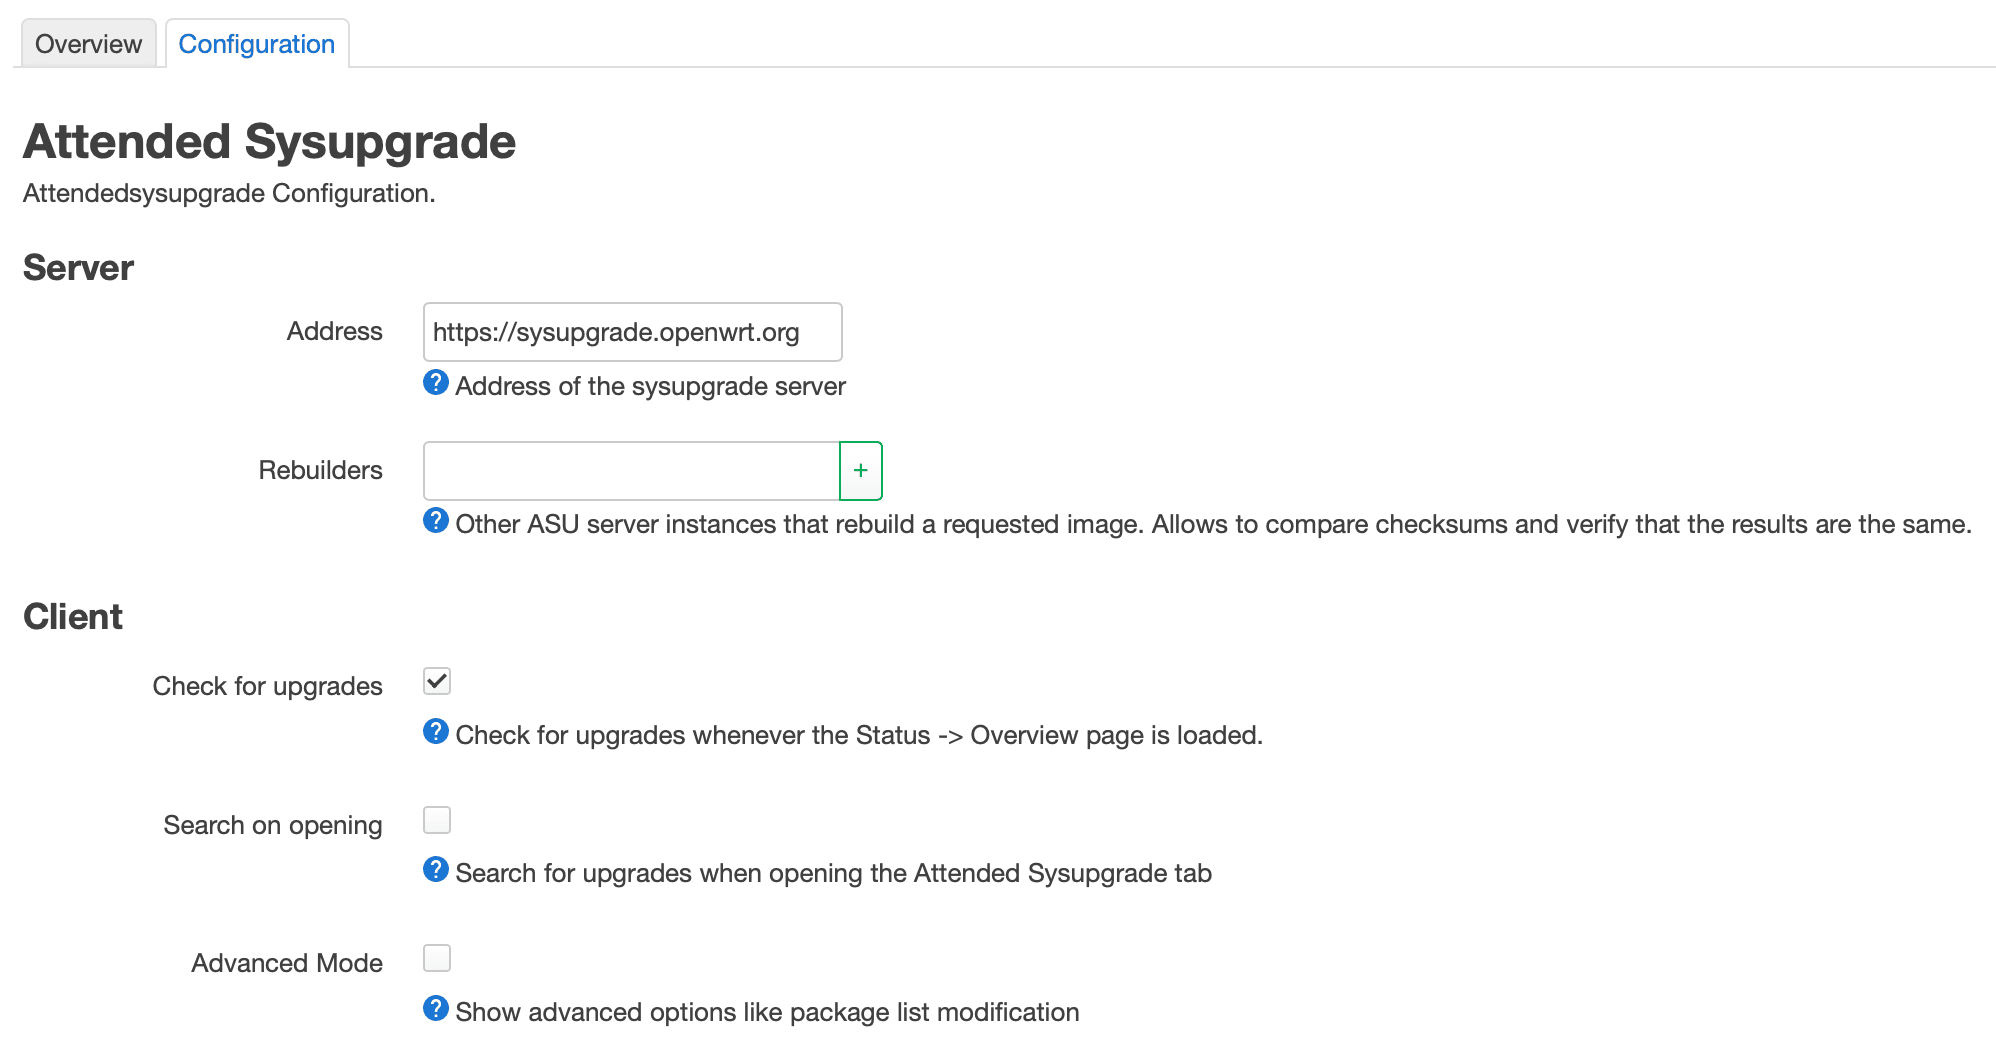
- Change the Server Address from
https://sysupgrade.openwrt.orgto your server’s IP and port.
Make sure you use just the base URL without any API paths at the end. For example:
http://192.168.1.12:8123(replace this with your actual server IP).
- Click Save & Apply.
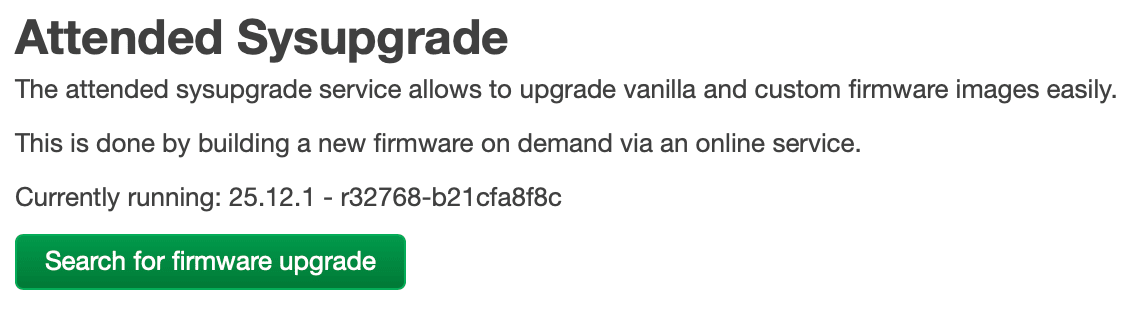
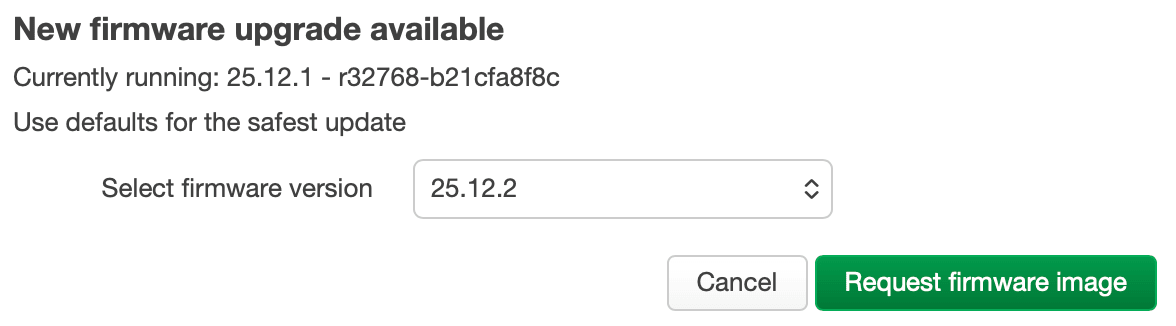
Once that is saved, switch back to the Overview tab in Attended Sysupgrade and click the Search for firmware upgrade button.
When your router fails to communicate with your local ASU
When I set my own server address in my OpenWrt and clicked the Search for firmware upgrade button, I got stuck with:
Searching...

Searching for an available sysupgrade of 25.12.1 - r32768-b21cfa8f8c
My Docker logs showed my previous test attempts when I loaded http://192.168.1.12:8123/api/distros in my browser, but there are no signs of my router communicating with it.
For some reason, it may be that the router is blocking itself from accessing the LAN IP. This is a bit strange, but I will need to check.
I logged in via SSH to my router and executed:
curl -I http://192.168.1.12:8123/api/v1/overview
OR if curl isn’t installed:
wget -qO- http://192.168.1.12:8123/api/v1/overview
and got
HTTP/1.1 405 Method Not Allowed
date: Sun, 29 Mar 2026 07:56:52 GMT
server: uvicorn
allow: GET
content-length: 31
content-type: application/json
Meaning, despite HTTP/1.1 405 Method Not Allowed, my router and my Ubuntu server are talking to each other perfectly. There are no firewalls blocking the connection, and the network routing is spot on. The logs on the Docker container (asu-server) are also showing communication from my router.
Time to run another command.
owut check --verbose
This will confirm if the router can talk to our own ASU server and display more information as to why it may be failing.
If you do not have the owut package installed on your system, add it using the command below:
apk update
apk add owut
All looks good, so I investigated my LuCI connection in Chrome with DevTools open and found some errors when I pressed the button to search for new firmware, relating to CORS (Cross-Origin Resource Sharing) and 301 Redirects.
I could theoretically stick with SSH and do owut upgrade to proceed, but I want to fix the UI.
The issue is that my browser demands the server sends an Access-Control-Allow-Origin header to prove it is allowed to share data. The official openwrt/asu Docker container currently does not send this header by default, so we need to fix that.
Let’s start by going backwards a bit and removing asu-server for now.
sudo docker stop asu-server
sudo docker rm asu-server
On the server, I will create a file that will grab the existing app and inject the headers into the browser.
nano cors_wrapper.py
Paste the following code into the file.
from asu.main import app
from fastapi.middleware.cors import CORSMiddleware

app.add_middleware(
    CORSMiddleware,
    allow_origins=["*"],
    allow_credentials=True,
    allow_methods=["*"],
    allow_headers=["*"],
)
Now let’s run the container with the wrapper.
sudo docker run -d \
  --name asu-server \
  --network asu-network \
  -p 8123:8000 \
  -e REDIS_URL="redis://asu-redis:6379/0" \
  -e PUBLIC_PATH="/app/public" \
  -v asu-data:/app/public \
  -v $(pwd)/cors_wrapper.py:/app/cors_wrapper.py:ro \
  --restart unless-stopped \
  openwrt/asu:latest \
  uv run uvicorn --host 0.0.0.0 cors_wrapper:app
Now, when the browser asks for the /api/v1/overview endpoint without a trailing slash, the Python server issues a 301 Redirect to add the slash. Previously, the browser blocked that redirect because it lacked CORS headers. Now, the CORSMiddleware guarantees that every single response—even redirects—contains the Access-Control-Allow-Origin header, allowing your browser to follow the path perfectly.
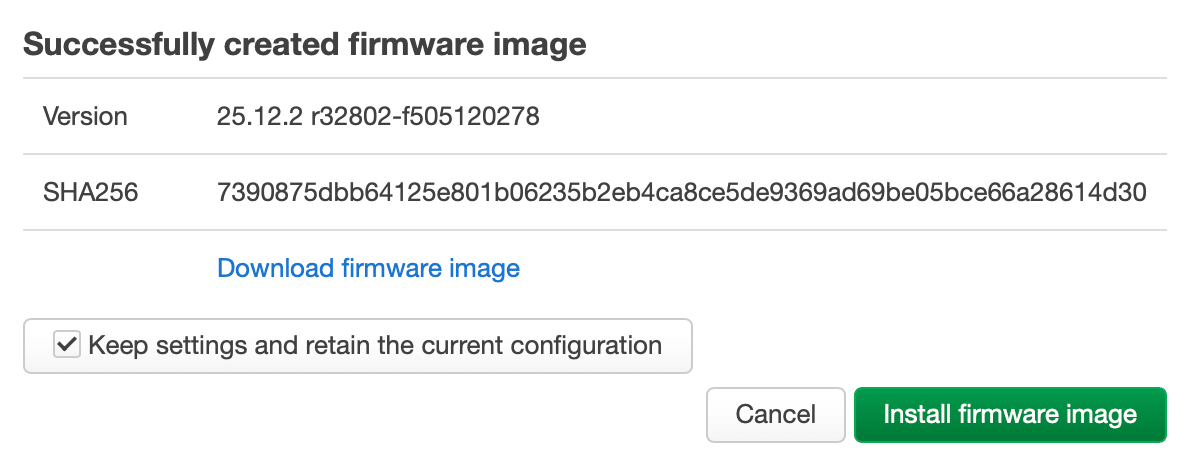
Now, when I press the Search for firmware upgrade button, I get an instant response:
And so I pressed Request firmware image, only to get Error building the firmware image.
Error building the firmware image - Podman not found
podman.errors.exceptions.NotFound: 404 Client Error: Not Found
Recently, the OpenWrt developers completely rewrote the ASU backend. For security reasons (to prevent builds from having too many permissions), they hardcoded the worker to strictly use Podman instead of Docker to spin up the ImageBuilder containers.
Even though we are successfully running the worker inside a Docker container, the Python script inside that container is using a Podman-specific library (podman.version()). It reaches out to the /var/run/docker.sock we gave it and expects Podman to answer, but Docker answers instead. The script asks for a Podman-specific API path, Docker replies with a “404 Page Not Found”, and the whole build crashes.
The good news is that we do not need to tear down our Docker setup. We just need to install Podman alongside Docker on your Ubuntu Server and hand the Podman socket to the worker container instead.
sudo apt update
sudo apt install podman
By default, Podman doesn’t keep a background service running like Docker does. We need to turn on its listening socket so the ASU worker can talk to it.
sudo systemctl enable --now podman.socket
Now we need to recreate the ASU Worker.
sudo docker stop asu-worker
sudo docker rm asu-worker
Then, run the corrected worker command. Notice that the two paths at the bottom have changed to /run/podman/podman.sock.
sudo docker run -d \
  --name asu-worker \
  --network asu-network \
  -e REDIS_URL="redis://asu-redis:6379/0" \
  -e PUBLIC_PATH="/app/public" \
  -e CONTAINER_SOCKET_PATH="/run/podman/podman.sock" \
  -v asu-data:/app/public \
  -v /run/podman/podman.sock:/run/podman/podman.sock \
  --restart unless-stopped \
  openwrt/asu:latest \
  uv run rqworker --logging_level INFO
Because LuCI tends to keep the last error message in its cache, clicking Request firmware image will return the previous message. To bypass this, we need to either reboot the router or clear some temporary files created by ASU (which are typically flushed upon a router reboot).
Run the following command on your OpenWrt router:
rm -rf /tmp/owut* /tmp/attended*
Let’s head back to our OpenWrt web interface and click that Request firmware image button one more time. The worker will now successfully talk to Podman, download the ImageBuilder, and compile our custom firmware.
That is the theory!


As in my instance, it failed again.
invalid config provided: pasta networking is only supported for rootless mode
Anybody fancy some pasta? 🍝
Pasta is the rather oddly named network driver that Podman uses to connect containers to the internet securely.
This is because in our previous step, we started Podman using sudo systemctl. This turned on the Administrator Podman socket. The worker script checked the socket, saw it was running as root, panicked because it expected a rootless user, and threw a “500 Internal Server Error”.
Let’s take a step back again.
Run this to shut down the root level Podman socket we created earlier.
sudo systemctl disable --now podman.socket
Now, we turn on the socket for your standard, non-administrative Ubuntu user.
Do not use
sudofor this command! It must be run as your normal user.
systemctl --user enable --now podman.socket
However, because we are likely logged in via SSH to our Ubuntu Server, Ubuntu tries to save resources by not spinning up a dedicated background systemd manager for your specific user account. When you ask it to start a user-level service like Podman, it fails because the user systemd instance isn’t running.
We need to tell Ubuntu to let your user account (my user: darek, replace this with yours accordingly) run background services permanently, even when you log out. This is called “lingering”.
Before that, let’s remove any locks that may be in place in the system.
sudo rm -rf /run/user/1000/podman
Let’s enable “Linger” for our User.
sudo loginctl enable-linger darek
Sometimes SSH sessions drop a crucial environment variable that systemd needs to find your user folder. Let’s force it, just to be safe:
export XDG_RUNTIME_DIR=/run/user/$(id -u)
Now that your user is authorised and the path is set, lets start the Socket Again.
systemctl --user enable --now podman.socket
Finally, we need to swap the socket path in our Docker command for the worker container.
Let’s start by removing asu-worker.
sudo docker stop asu-worker
sudo docker rm asu-worker
And spin it back up with the correct rootless socket path.
If, for some reason, your user ID is not
1000, you will need to change the1000in the second-vline; however, 99% of the time on Ubuntu, it is exactly1000.
sudo docker run -d \
  --name asu-worker \
  --network asu-network \
  -e REDIS_URL="redis://asu-redis:6379/0" \
  -e PUBLIC_PATH="/app/public" \
  -e CONTAINER_SOCKET_PATH="/run/podman/podman.sock" \
  -v asu-data:/app/public \
  -v /run/user/1000/podman/podman.sock:/run/podman/podman.sock \
  --restart unless-stopped \
  openwrt/asu:latest \
  uv run rqworker --logging_level INFO
Let’s run our quick cache-clearing routine on our OpenWrt router.
rm -rf /tmp/owut* /tmp/attended*
Head back to LuCI and hit that green button again.
This time, I passed the 10% point.


11:16:35 Successfully completed asu.build.build(BuildRequest(distro='openwrt', version='25.12.2', version_code='', target='...) job in 0:05:43.333466s on worker 172b8078680c4f64989ef57693b834a2
11:16:35 default: Job OK (f7b1b5f55f2de817f4d9ed18026a1ac8c31d664ef30a612d5430f14d899cb409)
11:16:35 Result is kept for 10800 seconds
It took slightly under 6 minutes (on my ASUS Chromebox 3), and my locally generated image was ready. I kept the box ticked to keep the configuration, and after the reboot, everything has been working great!
This way, I created my own independent ASU server, which will remove pressure from the OpenWrt servers and let me have better control over the overall process!

Comments & Reactions